Make It Ourselves!

We have been working on division with and without decimals. To help my students gain experience with the computation, I found a game (Four in a Row) in Georgia Math. They enjoy the game, but you always have those few who get board because it’s too easy. And yes, I had some of those. However, these 3 boys didn’t complain. Instead, they asked if they could make their own.


Screen Shot 2015-12-14 at 5.22.42 PM
Credit: J-Jey, Julian, and Adan

The boys chose the numbers and did the division to fill in the boxes with the quotient. This week, the rest of the class was able to enjoy the fruits of their labor. It was a hit.

Now, this same group has decided to recreate another game. It was a multiplication board game, also found in Georgia Math. They are pretty excited.

Why was this so important? First of all, we talk about differentiation but aren’t alway great at it. This allowed my more proficient students to be challenged yet work on the same goals as the rest of the class. Secondly, and more importantly, my students took control over their learning and thought of a way to challenge themselves. What a powerful lesson for all.


Google Docs: Colored Background

Recently I was giving a presentation using Google Classroom. As a part of the experience, I have participants experience it from the student perspective. One of the assignments had a colored background and caught the attention of a participant. Let’s face it, white backgrounds can be VERY boring!

background 1

Changing the background color is super easy. In your Document, navigate to ‘File’ then ‘Page Setup’. A pop-out window appears. Choose ‘Page Color’. This will prompt color choices to appear. You can choose one of those or insert the color code of your choice using ‘Custom’.

Once you find a background color you like, press ‘OK’. To set as background, select ‘OK’ on the Page Setup window in the lower left corner.

You’re all set!

Background 6

Google Classroom: Invite A Teacher

Working with our school’s RSP (Resource Specialist Provider) teacher has been great. She is an exceptional teacher who continues to help all her students. As a teacher who constantly uses Google Classroom and the Google suite of apps, I find it even easier to collaborate and work towards the same goal for my students with IEPs. Google Classroom allows me to share each classroom with other teachers. These co-teachers have the same abilities as I do within Classroom, with the exception of deleting the class.

Why would I want to share my class with another teacher? As a 5th grade teacher, some of my students receive extra services. By inviting the RSP teacher, we can better accommodate students’ needs. For example, my students are working on a collaborative project in Social Studies – Poetry Slam about Cortes and Montezuma. By allowing the RSP Teacher access, she can work, and review, her students’ writing and make modifications as needed because she has access to all the students’ work. In addition, there is never any question as to what we are doing in class. Thus, making her job that much easier. Each time a new assignment or announcement is posted, the RSP teacher receives an email. When a student submits a private comment to the teacher, we both receive it. The more teachers supporting our students the better!

To share your class with another teacher, log into Google Classroom. Navigate to the desired classroom you wish to share. Then, go to the ‘About’ page of that class. On the left side of the screen, there is an ‘Invite Teacher’ button.

Invite 1

A pop-out window appears next. You can now look up the desired teacher within your domain.

Invite 2

The final step is to ‘Invite’ the teacher. They will then receive an email notifying them that they have been invited to be a teacher for your class.

invite 3

Once they accept, their information will appear at the top of the classroom and on the side in the ‘About’ page.

Invite 4

Technology & Student Success

I’ve seen, and heard many stories, about teachers using technology, but not setting the students up for success. As adults, we know how to navigate through sites and find the information we are looking for. However, students many times, don’t have this level of sophistication, yet. I have been guilty of, “Your topic is X, go research it on the computer.” Looking back, I’m embarrassed. I really should have set the students up for success.

Setting Students Up For Success

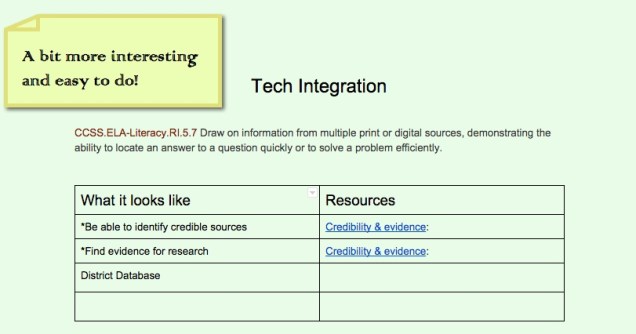
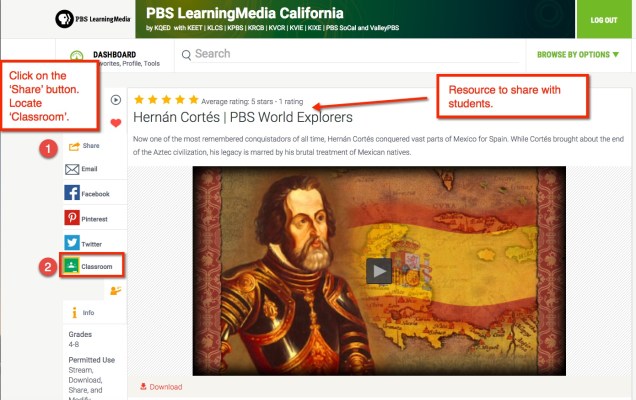
Since those fatal flaws, I have learned a thing or two about giving the students all the information needed in order for them to be successful. For example, I am having my 5th graders do a Poetry Slam/Rap performance to learn and show understanding of Hernan Cortes and Montezuma. So for this project, not only did I give them parameters, I gave them examples of a Poetry Slam (kid friendly), 3 Grade appropriate online articles (that I read through first) [article 1, article 2, article3], 1 PBS Video, and an template for the poem. The students are allowed to throw their own spin on the poem and are not bound by the template. They are, however, held accountable to show the information that I have asked for. Many students need a template to get started. Staring at a blank page can be intimidating for kids, and adults! I also assigned groups. This let them get started instead of bickering about who’s in which group. That, was more for me than them!

Poetry 1

That’s A Lot Of Work!

Yes, setting all this up is a lot of work in the beginning – for me. But, I’m a teacher. It’s my job to set my students up for success. There is not room for laziness when you’re a teacher. In addition to setting the students up for success, I have allowed them to focus on the content, not where to find information, what does a poem look like, what the heck is a poetry slam, and all the other anxieties that comes along with projects.

Let The Fun Begin

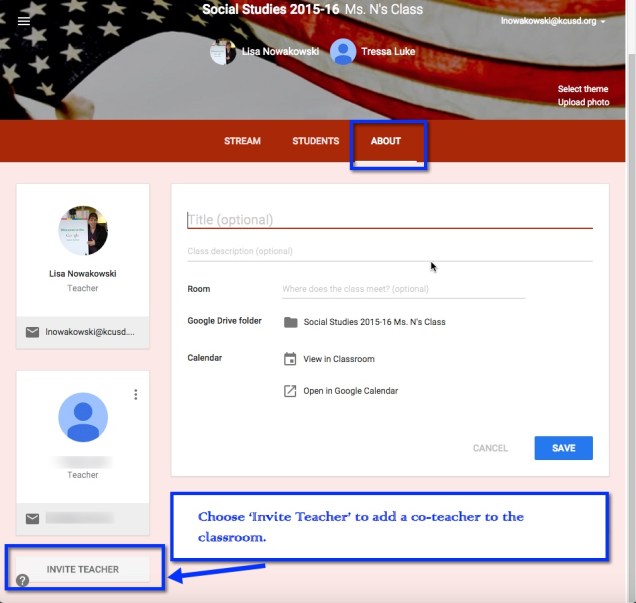
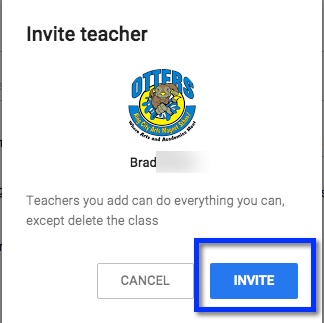
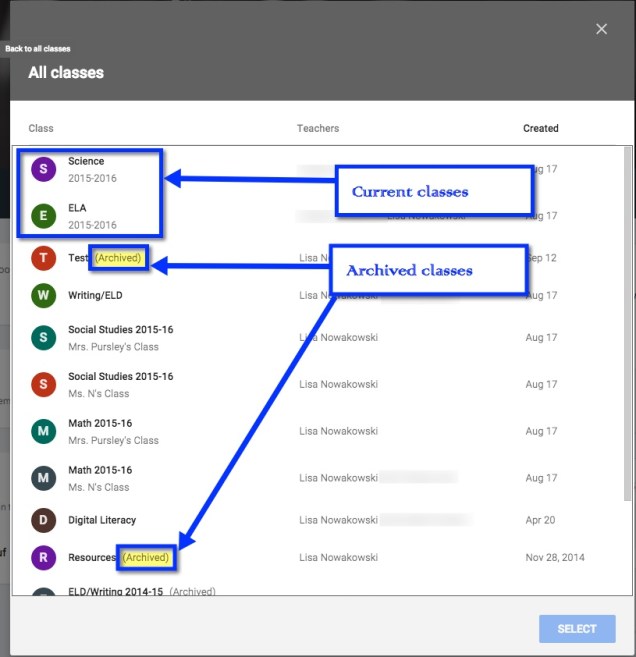
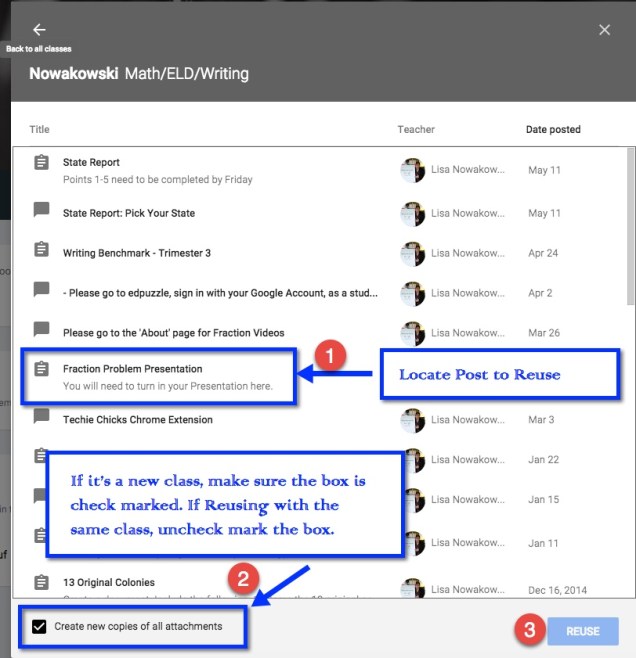
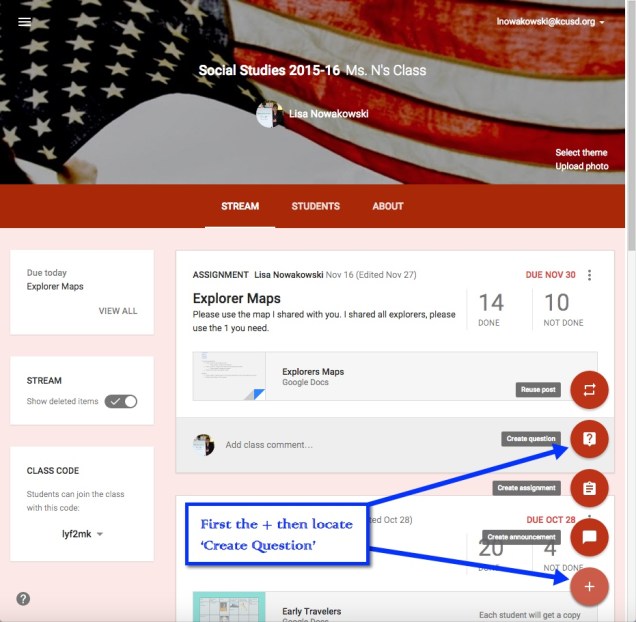
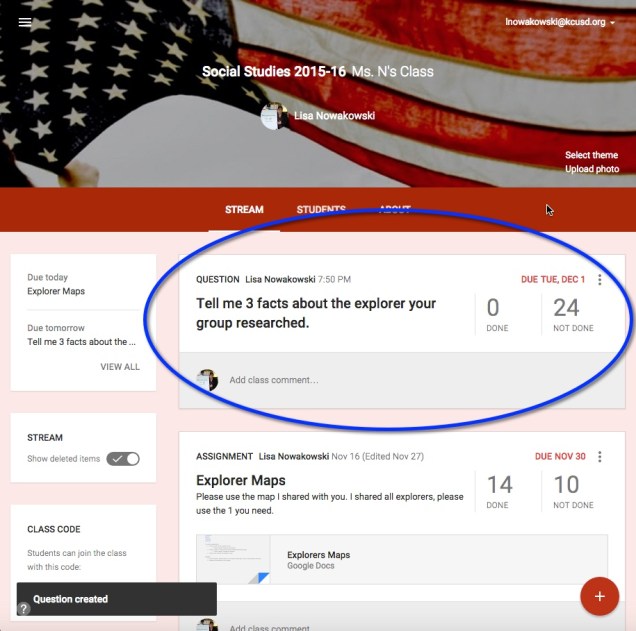
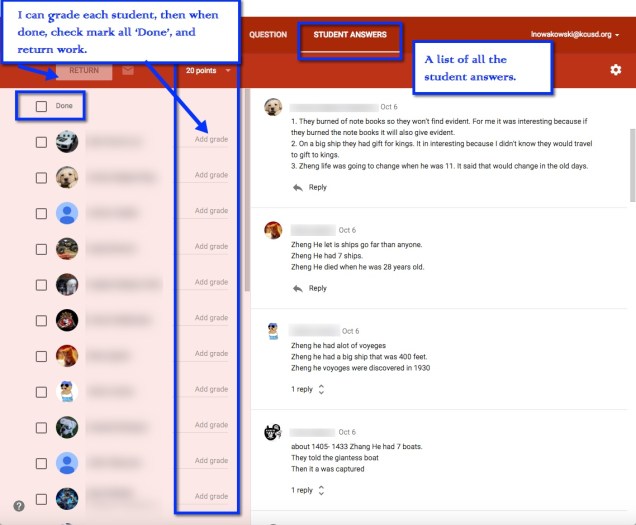
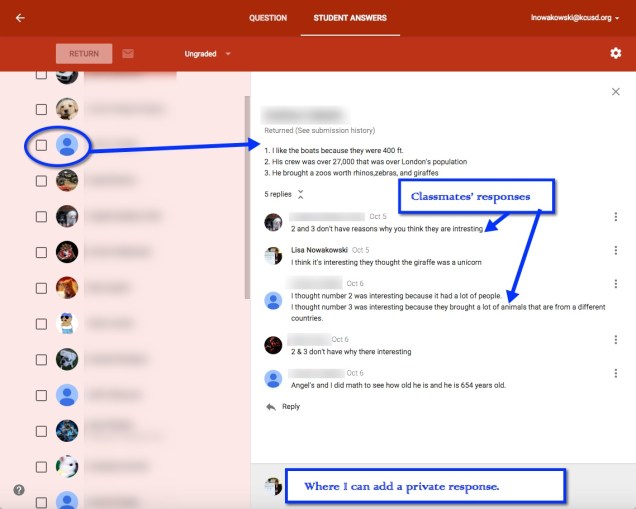
Now I get to have fun! I have all this collected in Google Classroom. This way all the information is organized in one place. While the students begin their writing (collaboratively), I walk around and conference with the groups and guide them. The result? A – MAZ – ING! While they aren’t finished yet, and some final corrections need to be made, I am quite pleased with their level of engagement.

Poetry 2

Update

Check out what I had to say about the final product!

Google Classroom & PBS Learning Media

For those of you not familiar with PBS Learning Media, check it out! It has some really great resources for you and your students. Recently, my students began learning about Hernan Cortes and Montezuma. I am using Google Classroom to compile and share resources for their project (poetry slam or rap about one or the other. I’m really excited about it). One of the resources I came across was on PBS Learning Media. It was a short video on Cortes and his conquests, including Montezuma. This is when I discovered that I can share directly to Google Classroom! Without copying/pasting the link. Use your Google Apps for Education account (your school account). Check this out: Find the desired resource, click on the ‘Share’ button, then locate ‘Classroom’.

PBS1

A pop-out window appears where you choose the desired class to share the resource with.

PBS2

Once the class is chosen, choose ‘Assignment’ or ‘Announcement’. Then, post or save as draft.

PBS3

PBS4


Google Classroom: Reuse a Post

Many teachers need to reuse an Assignment or Announcement throughout the year. This most often occurs when a teacher is teaching the same course but in different semesters. This could occur from year to year in a self-contained classroom as well. The process to reuse a post is rather simple.

reuse 1

This will bring up a pop-out window. You will be able to choose from ALL classes, current and archived, in which to find your Announcement or Assignment.

Reuse 2

Once in the class selected, locate the post which you will be reusing. If it is a new semester or new group of students, you will want to make sure that the box on the bottom, ‘Create new copies of all attachments’ is check marked. Conversely, if the group of students already has a copy of the attachments, uncheck mark the box. The press ‘Reuse’.

reuse 3

Once you select the Announcement or Assignment, it appears in a pop-out window giving you all the usual options: attachments, assign to several classes at once, and save as draft or post immediately.

Reuse 4

NOTE: If you are Reusing a Post from the same, one that has been buried in the stream, try moving the post to the top of the stream.

Online Homework

Don’t shoot! I know, I said the dreaded ‘H’ word… Homework. So yes, I give homework: read 20 pages and write a summary, 2 math problems (review of previously taught material), Mangahigh, and play outside for 30 minutes.

At first I thought I was pretty slick assigning homework online (I have a paper option for students without Internet access. Most come in early to complete the Mangahigh portion). I would routinely check their work online and in class together. Then it became apparent (okay, I was a little slow on this one) that I was missing the feedback step.

In order to change this, I use a combination of steps to allow students access to their work, with my feedback included. First, I set up a Google Form that I use for the entire week. This way, I just need to change the 2 math questions daily. However, I can’t just ‘edit’ the problems I have to ‘duplicate’ then ‘delete’ the original. Otherwise, I delete the original problem, and that sort of defeats the purpose of giving feedback if they don’t know what the problem was.

It’s not perfect and I’ll probably change it in a few months with a better system, but for now it works. I also set it up at the beginning of the week so that each time there is a response it auto updates. (Note: I turn row-call off when I’m responding.)

Google Classroom: Mute a Student

Last night I was fortunate enough to share the awesomeness that is Google Classroom with the IEC (Innovative Educators Certification) class – put on by CUE and Fresno Pacific University. One of the more convenient features is the ‘Mute a Student’ choice. Generally I allow my students the ability to post and respond in the Stream. However, there have been a few cases in which I needed to Mute a student. In the past, I located the student on the ‘Student’ page and muted them from here.

Mute 1

However during last night’s class, we discovered that a student can be muted from the Stream. If a student posts a comment on an Announcement, Assignment, or questions, there is now the option to Mute the student from here. In addition, if a student creates a post the teacher can Mute the student from here.

On the post or comment from the student 3 vertical dots appear. Choosing that will bring up the option to either Delete the comment or Mute the student. Choosing to Mute a student then brings up a pop-out window to which allow the teacher to also delete the comment if necessary. This will prevent the student from commenting or posting throughout the classroom until the teacher ‘Unmutes’ the student.

Mute 2

Mute 3

Google Classroom: Create Question

In Google Classroom, I like to ‘Create a Question’ for quick checks or exit tickets. They are easy to create and manage. Students can read each other’s posts, comment, and have quality discussions with ‘Questions’. This is an underused tool by many who use Google Classroom. It truly is a hidden gem in this tool.

In order to create a Question, choose the + located in the bottom right corner of the ‘Stream’ section of your classroom.

Question 1

Now I can create my question. I can insert a file, something from my Google Drive, a YouTube video, and/or a link to a website. I can insert as many items as needed. Since I teach 2 classes of Social Studies, I can assign the question to both classes, with files and links, at the same time. I can even set a due date. When I have my preferences set, I choose the blue ‘ASK’ button.

Question 2

Next a pop-out window appears where I can allow students to view each other’s responses, or not. I can also allow students to edit their own responses. I like to allow students to comment on each other’s. This allows for discussion and opportunity for students to defend their positions. When I’m ready, I click the blue ‘ASK’ button.

Question 3

My question now appears at the top of the stream.

Question 4

Here’s an example we did early this year. Once the students respond, I can then grade their answers if I choose to. On this particular example, I gave the students some material to review before answering. In order to encourage open dialog, I also asked them to comment on each other’s responses.

Question 5

When I’m ready to view, I can click on ‘Done’ in the Question. This takes me to the Student Response page. All of their responses are listed along with the option to grade, comment, and return work.

Question 6

When I click on an individual student, I can see his/her answer and the classmates’ responses.

Question 7


20% Time PD

Recently I wrote about how PD is run in my district. That got me thinking about how can we change that? What do other successful businesses do? What are other districts doing?

man-479670_1920.jpg

I began to wonder what PD would look like if we used Google’s 20% time model? What amazing lessons, innovations, and/or projects would teachers come up with? What exciting experiences would the students be getting? More importantly, how can we begin implementing this?

What it might look like

  • Research our passions
  • Set timelines for projects/lessons/etc.
  • Have a way to showcase our findings
  • Inspire others
  • Enjoy true collaboration with others who share similar interests
  • Happy, respected teachers
  • A district that can document their successes
  • An innovative district

The possibilities are truly endless.