Google Docs: Emojis

Last week, my students were writing an essay in their Google Docs. In the middle of writing, one student asked, “Hey, Ms. N., did you know you can insert emojis in docs?”

I was surprised and answered, “Wait, what? No? Really? Cool. Show me how.” So I went over to her table and she showed me. Pretty cool!emoji-1

So how’d she do it?

Start by going to ‘Insert’ in the menu options

emoji-2

emoji-3

emoji-4

emoji-5

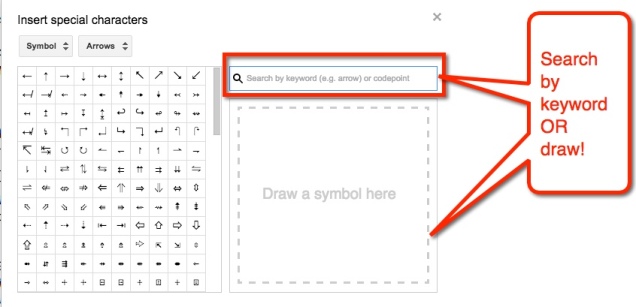
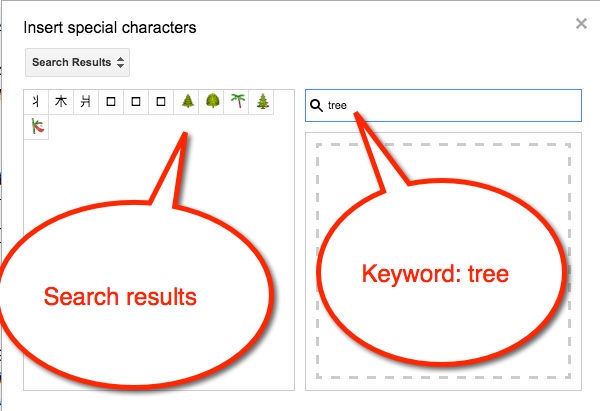
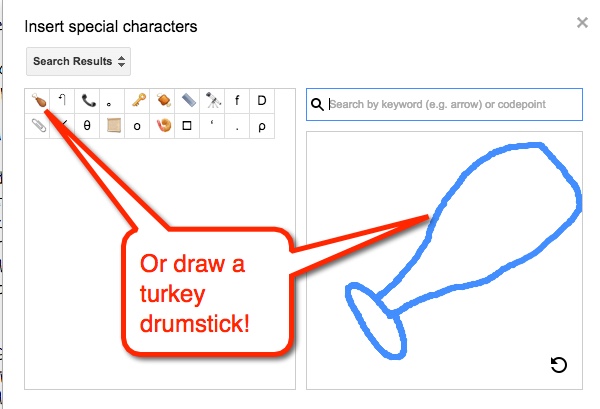
Choose the desired emoji and viola! You have an emoji in your doc. Now, what if we had students summarizing stories with just emojis?!

Thank you to my student, Johanna, for spreading her knowledge!


Create A Link in Docs

Creating a hyperlink in a Google Doc is simple. One reason you would want to create a hyperlink is for cleanliness. Having a large URL (short for Uniform Resource Locator) is messy on a document. Instead, I link a word or phrase to a particular web address. For example, if I am talking about Order of Operations in 5th grade I would link the words ‘Order of Operations in 5th grade’ to a particular web address like so:

This is a great resource for Order of Operations in 5th grade.

That is much nicer to look at than https://www.youtube.com/watch?v=zanq7gmXY88

Now, let’s check out how to do this in Google Docs (this also works in Gmail and Slides):

  1. Find the resource you want to link in your document and copy the URL. To copy highlight the URL, go to Edit > Copy. Or you can use the keyboard shortcut (Mac) command + C or (PC) control + C
    link-1
  2. Now that it’s copied to your clipboard (this is a virtual clipboard) navigate to your Google Doc. Find the word or phrase that will be connected with your site. Highlight the word or phrase. Now go to your menu bar and select Insert > Link
    link-2Or highlight the word or phrase then find the chain (or links) screen-shot-2016-10-02-at-7-39-33-pm in the toolbar.

    And there is always the keyboard shortcut. After highlighting the desired text, (PC) control + K or (Mac) command + K

  3. This will bring out a pop-out window which asks what you want the words to link to. Paste in the link. Go to Edit in the toolbar and select ‘Paste’.
    Keyboard shortcut – (PC) control + V, (Mac) command + V
    link-3
  4. And there you have it! A hyperlink in your doc.
    screen-shot-2016-10-02-at-7-59-51-pm

Google Docs: Comment

I have been editing my students NaNoWriMo Stories in Google Docs. The easiest way to communicate with them is to write comments. Since we are in the ‘it must be perfectly polished’ mode, I’m making a lot of comments! I’ve invited other teachers to give their input as well.

When I find an area that I would like to comment on I highlight the word or area with my cursor.

Comment 1

I can then either navigate to the toolbar at the top, find ‘Insert’, then scroll down to comment. OR I can locate the ‘Comment’ button on the right side of the toolbar, select it, then choose the comment button from there.

There is also a keyboard shortcut – Option + Command + M (Mac) or Alt + Control + M (PC and Chromebooks). Any of the 3 options will then bring up a comment window on the right side of the document. When this appears, type your comment, then select the blue ‘comment’ button. When the reader clicks on either the comment or the highlighted area, the highlight becomes a bit darker and the comment window becomes more prominent. comment 4

Happy Commenting!

Google Docs: Colored Background

Recently I was giving a presentation using Google Classroom. As a part of the experience, I have participants experience it from the student perspective. One of the assignments had a colored background and caught the attention of a participant. Let’s face it, white backgrounds can be VERY boring!

background 1

Changing the background color is super easy. In your Document, navigate to ‘File’ then ‘Page Setup’. A pop-out window appears. Choose ‘Page Color’. This will prompt color choices to appear. You can choose one of those or insert the color code of your choice using ‘Custom’.

Once you find a background color you like, press ‘OK’. To set as background, select ‘OK’ on the Page Setup window in the lower left corner.

You’re all set!

Background 6

Table of Contents – Google Docs

This year I had my 5th graders writing their state reports in Google Docs. One of their tasks was to create a Table of Contents. Normally this is painful – mainly for me. While they understand the concept, they often list ALL the pages in a topic. This year I avoided that by using the Table of Contents feature in Google Docs. It was ridiculously easy!

In their state report they changed the text of each heading from ‘Normal Text’ to ‘Heading 1’

toc 1

toc 2

Repeat this process for all sections that need to be added to the Table of Contents. Once you have done this, you can now insert the Table of Contents. Go to the Table of Contents page and place the cursor where you would like the Table of Contents to be submitted. Then insert your Table of Contents.

toc 3

This is what you get. You have hot links to the different sections in a document.

toc 4


Add-Ons – Google Documents

There are many additions that you can add to your Google Drive. For this post, I will specifically talk about Google Documents. An Add-on is simply a tool that makes your life easier. Some examples are: Easy-Bib, Doctopus (great for teacher management – EDU), and a thesaurus.

So how does one get Add-ons? Well, it’s super easy:

Add on 1

add on 2


You can scroll through the options or do a search in the search bar (upper right corner or pop-out menu).

add on 3


Once the desired Add-on is selected, you will need to add it. Simply select the blue ‘free’ (or if there is a cost, the amount will appear) bar located in the upper right corner of the pop-out menu.

add on 4


Another pop-out menu will appear. It will request that you accept their terms.


add on 5


Once you accept, the Add-on will be found under ‘Add-ons’ in the tool bar menu.

add on 6

Class Rules

Well, today was Day 2 (178 more to go). Yesterday we began writing down our class rules. I began typing them into Google Docs and in the end shared the document with all the students. One rule the students came up with was No Hats In The Class. Now normally, I’m not too fussy if students wear hats in the class, so I was good with whatever they wanted to do. This one rule lead to a rather lengthy discussion.

This morning the students came in and were eager, yes eager, to begin working. Their first assignment was to COLLABORATE and edit the Class Rules document. I showed them how to insert comments. That’s all it took!

hats in class

So while the conversation lacked any real depth, it was a great beginning. Hidden within the 20 comments were suggestions for your messy hair (get water and tame it). The deeper message most certainly got across; work together, collaborate, create (they changed the colors, fonts, and words) and communicate. I’d say this is a great way to begin the school year.