Google Docs: Comment

I have been editing my students NaNoWriMo Stories in Google Docs. The easiest way to communicate with them is to write comments. Since we are in the ‘it must be perfectly polished’ mode, I’m making a lot of comments! I’ve invited other teachers to give their input as well.

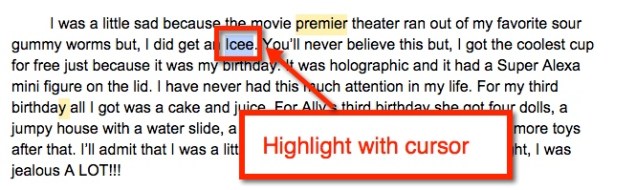
When I find an area that I would like to comment on I highlight the word or area with my cursor.

Comment 1

I can then either navigate to the toolbar at the top, find ‘Insert’, then scroll down to comment. OR I can locate the ‘Comment’ button on the right side of the toolbar, select it, then choose the comment button from there.

There is also a keyboard shortcut – Option + Command + M (Mac) or Alt + Control + M (PC and Chromebooks). Any of the 3 options will then bring up a comment window on the right side of the document. When this appears, type your comment, then select the blue ‘comment’ button. When the reader clicks on either the comment or the highlighted area, the highlight becomes a bit darker and the comment window becomes more prominent. comment 4

Happy Commenting!

Google Classroom: Drive Folder

One of the nice features of Google Classrooms is the folder that is automatically created in Google Drive. I like to use this when I am looking at student work. We have been working on our NaNoWriMo stories. We began polishing and editing our work last week (our first week back after break).

I created an assignment in Google Classroom, turn in their stories. Now that my students have turned them in, it’s easy to read them. While in Google Classroom, locate the assignment and select ‘Done’ (those students who have completed the assignment).

class folder 1 This takes me to a new page within Classroom. Here, I see thumbnails for those students who have completed the assignment. However, just above the thumbnail is an icon of a folder. Click that to open a new tab, Google Drive.

class folder 2 
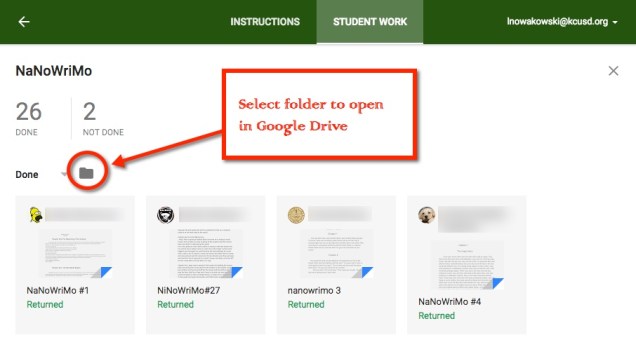
Once the Google Drive tab opens, you can easily navigate your students’ work.

class folder 3

NOTE: This is just one of several ways to access the Drive Folder.

Lesson Plans & Google Calendar

I know this is not revolutionary, but while reflecting this break, I thought I’d try out using Google Calendar as a lesson planner. There are a few reasons why I chose to do so.

  • I’m terrible with lesson plans. I keep them in my head. Then when I need to share what I’m doing, I have to remember then write it all down.
  • This will help me stay on task and organized.
  • It’s really not that hard to set up.
  • Since it’s in a calendar, I can easily see what weeks are short, which days are minimum, and so on.
  • Since it’s in Google Calendar, I can easily share the calendar or event(s) with various people.
    • Now the Resource (Special Ed) teacher doesn’t have to hound me about what I’m doing. Bless her for putting up with my ‘organization’.
    • I can easily share, therefore making collaboration that much easier.
    • My partner teacher can add details and we can have a cohesive program.
    • If I’m out and forget to leave lesson plans, anyone with access can quickly see what I’m doing. Still debating if I should make it open or restrict it to people who could help in a situation like that.

So here’s what I did. First, I created a new calendar  and named it ‘Lessons’. Then I created an event for each section of my day and made sure it was created in the ‘Lessons’ calendar.

calendar1Calendar2

calendar3

Remembering to make sure each event was repeated 5 days a week until the end of the school year.

calendar4

Now you can share your ‘Event’ with someone. Select ‘Save’ to save the event.

calendar5

And this is what my January looks like:

calendar6

To add details to a subject/day, simply click the subject on the desired day and select ‘edit event’. Then add the details. So Monday, January 11 I will do the following in Math:

calendar7

Google Docs: Colored Background

Recently I was giving a presentation using Google Classroom. As a part of the experience, I have participants experience it from the student perspective. One of the assignments had a colored background and caught the attention of a participant. Let’s face it, white backgrounds can be VERY boring!

background 1

Changing the background color is super easy. In your Document, navigate to ‘File’ then ‘Page Setup’. A pop-out window appears. Choose ‘Page Color’. This will prompt color choices to appear. You can choose one of those or insert the color code of your choice using ‘Custom’.

Once you find a background color you like, press ‘OK’. To set as background, select ‘OK’ on the Page Setup window in the lower left corner.

You’re all set!

Background 6

Voice Typing in Google Docs

Not so long ago, I wrote about a handy Add-On for Google Drive called Speech Recognition, here. It allows the user to talk into the microphone and have their words transcribed. Google has now incorporated Voice Typing in their Tools Menu, which does the same thing!

voice type 1

A microphone icon will appear on the side of the dVoice Type 2
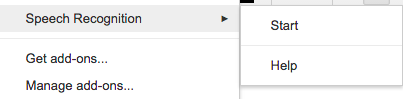
ocument. Click it. The first time you use this feature, you will be prompted to allow Google Docs to use your microphone. Choose allow and start talking.

Voice Type 3

Google Docs – Speech Recognition

Have a student who has great ideas, but can’t get them written down? Google Docs has a great Add-On to help: Speech Recognition.

In a Google Doc, look for Add-Ons in the toolbar.

You will need to get the Add-On.

Screen Shot 2015-08-25 at 8.41.08 PM

Now it’s ready to use. In the toolbar in your document, Speech Recognition is ready to use.

Screen Shot 2015-08-25 at 8.41.08 PM

Screen Shot 2015-08-25 at 8.35.34 PM Screen Shot 2015-08-25 at 8.48.44 PM

A sidebar will appear on the right side. Choose ‘Start’ and begin speaking.

When you finish speaking, press the ‘Stop’ and your text will appear in your document.

Archive A Classroom

The new school year has just begun, and I have been asked by a few, “How do I delete all of my assignments from last year, and add this year’s class to Google Classroom?”

My answer: Archive the old and create a new classroom! It’s easy to do.

Navigate to your Google Classroom. Find the class you wish to archive. Click on the three (3) dots in the upper right corner. This will bring up a pop out menu. Here you have the choice to ‘Rename’ the class, or ‘Archive’ it.

Archive 1

No worries, you can always refer back to last year’s assignments in your archived classes:

Archive 2

Publish To the Web – Google Docs

Throughout this past school year, I had students write their blog posts in Google Drive. This was a great way for them to get peer feedback, edit, and save their work. In the beginning, I told them to ‘copy’ and ‘paste’ their work into a new blog post. This was NOT acceptable for many of them. Many took their time getting just the right font (NEVER comic sans – responsible digital citizenship and all) and color. So I agreed to show them how their original work could be viewed on their blog posts – Publish to the web.

Here’s what we did:

Publish to web

First we chose the ‘Embed’ code, not the link. Then we copied the ‘Embed’ code (Control + c – PC; Command + c – Mac). Finally, we chose the blue ‘Published’ button. 

On our blogs, we found the ‘Text’ option – Not ‘Visual’. We use Edublogs, most blogs give you a Visual or Text option. Within Text, we placed our cursor where we wanted our document to be viewed, and ‘pasted’ (Control + v – PC; Command + v – Mac) the ‘Embed’ code. Below is an example of the results. We did play around with the Height and Width to get a visually pleasing outcome.