Now that you have an awesome map or HyperMap, you need to share it! You have a few options. You can have some edit or view. Or you may wish to have a MapFest where everyone can contribute and edit.
Sharing
Lesson Plans & Google Calendar
I know this is not revolutionary, but while reflecting this break, I thought I’d try out using Google Calendar as a lesson planner. There are a few reasons why I chose to do so.
- I’m terrible with lesson plans. I keep them in my head. Then when I need to share what I’m doing, I have to remember then write it all down.
- This will help me stay on task and organized.
- It’s really not that hard to set up.
- Since it’s in a calendar, I can easily see what weeks are short, which days are minimum, and so on.
- Since it’s in Google Calendar, I can easily share the calendar or event(s) with various people.
- Now the Resource (Special Ed) teacher doesn’t have to hound me about what I’m doing. Bless her for putting up with my ‘organization’.
- I can easily share, therefore making collaboration that much easier.
- My partner teacher can add details and we can have a cohesive program.
- If I’m out and forget to leave lesson plans, anyone with access can quickly see what I’m doing. Still debating if I should make it open or restrict it to people who could help in a situation like that.
So here’s what I did. First, I created a new calendar and named it ‘Lessons’. Then I created an event for each section of my day and made sure it was created in the ‘Lessons’ calendar.


Remembering to make sure each event was repeated 5 days a week until the end of the school year.

Now you can share your ‘Event’ with someone. Select ‘Save’ to save the event.
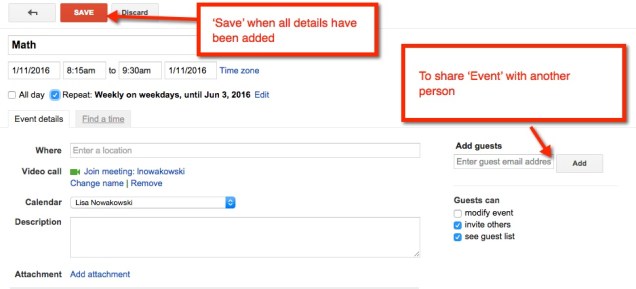
And this is what my January looks like:

To add details to a subject/day, simply click the subject on the desired day and select ‘edit event’. Then add the details. So Monday, January 11 I will do the following in Math:

Sharing in Google
The easiest way to collaborate is by ‘sharing’ Documents in your Drive. We have talked about how to create Docs and folders. Now, just take it one step further and ‘share’ those to have dynamic, cross-grade, cross-district PLCs. It’s quite easy.
Sharing a Document (or presentation, form, spreadsheet, drawing):
Once you have created your desired document, click the blue share button.

Type the names of those you wish to share with. You can allow others to edit or view. The default setting is ‘edit’. If you would like to retain control over who is allowed to have access to your document, click on the ‘change’ link on the bottom right. Change the ‘share settings’ to ‘Only the owner can change the permissions’. When finished, click ‘Done’.

Sharing a Folder:
Now there are many times when you will want/need to have ‘shared folders’, with your PLCs. That is the same process as sharing a document. The advantage with sharing a folder is that whatever is placed in that folder, it is automatically shared with everyone.
First find the folder you would like to share with others, select it. Then click the ‘share’ icon at the top of the page.


You will then be taken to the ‘Share Settings’ to select others to share the folder with.
I currently have several shared folders. I share an ELD folder with prezos and documents with several teachers in my district. I also share a Math folder with homework forms.
I have shared documents with 10 other teachers to create one OUTSTANDING document. One document was created within 12 hours by teachers in a 50 mile radius. Several of us were creating, sharing, and editing at the same time. It was an amazing experience. This type of sharing makes our lessons better, makes us better teachers, and allows the creativity to seamlessly flow.
