Calendar: Deleting A Calendar

I love using Google Calendar. It’s so easy to create multiple calendars to help me keep track of work, home, and other activities. However, there comes a time when I no longer need a calendar. For example, last year I created a calendar for my lesson plans. I don’t need that calendar any longer, nor do I need the daily emails with the agenda. There are also several calendars from past Google Classrooms that I no longer need. Here’s a quick guide on deleting unwanted calendars.

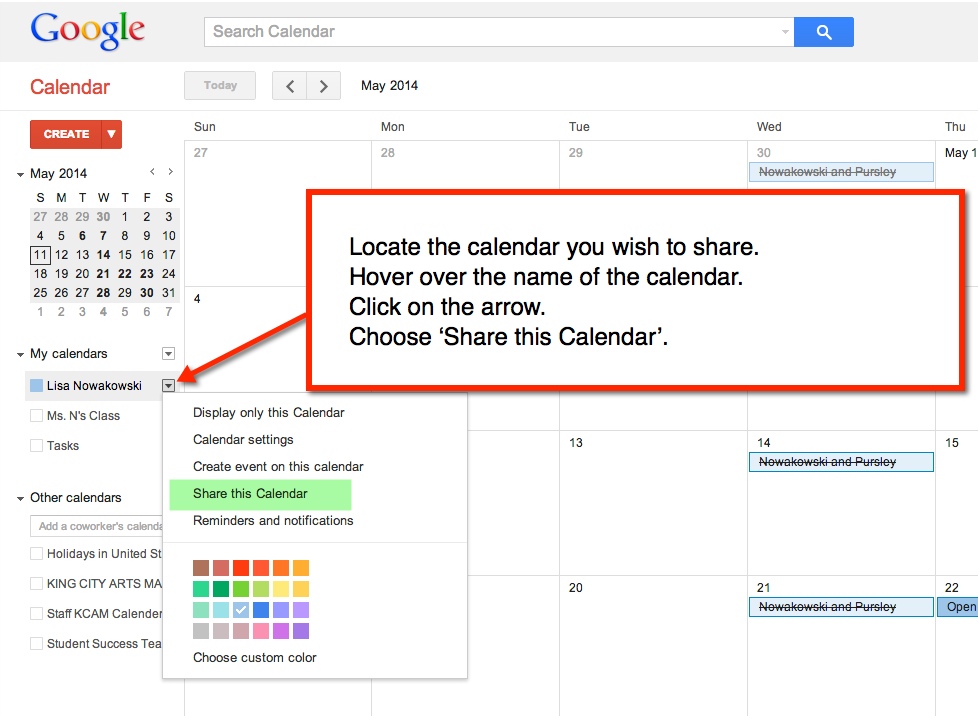
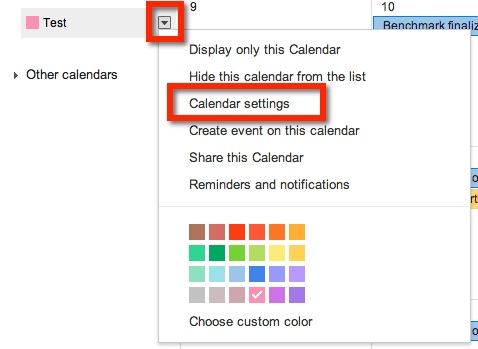
Navigate to your calendars. On the left side of the page find the section marked ‘My Calendars’ (if no calendars are listed, click on the down arrow next to the section). Locate the calendar you wish to delete and hover over it with your mouse. A small down arrow appears to the right. Select that go to ‘Calendar Settings’.

calendar-1

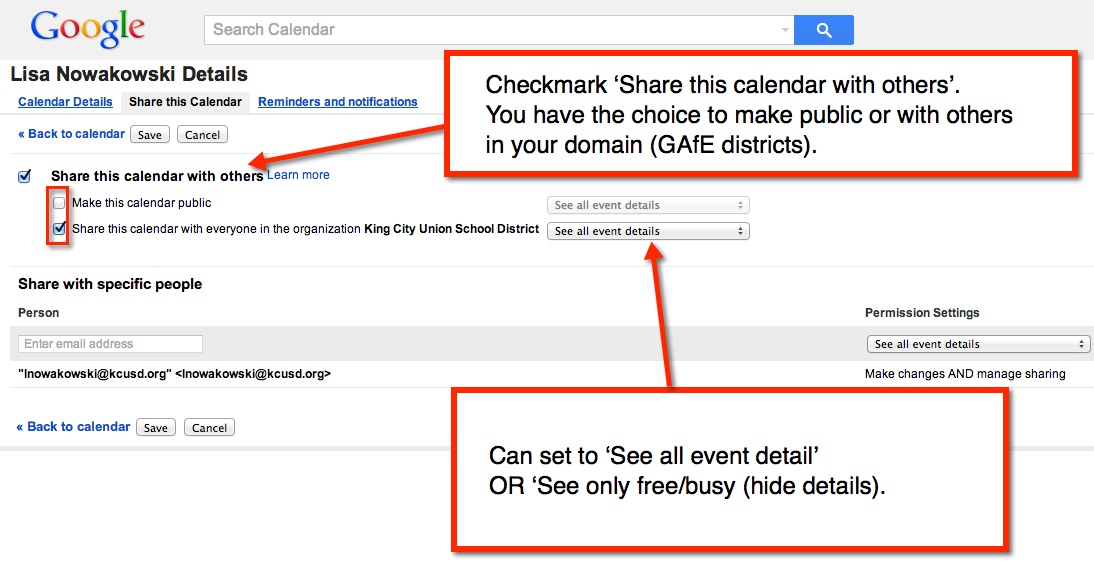
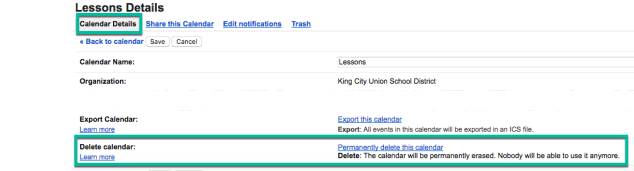
This will bring you to a new page with several options listed on the left side of the page. Scroll down to Delete Calendar. Then choose the ‘Permanently Delete this Calendar’ link.

calendar-2

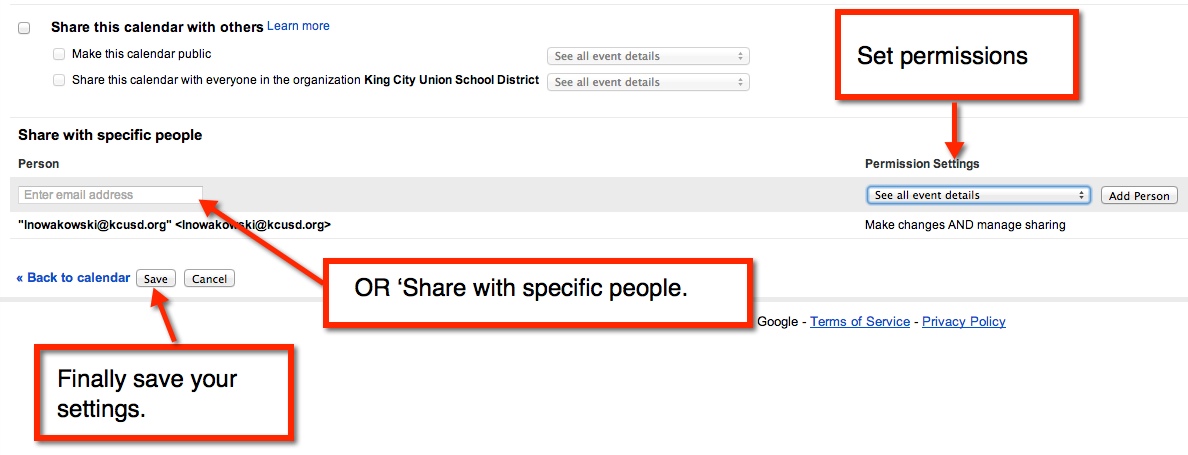
A pop out window appears confirming your request. You will need to checkmark the box and select the ‘Delete for Everyone’ button.

calendar-3

That’s all there is to it for deleting a calendar.


Lesson Plans & Google Calendar

I know this is not revolutionary, but while reflecting this break, I thought I’d try out using Google Calendar as a lesson planner. There are a few reasons why I chose to do so.

  • I’m terrible with lesson plans. I keep them in my head. Then when I need to share what I’m doing, I have to remember then write it all down.
  • This will help me stay on task and organized.
  • It’s really not that hard to set up.
  • Since it’s in a calendar, I can easily see what weeks are short, which days are minimum, and so on.
  • Since it’s in Google Calendar, I can easily share the calendar or event(s) with various people.
    • Now the Resource (Special Ed) teacher doesn’t have to hound me about what I’m doing. Bless her for putting up with my ‘organization’.
    • I can easily share, therefore making collaboration that much easier.
    • My partner teacher can add details and we can have a cohesive program.
    • If I’m out and forget to leave lesson plans, anyone with access can quickly see what I’m doing. Still debating if I should make it open or restrict it to people who could help in a situation like that.

So here’s what I did. First, I created a new calendar  and named it ‘Lessons’. Then I created an event for each section of my day and made sure it was created in the ‘Lessons’ calendar.

calendar1Calendar2

calendar3

Remembering to make sure each event was repeated 5 days a week until the end of the school year.

calendar4

Now you can share your ‘Event’ with someone. Select ‘Save’ to save the event.

calendar5

And this is what my January looks like:

calendar6

To add details to a subject/day, simply click the subject on the desired day and select ‘edit event’. Then add the details. So Monday, January 11 I will do the following in Math:

calendar7

Sharing Your Google Calendar


Calendar 1


You can either make the calendar public, share with everyone in your GAfE domain, or with specific people. Sharing with the public or in your GAfE domain allows you to set event details: ‘See all event details’ or ‘See only free/busy (hide details).

Calendar 2


Sharing with specific people will allow you to give different permissions: ‘Make changes AND manage sharing’, ‘Make changes to events’, ‘See all event details’, and ‘See only free/busy (hide details).

Calendar 3

Delete Calendar

Throughout the years, I have created a few different Calendars. This can become cumbersome, and I find the need to delete a Calendar from time to time. Here’s how to delete a Calendar:

From your Calendar page, locate the calendar you wish to delete. Your calendars are located under ‘My Calendars’. If you don’t see any, choose the arrow to the LEFT of ‘My Calendars’. All your calendars will be listed here. Once you have located the Calendar to be deleted, select the arrow to the right of desired calendar, and choose ‘Calendar Settings’.

pic 1


pic 2


You will be taken to a new page. Near the bottom of the page, you will see ‘Delete Calendar’ and ‘Permanently Delete This Calendar’

pic 3


Once you select the blue link ‘Permanently Delete This Calendar’, a pop out window will appear. It will ask if you want to Delete the calendar. Select ‘Yes’, then choose ‘Delete for Everyone’. Once you do that, the Calendar is deleted and will no longer appear the ‘My Calendars’ list.

pic 4

Insert Calendar Into Site

Recently I was asked if you could insert a SECOND calendar into a Google Site. The answer is YES!

Create a New Calendar

The process is simple. First, CREATE the new calendar. Make sure that the calendar is created in the same account that the Site is associated with. Choosing the arrow to the right of ‘My Calendars’ will give you the option to create a new calendar.

pic 1

This will take you to a new page where you will name your new calendar (1.). If you would like your calendar public, which you probably do if it’s on a website, be sure to choose the  “Share with Others’ then ‘Make This Calendar Public’ options on the page (2.). Once you have set up your calendar, remember to ‘Create Calendar’ (3.).

pic 2

Your new calendar will now appear under ‘My Calendars’ on your Google Calendars Page.

pic 3

Now you are ready to insert information on your new calendar.

Insert New Calendar Into Google Site

Locate the Site and Page you would like to insert your new calendar. Enter ‘Edit Mode’ on the Site – choose the pencil icon at the top right of the page (or press e on the keyboard).

pic 4

This will then bring up editing options. Find ‘Insert’, then ‘Calendar’.

Pic 5

A new window will appear, choose the desired Calendar. Then, choose the blue ‘Select’ button. From here, a new screen will pop up. This will allow you to set the properties of the calendar on your Site. Remember to choose the red ‘Save’ button when you are done.

pic 6

pic 7

Now that you have inserted your new calendar, remember to ‘Save’ the page (located at the top right of the page). You will now see your new calendar.

pic 8