Publish To the Web – Google Docs

Throughout this past school year, I had students write their blog posts in Google Drive. This was a great way for them to get peer feedback, edit, and save their work. In the beginning, I told them to ‘copy’ and ‘paste’ their work into a new blog post. This was NOT acceptable for many of them. Many took their time getting just the right font (NEVER comic sans – responsible digital citizenship and all) and color. So I agreed to show them how their original work could be viewed on their blog posts – Publish to the web.

Here’s what we did:

Publish to web

First we chose the ‘Embed’ code, not the link. Then we copied the ‘Embed’ code (Control + c – PC; Command + c – Mac). Finally, we chose the blue ‘Published’ button. 

On our blogs, we found the ‘Text’ option – Not ‘Visual’. We use Edublogs, most blogs give you a Visual or Text option. Within Text, we placed our cursor where we wanted our document to be viewed, and ‘pasted’ (Control + v – PC; Command + v – Mac) the ‘Embed’ code. Below is an example of the results. We did play around with the Height and Width to get a visually pleasing outcome.
Google Maps – Pins

Pinning a location on a custom Google Map is easy. You can either find the location by typing it in the search box at the top, or by placing a pin at your desired location.

Click on the Green pin > Add to Map > Pin will turn Red.

To pin location without looking it up: Select the Pin icon at the top of the screen, and click the desired location, then ‘Save’.

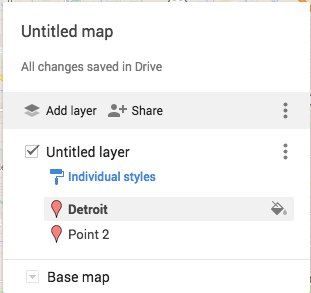
To change the icon symbol, go to the menu at the left, choose the point you would like to change, and click on the paint bucket.

Screen Shot 2015-05-13 at 6.01.06 PM

You can then choose a different color pin, icon shape, or even look for additional icons.

Want to know how to create a custom map? Check this out!

Happy Map making!

Search Your Google Drive

I have heard several comment that it is hard for them to find items in their Drive. What many are forgetting is that Drive has powerful search options.

In Google Drive there is a ‘Search Drive’ option at the top. You can type in key words such as the title or known keywords in the item you are looking for. I did a search for ‘puppy’. I know I don’t have anything named that, but I wanted to see which items had ‘puppy’ mentioned. This is what I got:

Screen Shot 2015-05-08 at 5.03.11 PM

None of the items are named ‘puppy’. So I wondered what ‘Rabbit’ had to do with puppy. So I went into the Spreadsheet, did a quick search (control + f on PC, or command + f on Mac) and this is what I found. Puppy is mentioned throughout the Spreadsheet.

I can also narrow my search by file type, opens with, or ownership. Choose the small arrow to the right on the Search Drive bar. So if I know the item I am looking for is in a Spreadsheet, I’d choose ‘opens with’ and select spreadsheet.

This should make searching for your items a bit easier. Happy Searching!

Speech Recognition Add-On

Today the Speech teacher asked if there was a way that Google could do an audio recording. I immediately thought of Google Voice. Then she explained that she needs to transcribe what was said. I changed my mind. While Google Voice does transcribe conversations, it requires a Google Voice Number. I’m not sure the teacher is ready for this. I was thinking in terms of what would be easiest for her, now.

Docs Add-Ons ‘Speech Recognition’

I currently have a student using this tool. He finds it difficult to get his thoughts from his head to his fingers. He’s been using this tool with great success. The tool is simple to use. Go to ‘Add-ons’ > ‘Speech Recognition’ > Start. A toolbar will appear on the right side of the screen. Press ‘Start’ and begin speaking. The text will appear in the space. Once you are done speaking, press ‘Stop’ and the text will automatically be inserted in the document.

Just like voice recognition texting, the speaker will have to say, “Period,” in order for periods to be inserted. So in the case of the school’s Speech teacher, she’ll have to go back and insert them herself, but hey that beats transcribing the whole conversation! I also suggested recording it on her phone for reference.

Get The Add-On 

Google Classroom: Save Draft Assignment

You now have the ability to upload an assignment in Google Classroom and ‘Save Draft’; and assign when necessary.

Create an assignment as usual, but instead of ‘Assign’ choose ‘Save Draft’. It will then appear on YOUR wall as ‘Draft’. When you are ready to ‘Assign’ either click on ‘Draft’ or the arrow on the right. Then click the name of the assignment, a pop-out window appears where you can see the settings of the assignment and have the option to ‘Assign’ or ‘Save Draft’. This time ‘Assign’.

Google Classroom: Invite Another Teacher

Today Google Classroom has made yet another improvement! Teachers have been wanting to share their Classrooms with other teachers. Today, Google has given us this opportunity.

Invite Another Teacher

Choose the Classroom you would like to share with another teacher. Once in the Classroom, navigate to the ‘About’ page (1.). Once there the teachers the Classroom have been shared with are located on the left (2.). Notice that the owner of the classroom is listed first. Below the teachers is an ‘Invite’ button (3.). Once this is chosen, you find the teacher you would like to share the Classroom with – within your domain. It will send an Invitation to the teacher. All they have to do is accept.

Move PlaceMark Between Layers

I have begun to plan my trip to Italy. As part of this I am creating a Google Map for each city I will visit. Within each city, I have different layers: Transportation, Hotels, Sights. While creating my Rome Map, I accidentally placed a hotel in the Sights Layer. My initial thought was that I would have to delete it and start over again, making sure that I placed it in the correct layer. Then…I thought, “Wait a minute, this is Google. I wonder if I can drag and drop the hotel to the correct layer.” Happily the answer was yes! So easy.

Check it out. The image on the left has Hotel Oceania on the Sights Layer. I drug that up to the Hotels Layer, where it now resides – shown in the image on the right.

A Few Of My Favorite Extensions

Google Dictionary

Google Dictionary allows you to look up a word on any webpage quickly.

Too Many Tabs

Too Many Tabs allows you to manage your tabs. Can make tabs ‘idle’ and view how many tabs are open.

One Tab

One Tab is similar to Too Many Tabs. With one click, all your tabs are condensed into one list with hyperlinks.

Adblock

Adblock blocks ads on webpages thus optimizing your browsing experience.

Goo.gl

Goo.gl is a Google URL shortener. It also creates a QR Code for the webpage.

Diigo

Diigo allows you to archive, annotate, and bookmark any webpage. Diigo is accessible from anywhere.

Feedly

Feedly is my favorite RSS Reader. I can easily follow new posts on my favorite blogs.

Google Cast

Google Cast is a must for anyone with Chromecast. Google Cast allows you to send content from your phone, tablet, or computer to your TV.

ColorZilla

CollorZilla identifies any color on any webpage; gives the hex code and keeps a history of identified colors.

Move It

Move It is a fun extension. You set the intervals at which an exercise challenge will appear on your screen.

Add This

Add This is a new favorite of mine. Have you ever stumbled across a great website that you wanted to share? Then you needed to copy and paste the link to Facebook, GMail, Twitter, or where ever. Skip that with Add This. Automatically lets you share a site to the media of your choice.

Clearly

Clearly cleans up posts, blogs, and articles. Read without the clutter.

WhatFont

WhatFont can identify any font on any website. Great for design purposes, or the curious.

Snagit

Snagit Extension in conjunction with the App is perfect for any classroom. It allows the user to do screen captures – video and pictures. Automatically saves to your Google Drive.

Insert Video – Google Slides

Inserting a video into a Google Slide is simple. Open the Slide you’d like to add a video to. Choose ‘Insert’ from the top menu, then ‘Video’.

Slides Video 1 (1)

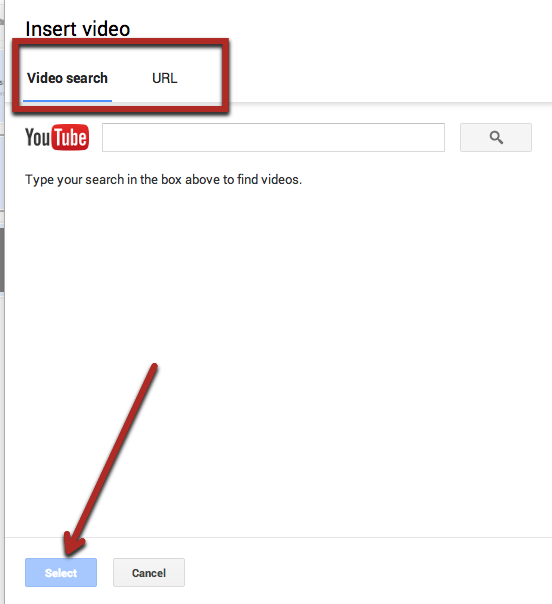
Once you choose ‘Video’ a pop-out window appears. You then have the option to search for a YouTube video by either URL or Search by keywords. When you find your desired video choose the blue ‘Select’ button on the bottom left.

Slides - video 2 (1)

It will then appear on your slide.