Another feature on Google My Maps is the Layers. When we were studying the 13 Colonies, I was able to separate information into layers. There was a layer for the original 13 colonies, a layer for the colonial regions (New England, Middle, Southern), and the current geography of the 50 states. The students were able to click on and off layers in order to clearly see important information.
Google My Maps Part 3: Lines and Shapes
There are so many learning opportunities with the lines and shapes feature of My Maps. We are currently adding and subtracting fractions with unlike denominators. It gets really boring doing problems from a book. In the coming days, I plan to create a Hypermap with lines – making sure the distance will be a fraction. (NOTE: My Maps measures distance using decimals. This will be good practice for my 5th graders to convert). My Maps will also tell the area and perimeter of a shape, MORE math opportunities!
Google My Maps Part 2: Place Marker Options
The Place Marker has several options available to the user. The icon can be customized through color and picture option. Adding information, directions, videos, and/or pictures is a breeze.
Google My Maps Part 1
I have begun to create a series of videos on Google My Maps. I enjoy incorporating the tool in several areas of the curriculum and want to share my passion. Here’s a quick guide on Getting Started.
Tweet The Author
I recently wrote for the CUE Blog on how to own a premade curriculum. I spoke about taking it and tweaking it so that we, as teachers, feel the ownership instead of feeling like we have no say. Part of the way I take ownership in my math class is to use Andrew Stadel‘s Estimation 180 site. It’s a nice warm-up for the students and a great way to practice several of the 8 Mathematical Practices found in CCSS.
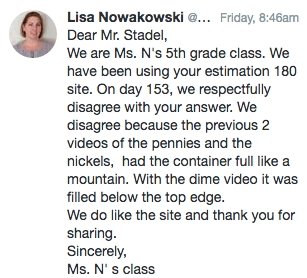
Most recently, we have been going through a series that has us estimate the value of coins in a container. It started with pennies, then progressed through until the day we estimated the value of dimes. We went through our normal routine – three minutes to discuss and find an estimate that is too low, too high, the actual estimate, and how they arrived at that estimate. Then, as normal, we viewed the video answer. Upon finding the answer, the RSP co-teacher got a discussion started. She disagreed with the answer. We left it at that so that the students could either agree or disagree. After they reviewed the previous two days’ answers and compared the answer to the dimes, the class determined that they too disagreed. Following the Mathematical Practices, they had to justify their reasoning, which they did. They reasoned that the pennies and nickels were mounding up to the point of almost spilling over, whereas the dimes didn’t quite reach the top of the container – same container.
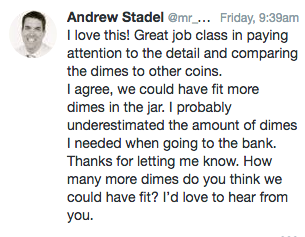
Fortunately, with modern technology, we didn’t have to let the discussion die there. So, I got on my phone, hooked it up to the screen so the students could be active participants, jumped on Twitter, and sent Mr. Stadel a private message. This is what they wrote, well, told me to type:
After they got over the initial shock that one could actually do this, they got excited. Now, I have only been a participant in a few of Mr. Stadel’s sessions at conferences but was fairly certain that he would be open to what we had to say and would most likely respond. And he didn’t disappoint! The kids were VERY excited that he did respond. Okay, I was pretty excited too. This was such a real and relevant experience.
We then talked about how many more dimes we thought could fit. They determined that 1/2 roll more – 25 dimes – would be needed.
THIS is why we, as educators, need to be connected. THIS is why we continuously grow our PLN.
I would like to thank Mr. Stadel and Ms. Luke (RSP teacher) for making this all possible.
Biggest, BEST Fail of the Day
Yesterday I wrote about the MLK Hyperdoc my students are doing this week. Today we discovered that at least one other class is using it. While doing their work today, a student approached me asking, “Who are some of these people?” My student was on the MLK Padlet doing their assignment. I looked, and sure enough, there were names on it of students who weren’t in our classroom or school.
When I shared the Hyperdoc I forgot to unlink the padlet and make a note to create your own padlet. The other teacher must not have thought about it either.
 I got pretty excited about this. THIS makes their learning even more relevant. They now have a chance to talk with another class somewhere in the US. I encouraged my students to answer questions and check out what the other students had written. Some were silly (a string of letters) and my students were disturbed by this. Which I took as a compliment. This means they know what I expect from them and that that sort of Internet activity isn’t acceptable. My students then began answering questions and reading the information.
This was such a GREAT learning opportunity for them (and me). So yes, my Padlet is a ‘hot mess’, but a wonderful ‘hot mess’!
Martin Luther King, Jr.
This week we went back to school, after 3 weeks off. My partner teacher and I decided to start book studies on the 17th which left us wide open for this week. Well, we have Benchmark Assessments (I know, who does those the first week back from a break? Apparently, my district). This got me excited. I never feel like there is enough time to study some of the important people and events in our history. That’s when I decided to create a Hyperdoc! I have fallen in love with the model. It’s work on my end in the beginning, but so worth it! The experience and learning are so much richer for the students.
I have shared this out with my PLN and some might be using it. This is what we want! Sharing really is caring. As my students were working on it today, one came up to me and showed me that there were 3 ‘anonymous’ animals on one of the required documents. I said yes, that makes sense since I shared it. He was confused. I explained to him that others were looking for an MLK Hyperdoc and I shared the one I created. He was satisfied with the answer and walked away.
I LOVE that I can model a collaborative mindset for my students. They know I find Hyperdocs and activities online (and am sure to point out the author and give credit even when they don’t know the person). This is what I want my students to do in the future; reach out to others online to create better products and help one another.
If you’d like to use the MLK Hyperdoc, go for it and feel free to pass it along. Sharing really is creating a caring world!
Calendar: Deleting A Calendar
I love using Google Calendar. It’s so easy to create multiple calendars to help me keep track of work, home, and other activities. However, there comes a time when I no longer need a calendar. For example, last year I created a calendar for my lesson plans. I don’t need that calendar any longer, nor do I need the daily emails with the agenda. There are also several calendars from past Google Classrooms that I no longer need. Here’s a quick guide on deleting unwanted calendars.
Navigate to your calendars. On the left side of the page find the section marked ‘My Calendars’ (if no calendars are listed, click on the down arrow next to the section). Locate the calendar you wish to delete and hover over it with your mouse. A small down arrow appears to the right. Select that go to ‘Calendar Settings’.

This will bring you to a new page with several options listed on the left side of the page. Scroll down to Delete Calendar. Then choose the ‘Permanently Delete this Calendar’ link.
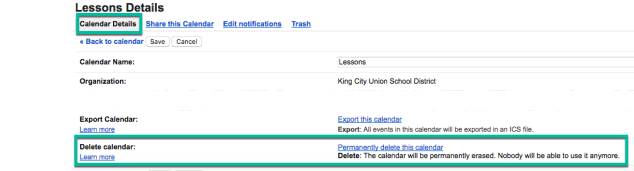
A pop out window appears confirming your request. You will need to checkmark the box and select the ‘Delete for Everyone’ button.

That’s all there is to it for deleting a calendar.
Google Classroom: Guardians
One of the biggest pitfalls of Google Classroom, in the beginning, was that parents and/or guardians didn’t have access. This meant they didn’t know what about missing work, class activity, or upcoming work. That all changed this school year when Google announced the option to sign Guardians up in Google Classroom. Now, once Guardians are signed up, they will receive a weekly email summary. Read for more information for Guardians.
Teachers, take advantage of this and add another way to connect with your families.
Go to your Classroom and select the middle tab option marked ‘Students’. Then select the ‘Invite Guardian’ option next to each student.

To invite the guardian(s), type their email address to invite them. If there is more than 1 guardian needing the information, no problem, simply choose the ‘Add Another’ choice before selecting ‘Invite’.

Guardians will receive an email inviting them to receive weekly emails. They will have 120 days to accept the invitation. Guardians can read more about it here.
After ‘experimenting’ with one parent, the student commented in class that his mom saw his work and liked what he had written. As a guardian, the parent couldn’t access the student account so the student signed in to show the parent his work. However, this was a great opportunity to have a meaningful conversation about what he did in school that week!
Chrome: Find Bar
One of my favorite features to show students is Control + f or f3 on Windows, Linux, and Chromebooks, or Command +f on Macs. This will open up the ‘Find Bar’ for that page. What is Find Bar? Well, it’s a handy feature to narrow your field when looking for specific text. Have you ever done a search and found a great website, but there was so much text it took a while to find the exact information you needed? The Find Bar solves that problem for you!
Here I am on Google’s Wikipedia page. There is a lot of text on the page, but I only want to find out about “BackRub”, which I was told was the original name of Google. I could go to the Contents section, find History (which would be the most logical place for it to be), or I could use the Find Bar and locate Back Rub instantly.
Open up Find Bar: Control + f (Windows) or Command + f (Mac). A small bar appears in the upper right corner.

Type in the desired text. In this case, I’ll type BackRub and hit the enter key. There are 2 places on the page where BackRub is written.

I can either click on the arrows to the right of the Find Bar or use Control + g (Windows) or Command + g (Mac) to navigate to the next location of the text. The orange highlight denotes the current match while a yellow highlight denotes previous or an upcoming match.

It’s pretty slick and so much more efficient. Give it a try!
