Another feature on Google My Maps is the Layers. When we were studying the 13 Colonies, I was able to separate information into layers. There was a layer for the original 13 colonies, a layer for the colonial regions (New England, Middle, Southern), and the current geography of the 50 states. The students were able to click on and off layers in order to clearly see important information.
How To
Google My Maps Part 3: Lines and Shapes
There are so many learning opportunities with the lines and shapes feature of My Maps. We are currently adding and subtracting fractions with unlike denominators. It gets really boring doing problems from a book. In the coming days, I plan to create a Hypermap with lines – making sure the distance will be a fraction. (NOTE: My Maps measures distance using decimals. This will be good practice for my 5th graders to convert). My Maps will also tell the area and perimeter of a shape, MORE math opportunities!
Google My Maps Part 2: Place Marker Options
The Place Marker has several options available to the user. The icon can be customized through color and picture option. Adding information, directions, videos, and/or pictures is a breeze.
Calendar: Deleting A Calendar
I love using Google Calendar. It’s so easy to create multiple calendars to help me keep track of work, home, and other activities. However, there comes a time when I no longer need a calendar. For example, last year I created a calendar for my lesson plans. I don’t need that calendar any longer, nor do I need the daily emails with the agenda. There are also several calendars from past Google Classrooms that I no longer need. Here’s a quick guide on deleting unwanted calendars.
Navigate to your calendars. On the left side of the page find the section marked ‘My Calendars’ (if no calendars are listed, click on the down arrow next to the section). Locate the calendar you wish to delete and hover over it with your mouse. A small down arrow appears to the right. Select that go to ‘Calendar Settings’.

This will bring you to a new page with several options listed on the left side of the page. Scroll down to Delete Calendar. Then choose the ‘Permanently Delete this Calendar’ link.
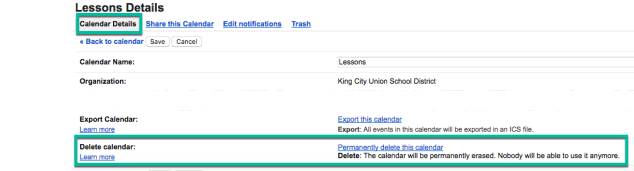
A pop out window appears confirming your request. You will need to checkmark the box and select the ‘Delete for Everyone’ button.

That’s all there is to it for deleting a calendar.
Create A Link in Docs
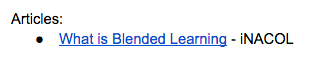
Creating a hyperlink in a Google Doc is simple. One reason you would want to create a hyperlink is for cleanliness. Having a large URL (short for Uniform Resource Locator) is messy on a document. Instead, I link a word or phrase to a particular web address. For example, if I am talking about Order of Operations in 5th grade I would link the words ‘Order of Operations in 5th grade’ to a particular web address like so:
This is a great resource for Order of Operations in 5th grade.
That is much nicer to look at than https://www.youtube.com/watch?v=zanq7gmXY88
Now, let’s check out how to do this in Google Docs (this also works in Gmail and Slides):
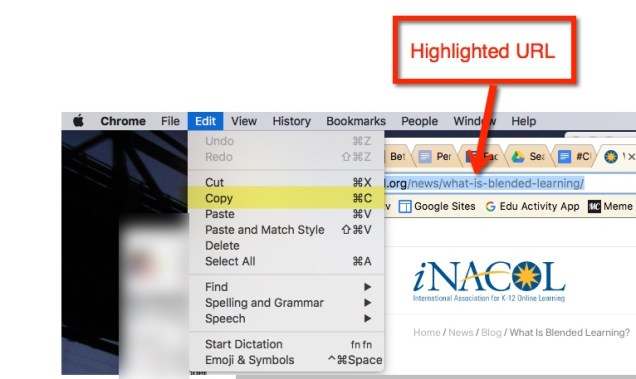
- Find the resource you want to link in your document and copy the URL. To copy highlight the URL, go to Edit > Copy. Or you can use the keyboard shortcut (Mac) command + C or (PC) control + C
- Now that it’s copied to your clipboard (this is a virtual clipboard) navigate to your Google Doc. Find the word or phrase that will be connected with your site. Highlight the word or phrase. Now go to your menu bar and select Insert > Link
 Or highlight the word or phrase then find the chain (or links)
  in the toolbar.
And there is always the keyboard shortcut. After highlighting the desired text, (PC) control + K or (Mac) command + K
- This will bring out a pop-out window which asks what you want the words to link to. Paste in the link. Go to Edit in the toolbar and select ‘Paste’.
Keyboard shortcut – (PC) control + V, (Mac) command + V

- And there you have it! A hyperlink in your doc.
‘Explore’ in Google Docs
Late last week, I was creating a Hyperdoc for my students. I needed an image so I did my usual and went to Tools>Research. And that’s when I noticed it… Research was MISSING! I’ll admit it, I did panic a bit.

Then I noticed ‘Explore’ was new. So I clicked on it. Note: I say when curious, or in doubt, click on it. It’s not like I’m going to break the internet. And when it get too scary, exit out. That’s when the sidebar I was looking for appeared. Albeit a little different looking than what I’m used to, but it was there!

Some of the features are a bit different. I do like that I, and my students, no longer have to filter our image search to ensure that they are free to use. Now, Google finds the free to use ones. And just like before, when I drag the image into my document it automatically cites it for me. However, instead of the footnote that it use to be, it is now cited directly below the image.
The feature to cite a website is missing, hopefully, it will return. I do like the ‘Drive’ feature. This searches my drive for all items matching my search query.
Other ways to access ‘Explore’
Keyboard shortcut: (Mac) – command+option+shift+I
(PC) – control+alt+shift+I
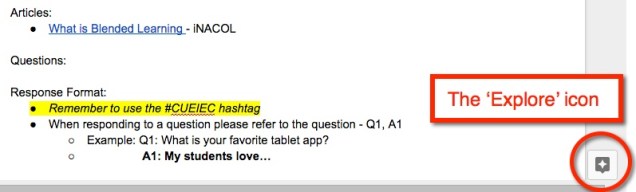
Icon on bottom right of screen:
Have fun Exploring!
Point of View
In Social Studies, my 5th graders have been learning about the causes of the American Revolution. Recently, they were researching ‘The Boston Massacre’. Being that we are in the US, the texts that we have, have a colonist/American point of view. This lead to; what was the British take on it? This lead us to a Google Search. However, we didn’t want to view anything that was written in the US, we wanted information from the UK. So how did we find out the UK point of view?
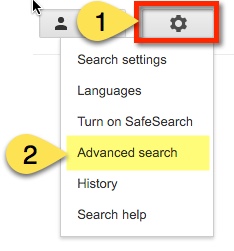
We navigated to a new tab, which brought up Google. While being logged in, we typed our query ‘Boston Massacre’. Now to filter our results for information from the UK. Located on the upper right side is a ‘gear’. Choosing it brings up a drop down menu. From this, click on ‘Advanced search’.
This sends us to a new page with several search filters. For our Boston Massacre example, we located ‘region’. This allowed us to narrow the region in which the information was published. We chose United Kingdom (this lead to a side conversation about ‘What is the United Kingdom?’). Then clicked the blue Advanced Search button on the lower right side.

This brought up the search results with the filter in place. All results were from the UK.

This, of course, led to an interesting discussion on why the accounts that we had been reading about and the accounts according to the UK were different.It was a great opportunity for my students to experience different points of view, why they exist, practice critical thinking skills, and begin to learn to question what really happened.
Playlists in YouTube
I’m a huge fan of YouTube, but then again who isn’t? One of my favorite features is the ability to create Playlists. These are a collection of videos of your choice. For example, I have a playlist for grammar to help students who are struggling with various grammar issues.
In YouTube, on the left side is my menu. The second section shows my ‘Library’ (aka playlists). creating them is SUPER easy!

When I find a video I like, I add it to (or create a new) playlist. The ‘Add to’ choice appears just below the video.

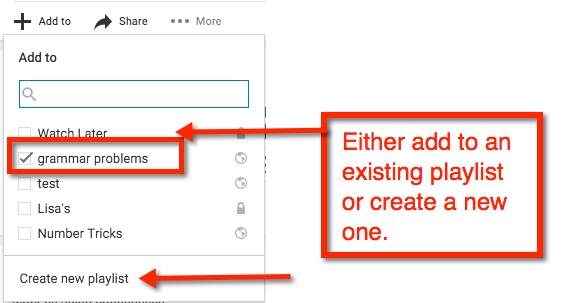
If you are creating a new playlist, you will have the option to have it ‘Public’ (open for anyone to find), ‘Unlisted’ (other can view if they have the link), or ‘Private’ (must be shared directly with others).

After you name your playlist, select ‘Create’. Viola! You now have started your playlist collection

Google Sites: Add/Edit Sidebar Countdown
On my classroom website, I like to have a countdown for events. These might include Days until:
- Conferences
- Minimum days
- Vacations
- Breakout EDU sessions
Other ideas include:
- End of semester
- Days until a project is due
- Meetings
Doing this is easy! Log into your site. Locate the ‘Gear’ and navigate to ‘Edit Site Layout’.

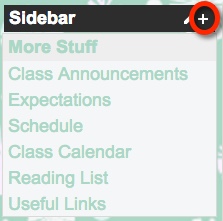
Once this option is selected, the top bar should show that you can now edit the Site layout. Next, locate ‘Sidebar’ and select the ‘+’ to insert a countdown.

This will then bring up a pop-out window. There will be several options to choose from such as Navigation, Text, and Countdown. Once you select Countdown, you will be able to configure your countdown. Name your event and set the date. When finished select ‘Ok’.

Now in the upper right corner, select ‘Close’ before exiting.

Once your Countdown has expired, setting the next one requires you to ‘Edit Site Layout’. Simply navigate towards the ‘Gear’, go down to ‘Edit Site Layout’, locate your expired Countdown, and hover your mouse. Notice the tag ‘Edit sidebar item’.

This will bring up the ‘Configure Countdown’ window. Identify your next Event and Event Date, select ‘ok’, then ‘Close’.
Happy counting!
Google Docs: Colored Background
Recently I was giving a presentation using Google Classroom. As a part of the experience, I have participants experience it from the student perspective. One of the assignments had a colored background and caught the attention of a participant. Let’s face it, white backgrounds can be VERY boring!

Changing the background color is super easy. In your Document, navigate to ‘File’ then ‘Page Setup’. A pop-out window appears. Choose ‘Page Color’. This will prompt color choices to appear. You can choose one of those or insert the color code of your choice using ‘Custom’.


Once you find a background color you like, press ‘OK’. To set as background, select ‘OK’ on the Page Setup window in the lower left corner.


You’re all set!