Google Maps in Class: State Reports

A few years ago I was looking for something new to do with state reports so I had students do them using Google Maps. Part of my desire to do something different came from frustration. I had been doing state reports near the end of the year. And that means NO ONE really wants to do them and I don’t want to read them – for the sheer fact that the quality isn’t there (end of the year, in 5th grade, last grade in our elementary school…see my point).

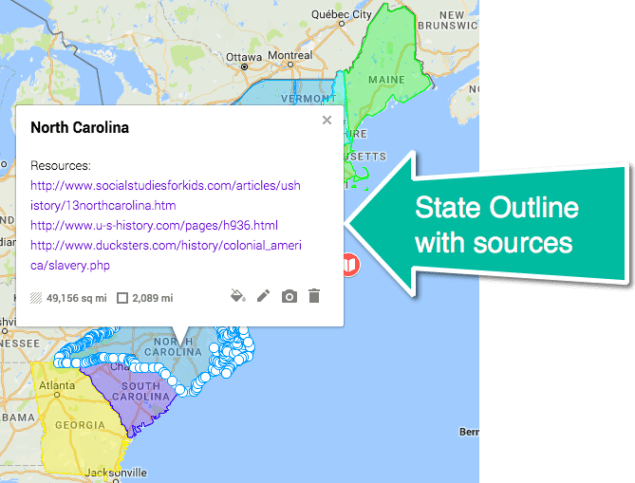
screen-shot-2017-02-05-at-1-38-06-pmHowever, when I changed the format to maps, the engagement and quality significantly improved. Students entered in the morning ASKING to do the ‘reports’. In the end, it was much more enjoyable for everyone! They still had to do the research and write a quality report.

State Report on Maps Directions.

Here’s a student example:

screen-shot-2017-02-05-at-1-39-54-pm

NOTE: While ‘Sate Reports’ are a tradition in 5th grade, it is not actually a standard. The standard, in California, states:

5.9 Students know the location of the current 50 states and the names of their capitals

This standard can be met by participating in Mystery Skypes/Hangouts and various other engaging activities. Just because we’ve always done something doesn’t mean we have to continue doing it.

Notes on Google Slides

Earlier this week my students started on a group project – Road to the Revolution. I had given them a Hyperdoc with the information on the French and Indian War. I gave them very specific guidelines and some questions to answer. The end product is an Animoto video. As I was walking around and helping, I noticed that a group of students had Google Slides open. I got worried. It took a long time for me to get my students out of the habit of wanting to create a slideshow for presentations. So I stopped and asked why Slides was open and “Please don’t tell me you’re creating a slideshow.” I was so relieved when one of the girls explained that they were using it to take notes! I didn’t even show them this trick. Yeah, proud teacher moment.
download One of the girls created and shared the slides with the rest of the group. Each person in the group had their own slide to take notes. I know this isn’t the first time this has been done, but I was really proud of my students for thinking of this. It is so much easier to take shared notes on Slides as opposed to Docs.
I LOVE it when students take learning into their own hands and make it work for them. Go Innovators!

Just another great example of what students will do when we give them the freedom to own their learning.

Tweet The Author

I recently wrote for the CUE Blog on how to own a premade curriculum. I spoke about taking it and tweaking it so that we, as teachers, feel the ownership instead of feeling like we have no say. Part of the way I take ownership in my math class is to use Andrew Stadel‘s Estimation 180 site. It’s a nice warm-up for the students and a great way to practice several of the 8 Mathematical Practices found in CCSS.

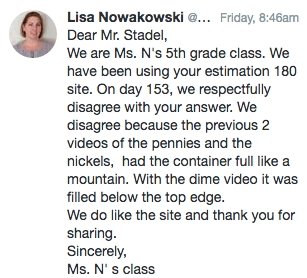
Most recently, we have been going through a series that has us estimate the value of coins in a container. It started with pennies, then progressed through until the day we estimated the value of dimes. We went through our normal routine – three minutes to discuss and find an estimate that is too low, too high, the actual estimate, and how they arrived at that estimate. Then, as normal, we viewed the video answer. Upon finding the answer, the RSP co-teacher got a discussion started. She disagreed with the answer. We left it at that so that the students could either agree or disagree. After they reviewed the previous two days’ answers and compared the answer to the dimes, the class determined that they too disagreed. Following the Mathematical Practices, they had to justify their reasoning, which they did. They reasoned that the pennies and nickels were mounding up to the point of almost spilling over, whereas the dimes didn’t quite reach the top of the container – same container.

Fortunately, with modern technology, we didn’t have to let the discussion die there. So, I got on my phone, hooked it up to the screen so the students could be active participants, jumped on Twitter, and sent Mr. Stadel a private message. This is what they wrote, well, told me to type:

screen-shot-2017-01-22-at-2-22-09-pm

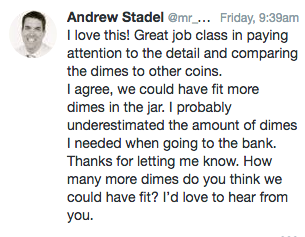
After they got over the initial shock that one could actually do this, they got excited. Now, I have only been a participant in a few of Mr. Stadel’s sessions at conferences but was fairly certain that he would be open to what we had to say and would most likely respond. And he didn’t disappoint! The kids were VERY excited that he did respond. Okay, I was pretty excited too. This was such a real and relevant experience.

screen-shot-2017-01-22-at-2-27-05-pm

We then talked about how many more dimes we thought could fit. They determined that 1/2 roll more – 25 dimes – would be needed.

THIS is why we, as educators, need to be connected. THIS is why we continuously grow our PLN.

I would like to thank Mr. Stadel and Ms. Luke (RSP teacher) for making this all possible.

Winter Break Activities

This week I started my Winter Break. A glorious 3 weeks off from school. That also means that the students will most likely have 3 weeks off from practicing any of their skills, including reading. The no reading thing makes me sad. In an effort to combat the ‘Winter Break Slide’ (very similar to the Summer Slide) our principal requested that we give homework. As I am not a fan of homework, I designed a Winter Break Activities sheet.

2016-winter-break-activities-1

Since the students only need to choose 3 activities, it gives them some ownership and flexibility. I also tried to make them a bit more interesting as well as non-tech friendly. However, I think my favorite part is the Kindness Calendar. The calendar is ‘homework’ that everyone can agree on.

2016-winter-break-activities-2

One student noted that many items were ‘chores’. I told her it was my present to the parents!

Explain Your Answer

Shifts in Math

2000px-math-svgOne of the bigger shifts in math, aside from the building blocks in the CCSS Framework, is the ever dreaded ‘Explain your answer’. When this first came out, I wasn’t sure what they meant, the frameworks hadn’t been written yet. I had students explaining that they ‘added the ones then regrouped to get the answer.’ And while they were technically correct, there was a lot missing.
Better Understanding

Now, I have a better understanding of what is needed. The students need to break down each step and explain, using academic language, what their thought process is. I furthered my understanding when I went to a training on this. Honestly, it wasn’t the best training, but it got me thinking. I used some of the techniques to create a better lesson.

The Lesson

First, I created a template that the students were going to be using. Then, as a group, we walked through each part of the template and filled it in. There was  A LOT of guidance this first time. I’m hoping with practice, they will become more independent. Students worked in table groups to solve their table problem. Finally, they were to film their process of solving the problem. Using their ‘scripts’ students explained the process for division. Here’s an example:

sample

Beast Mode Writing

We have been reading Bud, Not Buddy (fantastic book; read it if you haven’t already) and writing in our Response Journals. The kids have been doing an ‘okay’ job, and I want to challenge them. So yesterday, I asked a few students if I could display their work to the class and we would talk about it. That’s when one student shouted out, “Put mine up.” I asked if I would be impressed (I tell them to impress me as a challenge). He assured me that his writing was ‘Beast Mode’.

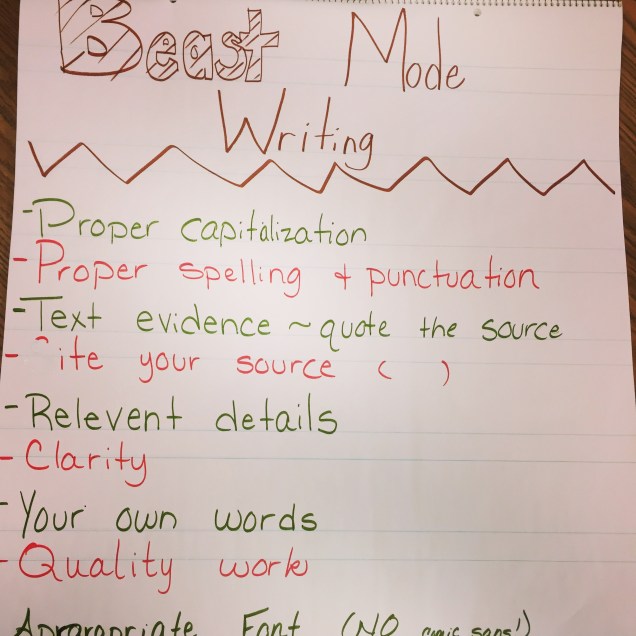
This is when I diverted from my lesson. I asked what would a ‘Beast Mode Writing’ look like. What attributes would it have? And so the class generated a list of what they thought ‘Beast Mode Writing’ would be (or to the rest of us, a quality writing piece).

And this is what they said:

img_4741

For a while now, I have struggled with Rubrics. On one hand, I like that the students know what is expected. On the other, I feel that some look at the least amount of work needed to pass and do just that. However, with this, it gives the students the highest standard, nothing else. This way, they will shoot for the best and nothing less. I like it! And it was student generated to boot! And yes, that includes the – Appropriate font (size and style). Okay, I had some influence on the ‘NO comic sans’ earlier this year.

FAIL

Remember that Mult/Div math paper I was sooooo excited about the other day? Well, it was an EPIC fail. Monday morning I introduced the paper to the class. They freaked out. Okay, that’s normal. It was new and unexpected. We walked through each part together…slowly. Oh. So. Slowly. They could almost handle the paper until…division! Yup, that killed ’em. And here is where the fail occurred. I was so excited, I didn’t worry about the 2 numbers they would be dividing. BIG mistake!

failCreative Commons 3 – CC BY-SA 3.0 NY – http://www.thebluediamondgallery.com/scrabble/f/fail.html

I don’t remember what the numbers were, but it was a HOT mess! They were over it, I was over it, and they were super confused – it didn’t divide evenly and decimals were needed. For 5th graders who forgot how to divide in most cases, it was too much. So last night I reflected. I needed to choose the numbers (not let the kids) at least for now.

Today I went into class and discussed how that was an EPIC failure. I got jazz hands. Yes, we celebrate failure in my class. I told them what I thought and how I think it could be fixed. Then I asked what they thought. They agreed, the numbers needed to be smaller. So we went through the paper in a slightly different manner. We chose the whole number first. THEN, we went to the tool box and created equations. From here, we were able to find a decimal (first number box) that we knew would divide evenly. We had to manipulate the number (multiply 1/10 or multiply by 1/100) to get our desired decimal, but it worked. And hey, they are getting extra practice with place value!

I am happy to report that things went much more smoothly today. They kids were still a little perplexed as to how to confidently divide, but that’s why we’re in school; to learn. They got to see me fail, which is always a bonus. And they saw how the reflection and iteration are a part of the failure process.

Multiplication & Division Basics

In the beginning of the school year, I created Place Value Basics. This was meant as a daily review to get students thinking quickly about some of the basics we learn. It was a big hit! My students went from doing it in 40 minutes (I know, but they needed the time) to around 8 minutes. Pretty good, right!?

Well, they had been bugging me to change it up. THIS is a good sign. So I came up with Multiplication and Division Basics. As some were still having a bit of trouble with Prime Factors, I kept in on this version.

Each year I teach this before Winter Break. Then after this, we head into fractions. Fractions take up all of the 2nd Trimester and by the time 3rd Trimester and the State Test roll around, students have forgotten how to multiply and (deep sigh here) divide. The problem is they have a shaky footing on these concepts before hitting fractions. I know, I’m the teacher… I should go with what they know and base lessons around them. Yes, in an ideal world that is happening. However, the pressure to do Benchmark Assessments and my district’s pacing (don’t get me started on that), and prepping them for the next grade are all too much for me – and them I suspect.

I have seen a great success with my students and the Place Value Basics. I am hoping that they can have the same success with this. How long will it take us in the beginning? Ugh, I hope not the 40 minutes! It’ll take us a while the first week or so, but in time they will successfully complete it in 8 minutes or less! Again, I will start off doing this whole class.

Which One Doesn’t Belong

Last year I was introduced to a great website called Which One Doesn’t Belong by my friend, Nancy Minicozzi. The site is full of visuals in which students must decide which of the 4 images doesn’t belong.

Looking at the following, which would you say doesn’t belong?

screen-shot-2016-10-04-at-7-10-38-pm

Based on your perception you may have said the heart because it is the only one that is NOT a polygon. Or perhaps you thought the star for the lack of the red outline. Possibly you were drawn to the green arrow as it is comprised of two different shapes. Or maybe it was the last shape because it lacked a color on the inside. No matter what you thought, you were right.

This is a fantastic, low-risk activity for students to participate in. I have done it a few different ways. I have had students study the image and then move to different parts of the room. While gathered there, they talk about why they chose the image they did. Other times I have used tools like Padlet for them to record their thoughts. No matter what method I use, they enjoy the activity.

This year I have 1 non-English speaker. At first, he was reluctant to participate, but now he regularly raises his hand to explain why he chose the image he did. I also have students moving from table to table because they can see how the different images don’t belong.

In addition to the low-risk appeal, I am able to teach my students how to have conversations. We begin sentences with, “I agree with…. because…”, or “I disagree with… because…”, or even better, “In addition to what … said…” Quality language, thought process, and communication skills that are being utilized daily.

Student ‘Ransomes’

This year I have been giving out a few ‘Ransomes’ each week. I know what you’re thinking, no I did not hijack personal objects from students and offer to return them in exchange for payment of Kit Kat minis (my totes faves!) No, Ransomes are little notes I leave for students like this one:

screen-shot-2016-10-03-at-8-03-17-pm

I do usually put their name on them as well.

I didn’t think much of the habit. I just thought it was cute and a nice way to send a positive message to my students. It wasn’t until Parent-Teacher Conferences last week that I realized how much they mean to the students. Sometimes it’s easy for us to overlook how much a simple gesture means to a child. One of my parents told me that the Ransome I had given her son had made his day. He was so proud of that note, he put it in his room at home. It was something that made his day and the mom’s day, too.

What I Do

Go to Ransomizer and type your message in the box provided. When you’re ready, select the ‘Ransomize’ button. You can customize the font, colors, etc. I then take a screenshot of the Ransome Note and place that in a Google Doc to print. I print 5 per week.

Give it a try. Your kids will love it and it’s a great way to connect with your students.