Today’s tip is all about creating your own Custom Theme in Google Slides. Whether you’re designing presentations for your classroom, professional meetings, or digital work for your classroom, custom themes ensure consistency, efficiency, and a polished final product. Let’s dive in!
Why Use a Custom Theme?
Custom themes offer several benefits:
Consistent design across all slides.
Easy to replicate layouts for multiple presentations.
Prevent accidental changes by students in classroom settings.
Save time with reusable templates.
Accessing the Theme Editor
Open a Google Slides presentation.
Go to Slide > Edit Theme.
This opens the Theme Editor, where you can customize layouts, fonts, and colors.
Customizing Fonts and Layouts
Select a layout from the left panel.
Click on any text element and change the font (e.g., Montserrat).
Changes will apply to all slides using that layout.
Pro Tip: Stick to 1-2 fonts for a clean, professional look.
Adding Design Elements to Layouts
Use shapes (e.g., circles, rectangles) for design consistency.
Customize with gradient backgrounds and border styles.
Duplicate shapes and align them for a cohesive layout.
Creating Print-Ready Templates
Choose a Blank Slide Layout.
Use shapes and lines to design specific templates (e.g., Freyer models).
Customize with placeholders for consistent structure.
Adding Placeholders
Placeholders define editable and non-editable areas:
Text Placeholder: Editable text areas for user input.
Text Box: Static text areas for instructions or headers.
To add a placeholder:
Go to Slide > Edit Theme.
Choose Insert Placeholder from the toolbar.
Adjust its position and size.
Creating a Student-Friendly Template
For classroom activities:
Lock instructional text and static design elements.
Create editable sections only where students need to type.
Use gridlines for models (e.g., area models).
Final Touches and Testing
Switch to the normal slide view. Select a slide from the left panel.
Test your template by adding a new slide.
Verify that only editable placeholders are modifiable.
Creating custom themes in Google Slides is an excellent way to save time, maintain consistency, and improve the quality of your presentations and worksheets. Explore text and image placeholders in upcoming videos!
If you found this guide helpful, don’t forget to check out my YouTube channelfor more tips. Happy designing, and see you soon!
Welcome! Today, we’re exploring a super practical tip for Google Slides: Custom Page Size. Did you know you can set your slides to 8.5 x 11 inches? This makes them perfect for worksheets, handouts, or any printable materials. Let’s dive into this step-by-step guide and make your slides print-ready!
Why Customize Page Size?
Google Slides defaults to a widescreen format (16:9 ratio). While this is great for digital presentations, it’s not ideal for printed materials. Customizing your page size ensures:
Full-page printouts without unnecessary white space.
Better scaling and alignment for worksheets and notes.
Professional-looking handouts.
Accessing Page Setup
Follow these simple steps to customize your page size:
Open your Google Slides presentation.
Go to File > Page Setup.
A dropdown menu will appear with default aspect ratios:
Widescreen (16:9)
Standard (4:3)
Widescreen (16:10)
Select Custom from the dropdown menu.
Setting Custom Dimensions
When you select Custom, you’ll see input boxes for dimensions. Here’s how to set it up:
Enter 8.5 x 11 inches (or reverse for landscape: 11 x 8.5).
Click Apply.
All your slides will now resize to match the new dimensions.
Note: The custom size applies to all slides in your presentation—you can’t mix different sizes in one slide deck.
Preview and Print
After customizing:
Review your slide content to ensure everything fits properly.
Go to File > Print Preview to see how it will look on paper.
Adjust text, images, and elements if needed.
Now, when you print, your content will fill the page without awkward white spaces!
Practical Uses for Custom Page Sizes
Custom slide sizes are perfect for:
Worksheets for classroom activities.
Printable newsletters or notes home.
Creative posters and flyers.
Customized certificates or templates.
Final Tips
Double-check alignment before printing.
Use high-resolution images for the best print quality.
Save your customized template for future use.
Customizing page size in Google Slides is a simple yet powerful tool. It eliminates printing frustrations and ensures your materials look polished and ready to go.
If you enjoyed this tip subscribe here or on my YouTube channelfor more Google Slides tricks. Happy designing, and see you next time!
In this quick tip, I’ll show you how to elevate your Google Presentations using the custom Word Art feature. Whether for school or professional use, you’ll learn how to add flair and make your slides stand out. Grab your devices, and let’s get started!
Getting Started with Word Art
Learn how to insert Word Art in Google Slides. Start by navigating to the “Insert” menu, selecting “Word Art,” and typing your text. Discover how to add line breaks by holding the Shift key and pressing Enter. With these simple steps, you’ll have the foundation for customized Word Art.
Customizing Fonts for a Unique Look
Breathe life into your Word Art by changing fonts. Explore Google’s font library to find styles that suit your presentation. From fun fonts like “Henny Penny” to more professional options, you’ll find endless possibilities to match your style.
Adding Color and Gradients
Use the fill color and gradient options to make your word art pop. Choose from solid colors, pre-designed gradients, or radial effects for a dynamic look.
Enhancing with Borders
Adjust the border color, weight, and style to add pizzazz to your word art. Experiment with solid, dashed, or dotted lines. While bold outlines can add fun, consider the context—subtle solid lines are better for professional settings, while dots and dashes are perfect for “Worst Preso Ever“.
Resizing and Maintaining Proportions
Easily adjust the size of your Word Art using the blue drag handles. For proportional resizing, hold the Shift key while dragging from the corners. This ensures your design stays balanced and visually appealing.
Adding Shadows and Reflections
Use formatting options to create drop shadows and reflections for depth. Customize shadow blur, distance, and color for the perfect effect. Reflections can also be adjusted for opacity and distance, adding a polished finish.
Accessibility Tips
Make your presentations inclusive by adding alternate text to Word Art. This step ensures screen readers can describe your visuals for visually impaired viewers, improving accessibility.
Wrap-Up and Next Steps
With just a few steps, your slides can go from plain to standout using Word Art. Experiment with these features and let your creativity shine. If you enjoyed this guide, subscribe for more tips and tricks delivered to your inbox!
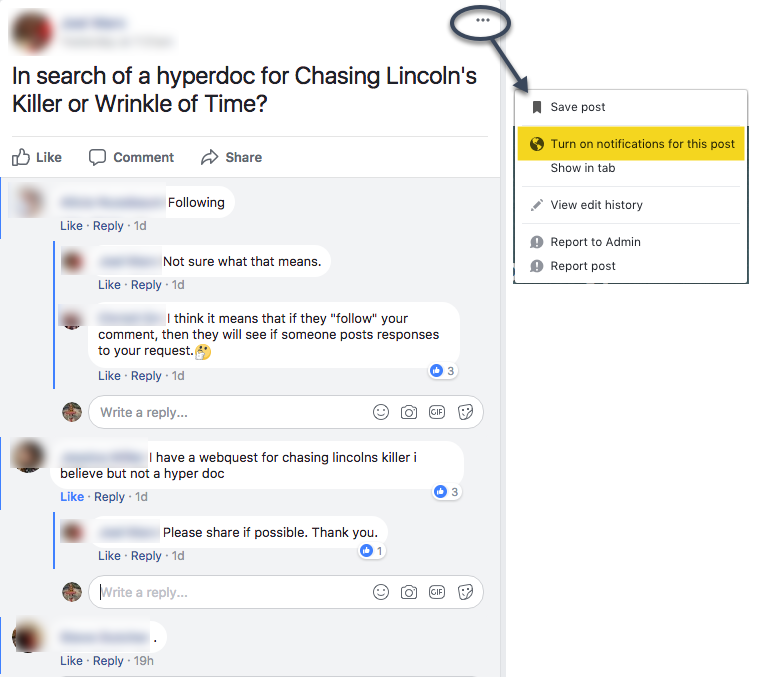
Many of us use a variety of social media outlets to collaborate, collect information and new ideas, and learn. One that I am using more and more is Facebook. There are several great groups to be a part of there. However, one thing that drives me batty is the ‘follow’ or ‘.’ in a thread. I understand why it’s done – to get the information when someone posts – but am still driven crazy by it.
Facebook allows you to ‘turn on notifications’ on a post without all the ‘follow’ in a thread. By turning on the notifications, you will receive all the comments without cluttering the thread with ‘follow’ or ‘.’. And it’s easy to do!
In a post, click on the three dots that appear in the right corner of the post. One of the options will be ‘turn on notifications’. That’s it!
There are a few additional tips that can make creating a site that much easier. I know, it’s hard to believe that Google has tricks that can make an already easy tool, easier.
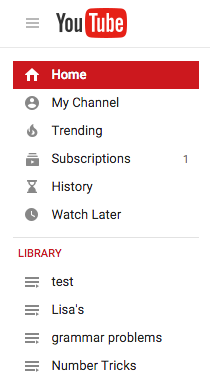
I’m a huge fan of YouTube, but then again who isn’t? One of my favorite features is the ability to create Playlists. These are a collection of videos of your choice. For example, I have a playlist for grammar to help students who are struggling with various grammar issues.
In YouTube, on the left side is my menu. The second section shows my ‘Library’ (aka playlists). creating them is SUPER easy!
When I find a video I like, I add it to (or create a new) playlist. The ‘Add to’ choice appears just below the video.
If you are creating a new playlist, you will have the option to have it ‘Public’ (open for anyone to find), ‘Unlisted’ (other can view if they have the link), or ‘Private’ (must be shared directly with others).
After you name your playlist, select ‘Create’. Viola! You now have started your playlist collection
I have heard several comment that it is hard for them to find items in their Drive. What many are forgetting is that Drive has powerful search options.
In Google Drive there is a ‘Search Drive’ option at the top. You can type in key words such as the title or known keywords in the item you are looking for. I did a search for ‘puppy’. I know I don’t have anything named that, but I wanted to see which items had ‘puppy’ mentioned. This is what I got:
None of the items are named ‘puppy’. So I wondered what ‘Rabbit’ had to do with puppy. So I went into the Spreadsheet, did a quick search (control + f on PC, or command + f on Mac) and this is what I found. Puppy is mentioned throughout the Spreadsheet.
I can also narrow my search by file type, opens with, or ownership. Choose the small arrow to the right on the Search Drive bar. So if I know the item I am looking for is in a Spreadsheet, I’d choose ‘opens with’ and select spreadsheet.
This should make searching for your items a bit easier. Happy Searching!
I love when my students want to improve their work. One way in which they have been doing this is by using Bibme‘s Score your Essay option. In short, you paste in your essay and the program grades it on several points – for FREE! Not only does it score it, but tells you what you can do to make it better. The results appear quickly: And even though my essay scored a 5 of 5 in Organization, it still gave me a suggestion. Love that! And at the end, it gives you a final score. Is it perfect? No, but it is pretty great. And FREE, did I already mention that? Give it a try.