Winter Break Activities

This week I started my Winter Break. A glorious 3 weeks off from school. That also means that the students will most likely have 3 weeks off from practicing any of their skills, including reading. The no reading thing makes me sad. In an effort to combat the ‘Winter Break Slide’ (very similar to the Summer Slide) our principal requested that we give homework. As I am not a fan of homework, I designed a Winter Break Activities sheet.

2016-winter-break-activities-1

Since the students only need to choose 3 activities, it gives them some ownership and flexibility. I also tried to make them a bit more interesting as well as non-tech friendly. However, I think my favorite part is the Kindness Calendar. The calendar is ‘homework’ that everyone can agree on.

2016-winter-break-activities-2

One student noted that many items were ‘chores’. I told her it was my present to the parents!

Lesser Known Geo Tools

It’s no secret that I LOVE Google My Maps and incorporating them into lessons. Whether it’s to have students document their learning like in the Pre-Columbian People’s lesson, or a self-guided lesson on Marco Polo (with additional tasks to show understanding); My Maps are the bee’s knees for me! But there are some insanely cool, yet lesser known, Geo Tools out there?

Smarty Pins – This fun game combines screen-shot-2016-11-15-at-6-31-27-pmtrivia and location skills. Players are given a trivia question, which correlates to a place in the world, that they then must place Peg Man on the map. This game was developed by Google. The closer you are to the location, and faster you are, the more ‘miles’ you earn. You are given 1000 miles to start the game. However, if you are not accurate you lose ‘miles’. So if your answer is 149 miles away, that’s how many ‘miles’ or points you lose. Once you are out of ‘miles’ the games ends.

GeoGuessr –screen-shot-2016-11-15-at-6-30-03-pm This is a super fun, highly addictive game (if you’re a nerd like me!). There are 2 modes and several GeoGuessr Maps to choose from. When you arrive on the site, the first game is ‘Explore the World’. Using Google Maps Street View, you are dropped in a location. Using clues (signs, vegetation, cars, etc.) you need to place a pin on the map as to the location of where you are. Scrolling a bit further down on the page, there are several maps focusing on countries, cities, and continents. I clicked on ‘North America’ where game maps for Canada and United States, along with some cities, appeared. You can set a timer for minutes and seconds. I mentioned a second mode: Challenge. This is where you can challenge a friend.

GeoSettr – This is similar to GeoGuessr, but YOU create your own GeoGuessr game. You start by dropping Peg Man in a location on the map on the left, zoom in as far as needed to find your desired location. You can see the view your players will see on the right screen. Then, set the pin for that round. You have 5 rounds. Once you have completed your GeoSettr, the game will give you a unique URL to share. You can check out mine. This could be fun for 5th Grade States and state capitals.

screen-shot-2016-11-15-at-6-29-03-pm

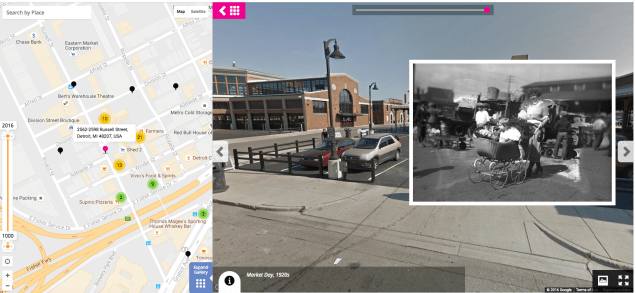
History Pin – This is a new one for me. This combines my love of historical (or family shared) photos with maps. I have only browsed some collections and was in nerd heaven! Again, using Google Maps and Google Maps Street View you are shown the Street View image of what the location looks like today with an insert of a photo, or image, from the past. Check out this example from Eastern Market in Detroit, MI.

screen-shot-2016-11-15-at-6-19-04-pm

Tour Builder – One of my all time favorites. This lets you create your own map story. The story is a bit more linear than using regular Google Maps. You choose all destinations in the order you want. You can add text, photos, and videos. Here’s a quick ‘Cheat Sheet‘ I created to help get you started.

screen-shot-2016-11-15-at-6-25-54-pm

Google Docs: Emojis

Last week, my students were writing an essay in their Google Docs. In the middle of writing, one student asked, “Hey, Ms. N., did you know you can insert emojis in docs?”

I was surprised and answered, “Wait, what? No? Really? Cool. Show me how.” So I went over to her table and she showed me. Pretty cool!emoji-1

So how’d she do it?

Start by going to ‘Insert’ in the menu options

emoji-2

emoji-3

emoji-4

emoji-5

Choose the desired emoji and viola! You have an emoji in your doc. Now, what if we had students summarizing stories with just emojis?!

Thank you to my student, Johanna, for spreading her knowledge!


Explain Your Answer

Shifts in Math

2000px-math-svgOne of the bigger shifts in math, aside from the building blocks in the CCSS Framework, is the ever dreaded ‘Explain your answer’. When this first came out, I wasn’t sure what they meant, the frameworks hadn’t been written yet. I had students explaining that they ‘added the ones then regrouped to get the answer.’ And while they were technically correct, there was a lot missing.

Better Understanding

Now, I have a better understanding of what is needed. The students need to break down each step and explain, using academic language, what their thought process is. I furthered my understanding when I went to a training on this. Honestly, it wasn’t the best training, but it got me thinking. I used some of the techniques to create a better lesson.

The Lesson

First, I created a template that the students were going to be using. Then, as a group, we walked through each part of the template and filled it in. There was  A LOT of guidance this first time. I’m hoping with practice, they will become more independent. Students worked in table groups to solve their table problem. Finally, they were to film their process of solving the problem. Using their ‘scripts’ students explained the process for division. Here’s an example:

sample

Ninja Selfies

screen-shot-2016-10-16-at-6-31-33-pmLate last week we had CELDT testing for some students. This meant that I had several students who were NOT being tested. This meant that I really couldn’t start something new as too many students would be out. Okay, so what to do? Well, make Ninja Selfies of course!

Taking a page out of Tracy Walker‘s book, I had my students create Ninjas. My partner in crime, – in podcast crime – Nancy Minicozzi, created a tutorial on how we created our Ninjas as our logo for T.L.C. – Tech. Learn. Coffee podcast. It was a BIG hit.

It was not only fun, but they learned a trick or two. Check out their creations. I had 2 classes do this. And with their permission here are their Ninjas:


Beast Mode Writing

We have been reading Bud, Not Buddy (fantastic book; read it if you haven’t already) and writing in our Response Journals. The kids have been doing an ‘okay’ job, and I want to challenge them. So yesterday, I asked a few students if I could display their work to the class and we would talk about it. That’s when one student shouted out, “Put mine up.” I asked if I would be impressed (I tell them to impress me as a challenge). He assured me that his writing was ‘Beast Mode’.

This is when I diverted from my lesson. I asked what would a ‘Beast Mode Writing’ look like. What attributes would it have? And so the class generated a list of what they thought ‘Beast Mode Writing’ would be (or to the rest of us, a quality writing piece).

And this is what they said:

img_4741

For a while now, I have struggled with Rubrics. On one hand, I like that the students know what is expected. On the other, I feel that some look at the least amount of work needed to pass and do just that. However, with this, it gives the students the highest standard, nothing else. This way, they will shoot for the best and nothing less. I like it! And it was student generated to boot! And yes, that includes the – Appropriate font (size and style). Okay, I had some influence on the ‘NO comic sans’ earlier this year.

FAIL

Remember that Mult/Div math paper I was sooooo excited about the other day? Well, it was an EPIC fail. Monday morning I introduced the paper to the class. They freaked out. Okay, that’s normal. It was new and unexpected. We walked through each part together…slowly. Oh. So. Slowly. They could almost handle the paper until…division! Yup, that killed ’em. And here is where the fail occurred. I was so excited, I didn’t worry about the 2 numbers they would be dividing. BIG mistake!

failCreative Commons 3 – CC BY-SA 3.0 NY – http://www.thebluediamondgallery.com/scrabble/f/fail.html

I don’t remember what the numbers were, but it was a HOT mess! They were over it, I was over it, and they were super confused – it didn’t divide evenly and decimals were needed. For 5th graders who forgot how to divide in most cases, it was too much. So last night I reflected. I needed to choose the numbers (not let the kids) at least for now.

Today I went into class and discussed how that was an EPIC failure. I got jazz hands. Yes, we celebrate failure in my class. I told them what I thought and how I think it could be fixed. Then I asked what they thought. They agreed, the numbers needed to be smaller. So we went through the paper in a slightly different manner. We chose the whole number first. THEN, we went to the tool box and created equations. From here, we were able to find a decimal (first number box) that we knew would divide evenly. We had to manipulate the number (multiply 1/10 or multiply by 1/100) to get our desired decimal, but it worked. And hey, they are getting extra practice with place value!

I am happy to report that things went much more smoothly today. They kids were still a little perplexed as to how to confidently divide, but that’s why we’re in school; to learn. They got to see me fail, which is always a bonus. And they saw how the reflection and iteration are a part of the failure process.

Multiplication & Division Basics

In the beginning of the school year, I created Place Value Basics. This was meant as a daily review to get students thinking quickly about some of the basics we learn. It was a big hit! My students went from doing it in 40 minutes (I know, but they needed the time) to around 8 minutes. Pretty good, right!?

Well, they had been bugging me to change it up. THIS is a good sign. So I came up with Multiplication and Division Basics. As some were still having a bit of trouble with Prime Factors, I kept in on this version.

Each year I teach this before Winter Break. Then after this, we head into fractions. Fractions take up all of the 2nd Trimester and by the time 3rd Trimester and the State Test roll around, students have forgotten how to multiply and (deep sigh here) divide. The problem is they have a shaky footing on these concepts before hitting fractions. I know, I’m the teacher… I should go with what they know and base lessons around them. Yes, in an ideal world that is happening. However, the pressure to do Benchmark Assessments and my district’s pacing (don’t get me started on that), and prepping them for the next grade are all too much for me – and them I suspect.

I have seen a great success with my students and the Place Value Basics. I am hoping that they can have the same success with this. How long will it take us in the beginning? Ugh, I hope not the 40 minutes! It’ll take us a while the first week or so, but in time they will successfully complete it in 8 minutes or less! Again, I will start off doing this whole class.

Which One Doesn’t Belong

Last year I was introduced to a great website called Which One Doesn’t Belong by my friend, Nancy Minicozzi. The site is full of visuals in which students must decide which of the 4 images doesn’t belong.

Looking at the following, which would you say doesn’t belong?

screen-shot-2016-10-04-at-7-10-38-pm

Based on your perception you may have said the heart because it is the only one that is NOT a polygon. Or perhaps you thought the star for the lack of the red outline. Possibly you were drawn to the green arrow as it is comprised of two different shapes. Or maybe it was the last shape because it lacked a color on the inside. No matter what you thought, you were right.

This is a fantastic, low-risk activity for students to participate in. I have done it a few different ways. I have had students study the image and then move to different parts of the room. While gathered there, they talk about why they chose the image they did. Other times I have used tools like Padlet for them to record their thoughts. No matter what method I use, they enjoy the activity.

This year I have 1 non-English speaker. At first, he was reluctant to participate, but now he regularly raises his hand to explain why he chose the image he did. I also have students moving from table to table because they can see how the different images don’t belong.

In addition to the low-risk appeal, I am able to teach my students how to have conversations. We begin sentences with, “I agree with…. because…”, or “I disagree with… because…”, or even better, “In addition to what … said…” Quality language, thought process, and communication skills that are being utilized daily.

Student ‘Ransomes’

This year I have been giving out a few ‘Ransomes’ each week. I know what you’re thinking, no I did not hijack personal objects from students and offer to return them in exchange for payment of Kit Kat minis (my totes faves!) No, Ransomes are little notes I leave for students like this one:

screen-shot-2016-10-03-at-8-03-17-pm

I do usually put their name on them as well.

I didn’t think much of the habit. I just thought it was cute and a nice way to send a positive message to my students. It wasn’t until Parent-Teacher Conferences last week that I realized how much they mean to the students. Sometimes it’s easy for us to overlook how much a simple gesture means to a child. One of my parents told me that the Ransome I had given her son had made his day. He was so proud of that note, he put it in his room at home. It was something that made his day and the mom’s day, too.

What I Do

Go to Ransomizer and type your message in the box provided. When you’re ready, select the ‘Ransomize’ button. You can customize the font, colors, etc. I then take a screenshot of the Ransome Note and place that in a Google Doc to print. I print 5 per week.

Give it a try. Your kids will love it and it’s a great way to connect with your students.