EasyBib Add-On

I think I’m in LOVE! Yes, I love the EasyBib Bibliography Creator in Google Docs (via Add-Ons). Back in the day when I went to school and wrote reports – only a few short years ago – I had to look up how to cite my sources in a book. Today, all you have to do is type a few bits of information, and the citation is created for you! See, you’re falling in love too, aren’t you?

My 5th graders have no idea how easy they have it. Here’s how it works:

Easy bib1

Easy Bib 2

Easy Bib 3

Easy Bib 4

Easy Bib 5

Easy Bib 6

Easy Bib 7Easy Bib 8

And in case you were wondering, it does save as you work. My 5th graders have been working on their State Reports for a few weeks. As they find resources, they add it to the EasyBib. When they are ready to add it to their Doc, it’s all there for them ready to insert. Pretty cool, huh?

Sharing Your Google Calendar


Calendar 1


You can either make the calendar public, share with everyone in your GAfE domain, or with specific people. Sharing with the public or in your GAfE domain allows you to set event details: ‘See all event details’ or ‘See only free/busy (hide details).

Calendar 2


Sharing with specific people will allow you to give different permissions: ‘Make changes AND manage sharing’, ‘Make changes to events’, ‘See all event details’, and ‘See only free/busy (hide details).

Calendar 3

Google Presentation Background

So, say you like a particular Theme in Google Presentation, but not the color. Well, that is an easy fix!

1. Choose the desired Theme. For this example, I chose ‘Label’.

pic 1


2. Just above the slide, there is a toolbar. One of the options is ‘background’. (NOTE: be sure that the slide is selected – on left – NOT a space on the actual slide, otherwise you will not be able to see this option.)

pic 2


3. A pop-out window will appear. This is where you can select a new color.

pic 3


4. Select ‘Apply to all’ in order to have a uniform looking presentation. Then select the blue ‘Done’ button, and viola you have customized the Presentation Theme.

pic 4


pic 5

Delete Calendar

Throughout the years, I have created a few different Calendars. This can become cumbersome, and I find the need to delete a Calendar from time to time. Here’s how to delete a Calendar:

From your Calendar page, locate the calendar you wish to delete. Your calendars are located under ‘My Calendars’. If you don’t see any, choose the arrow to the LEFT of ‘My Calendars’. All your calendars will be listed here. Once you have located the Calendar to be deleted, select the arrow to the right of desired calendar, and choose ‘Calendar Settings’.

pic 1


pic 2


You will be taken to a new page. Near the bottom of the page, you will see ‘Delete Calendar’ and ‘Permanently Delete This Calendar’

pic 3


Once you select the blue link ‘Permanently Delete This Calendar’, a pop out window will appear. It will ask if you want to Delete the calendar. Select ‘Yes’, then choose ‘Delete for Everyone’. Once you do that, the Calendar is deleted and will no longer appear the ‘My Calendars’ list.

pic 4

Insert Calendar Into Site

Recently I was asked if you could insert a SECOND calendar into a Google Site. The answer is YES!

Create a New Calendar

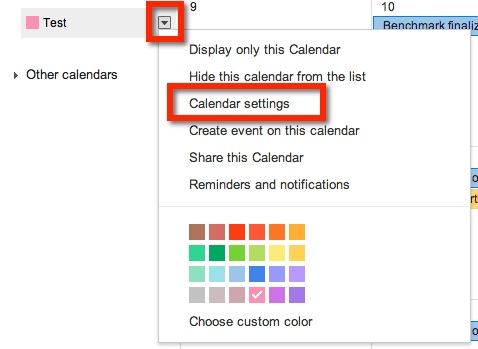
The process is simple. First, CREATE the new calendar. Make sure that the calendar is created in the same account that the Site is associated with. Choosing the arrow to the right of ‘My Calendars’ will give you the option to create a new calendar.

pic 1

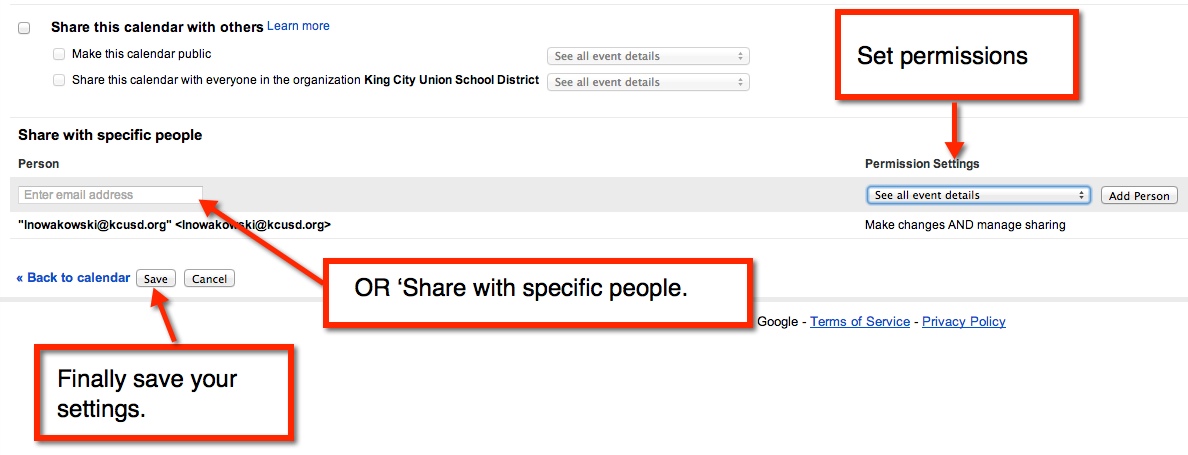
This will take you to a new page where you will name your new calendar (1.). If you would like your calendar public, which you probably do if it’s on a website, be sure to choose the  “Share with Others’ then ‘Make This Calendar Public’ options on the page (2.). Once you have set up your calendar, remember to ‘Create Calendar’ (3.).

pic 2

Your new calendar will now appear under ‘My Calendars’ on your Google Calendars Page.

pic 3

Now you are ready to insert information on your new calendar.

Insert New Calendar Into Google Site

Locate the Site and Page you would like to insert your new calendar. Enter ‘Edit Mode’ on the Site – choose the pencil icon at the top right of the page (or press e on the keyboard).

pic 4

This will then bring up editing options. Find ‘Insert’, then ‘Calendar’.

Pic 5

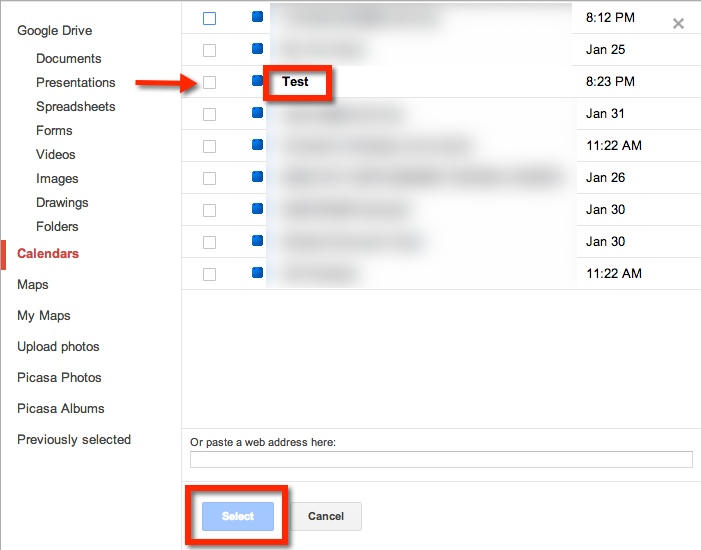
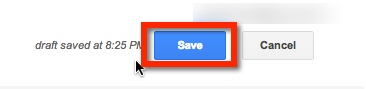
A new window will appear, choose the desired Calendar. Then, choose the blue ‘Select’ button. From here, a new screen will pop up. This will allow you to set the properties of the calendar on your Site. Remember to choose the red ‘Save’ button when you are done.

pic 6

pic 7

Now that you have inserted your new calendar, remember to ‘Save’ the page (located at the top right of the page). You will now see your new calendar.

pic 8

Form Letter in GMail

I like to stay in contact with my students’ parents. One way in which I do so is through a weekly email. Each Thursday I send home an email updating the parents on what we have been learning, what we will be learning, and any important dates or events that are coming up.

The Problem:

How do I create a form that I can use week after week? I like to have the subheadings ‘pop’ with color. I didn’t want to have to rewrite the ‘Update’ weekly, nor did I want to copy and paste the previous week’s ‘Update’ for 36 weeks.

The Solution:

Canned Response! I created the first ‘Update’ email, and saved it as a Canned Response template. Now when I send out my ‘Update’, I simply insert the ‘Weekly Update’ Canned Response template. It’s so simple.

How:

Canned Response can be found on the bottom of an email draft – 1 (bottom right, small arrow). Once it’s chosen, additional choices can be made. Choose – 2–  ‘Canned Response’. From here, you can: ‘Save a Canned Response’ (save to use in the future, like I did with my ‘Update’), ‘Insert a Canned Response’ (like I do each Thursday), or ‘Delete a Canned Response’.

Canned Response

Comment in Google

Another feature that allows for easy collaboration in Google Documents is the ‘Comment Feature’. This feature allows me to highlight a particular text and comment on it, for clarification or questions. It’s really very easy.

First, highlight the desired text (can be a word, phrase, sentence).

pic 0

Now you can add your comment. There are 4 ways in which to access the ‘Comment Feature’:

1.  From the Tool Bar iconPic 1


2. ‘Insert’ option on Tool Bar

3. Keyboard Shortcut


Pic 2


4. Gray Comments button next to Share button on top right.

pic 5


A yellow comment box will appear to the  right of the document. This is where you will type your comment.

pic 6


If more than one comment is on the document, and you are unsure of which comment goes to which highlight, simply click on either the comment or the highlighted section. If the highlighted text is chosen, then the comment will ‘pop up’ and show in the yellow box. If the comment is chosen, the highlighted text will become a darker yellow.

When you have finished making your comment, be sure to chose the blue comment button.

Screen Shot 2014-01-29 at 8.02.48 PM

Clean Up Your Bookmark Bar

I love having my Bookmark Bar. It has many websites ready to go at the click of a mouse. However, I hate that it also provides the name of the site. Sites like Twitter and Facebook have recognizable favicons (those handy little pictures that appear on tabs and in the Bookmark Bar).

I recently learned that I could get rid of the names and just leave the favicons on Chrome. Here’s how…

pic 1


pic 2


pic 3


pic 4


pic 5