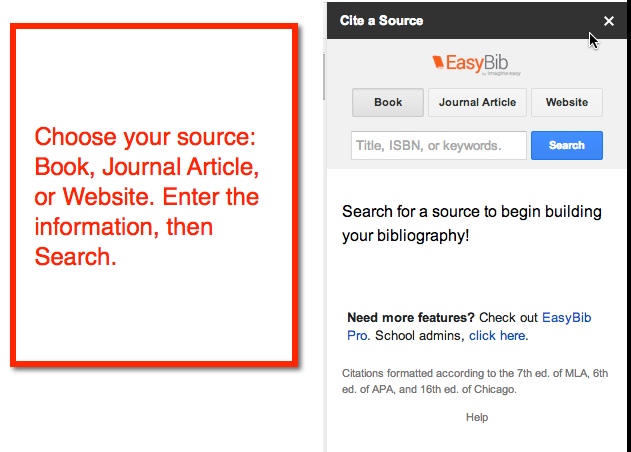
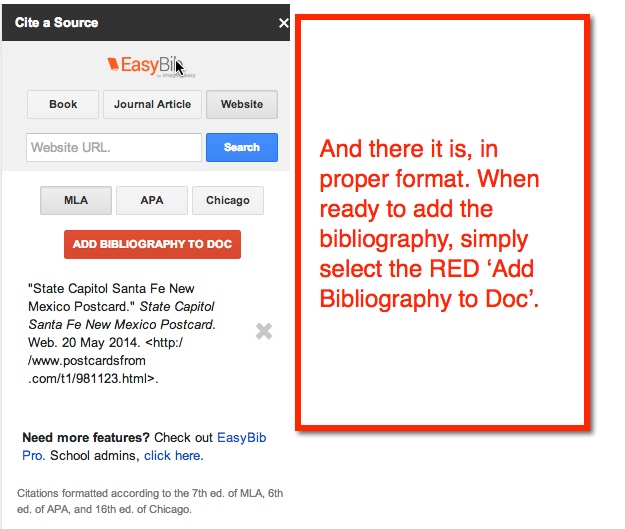
I think I’m in LOVE! Yes, I love the EasyBib Bibliography Creator in Google Docs (via Add-Ons). Back in the day when I went to school and wrote reports – only a few short years ago – I had to look up how to cite my sources in a book. Today, all you have to do is type a few bits of information, and the citation is created for you! See, you’re falling in love too, aren’t you?
My 5th graders have no idea how easy they have it. Here’s how it works:
And in case you were wondering, it does save as you work. My 5th graders have been working on their State Reports for a few weeks. As they find resources, they add it to the EasyBib. When they are ready to add it to their Doc, it’s all there for them ready to insert. Pretty cool, huh?
The other day I had an awesome lesson planned teaching coordinates. I was going to use geoboards (NOTE: I found the plan at Howard County Public Schools Wiki). While I was teaching the lesson, one of my more creative thinkers modified it and made it into a game. Yesterday, the student tried to explain the game to me. I’ll admit, I didn’t get it. After completing an assigned task on coordinates, he drug out two geoboards and showed another student how to play. Okay, they’re learning and focusing on the standard. Today, the same students begs me to show the class his game. I, of course, agree.
I’ll admit, I still don’t totally understand it, but I let him explain it to the rest of the class. Apparently, it’s just me. Everyone else seemed to understand what to do. So here’s how it goes…
Both players have geoboards and create a shape on their boards. Then each player tries to guess the coordinates of the shape – Battleship style. Now this is where I get confused. The player is to remember where they had a ‘hit’. If the player gets a ‘hit’ they get another turn. When a player has found all points, the rubber band is lost to the opposing player.
I got lost at ‘you just remember where you had a ‘hit”. Well, the students seemed to be up for it. As they played, they each modified it to fit their own needs. I, for one, used cubes to mark my ‘hits’. while others plotted them out on graph paper. And don’t even get me started on the intricate designs some of them came up with! All in all, a good time was had by all, and my creative student felt like a ROCKSTAR!
Accelerated Reader (AR) seems to be all the rage in my district. All the elementary schools use it, and have for quite some time. Many teachers seem to be huge supporters of it, too. I however, have never been a big fan of AR. I will admit that my bias comes from personal experience rather than that of a pedagogical reason. I have never banned my students from using it, but never really pushed it either.
Their website states: “At its heart, AR is simple. Students read a book, take an AR Quiz, and get immediate feedback. Kids get excited and motivated when they see their progress.”
This lead me to wonder why my students aren’t taking AR tests. They read 30 min each day – a book of their choice. They read an additional 20 pages each night – a book of their choice. They are reading, and talking about what they are reading! So why aren’t they taking the tests at the end? They can earn prizes once they reach certain percent of their overall goal. What was the problem?
The Discussion
I truly did want to find out why the students weren’t taking the tests. So I sat down with them and had an open discussion with them. At first they were reluctant to answer, but once they got started, their answers blew me away! 10 year olds are way smarter than we give them credit for. They were so mature about the subject, I recorded their answers. Here’s a small sampling:
“I don’t think there’s any purpose in taking an AR tests because I read books to enjoy them, not take tests on them.”
“When I finish reading a book, I just don’t do the AR quizzes because I want to get to the next one [book] really fast so I can continue reading.”
“There’s no purpose for me, because I want to get to the next book fast. And anyway, what’s the point of getting a prize? … We don’t really need a prize.”
“…They’re giving you prizes just to make you read…”
“Instead of making us read, we should read because we want to.”
“We should be reading for the joy of books, not for prizes.”
“They need a wider variety of different genres of books.”
“The books I do have, are not AR books.”
“I just like to enjoy a book.”
What Have I Learned?
1 -My students are way smarter than I ever gave them credit for.
2 -By the age of 10, kids have figured out that AR is a scam.
3 -AR has NOT instilled a love of reading.
4 -Students gained a love of reading on their own, sans prizes!
5 -AR books and genres can be too limiting for some students.
6 -My students do not see eye to eye with the AR website. Clearly they are neither motivated nor excited by the AR quizzes.
Other Thoughts
Some students live for competition. Some students love the bragging rights they get when they have read the most (percentage) in the school. Some students enjoy receiving the prizes, although I would venture to say this is a greater motivator in the younger grades than upper. The idea that we are monitoring student comprehension is a good one, I’m not sure AR is the answer.
At the beginning of the year, I was having students create ‘Book Projects‘ when they finished reading a book. I soon became overwhelmed. I’m thinking I need to revisit this idea and rework it so that it works for me too. I had some great work produced by the students. It was more meaningful, and the students really got into it.
Recently a friend and I were talking about some of our district meetings, some of which are the occasional ‘Tech’ meetings. We have tried the ‘Cafeteria’ style, where teachers choose from a list of presenters & presentations/workshops. It’s worked ‘okay’, but not great. And as my friend and I were talking, we got around to all the different things that my students do in class. She then suggested having students give some of the presentations/workshops!
I know, she’s brilliant! Now many would be skeptical of the idea of having 5th graders presenting to a group of adults. I will admit that, while I thought it was brilliant, I had my doubts that my students would be open to the idea. To my surprise, they were on-board. Many of them asked when the meeting is, and what they should present! Two girls want to show off their knowledge of ‘Animoto’, another boy wants to do a whole presentation on using iMovie from an iPhone (via Reflector – his idea), and a few others that want to present, just not sure on what. My students are FEARLESS and amazing!
After school I was talking to another teacher about the idea and my students’ responses. She also felt that it was an awesome idea. She pointed out that many teachers don’t think students can do what they have seen in the (past) presentations/workshops. She went on to state how powerful the experience could be for the students and the teachers. Teachers would not only see that students COULD do it, but have a deep understanding of the different tools or apps being used, and how these tools can be used to show their knowledge in different subjects. And the students would shine, gain confidence, and experience something so HUGE at such a young age.
I can’t wait to see how this ends, or should I say begins (let’s hope this is the beginning of something great)! I’m so excited. I will definitely be blogging about their success in about a month! Stay tuned.
If you have been to a Google Summit or other Googley type event, you have most likely witnessed a Demo Slam. For those of you who have not, a Demo Slam is where a presenter (anyone really) is given 3 minutes to show off their coolest, geekiest, most interesting tech ‘thing’. I have seen Demo Slams on tricks in YouTube, useful Chrome Extensions, tools in Google Docs, and Google Easter Eggs.
I began doing Demo Slams in my classroom. It began as a way to teach my students some simple tricks to help them in class. For example, I showed them ‘Build With Chrome‘, how to search images with reuse policies, and a few Chrome Extensions. It was a success from the beginning.
My story doesn’t end here. Not to be outdone, my students begged to begin doing them. You see, they like to ‘Out Geek’ me. They have each made it their mission to find a trick or two that I don’t know about. And yes, they have taught me so much! Of course I was thrilled that they wanted to do slams. So now I have a sign up sheet in my class. They can sign up for a slam anytime they want. I also have official time keepers. I just sit back watch, and learn new things from them.
One of the biggest successes came with ‘Build With Chrome‘. I briefly showed the tool, and as always encouraged them to explore it more on their own. I have a student who loves Minecraft, Legos, and creating, but is not big on getting up in front of the class and presenting. He took the idea and ran with it. He signed up for his own account, showed others what could be done with it, and ASKED if he could do a Demo Slam on it!
So pleased with their initiative, I have offered to share out the Demo Slams with other teachers. Recently, 2 girls went to a second grade classroom to show them a few keyboard shortcuts. I had 2 boys read about Anne Frank, and give a Demo Slam about what they read. Yeah, we decided Demo Slams don’t have to be tech related. It’s a HUGE success with my students. They are confident, learn from their mistakes, take chances, and freely share their knowledge. What more could a teacher ask for?
Today began our Second Trimester Benchmark Assessments. Fortunately, I am in a 1:1 Chromebook classroom. This means that my students are able to take the assessment online. My students work online daily, so this is no big deal – or so I thought.
The students had 1 open ended question to answer. As I was checking them, I noticed that two boys, who sat next to each other, had the same wording for their answer. My immediate thought was, “Oh great, they cheated.” That wasn’t really the case.
When I spoke with them, I asked why they both had the same answer. One boy, honestly answered, “We were helping each other.”
And that’s when it hit me. With or without Common Core, we still have a disconnect between how students learn, and how we ‘record’ their knowledge.
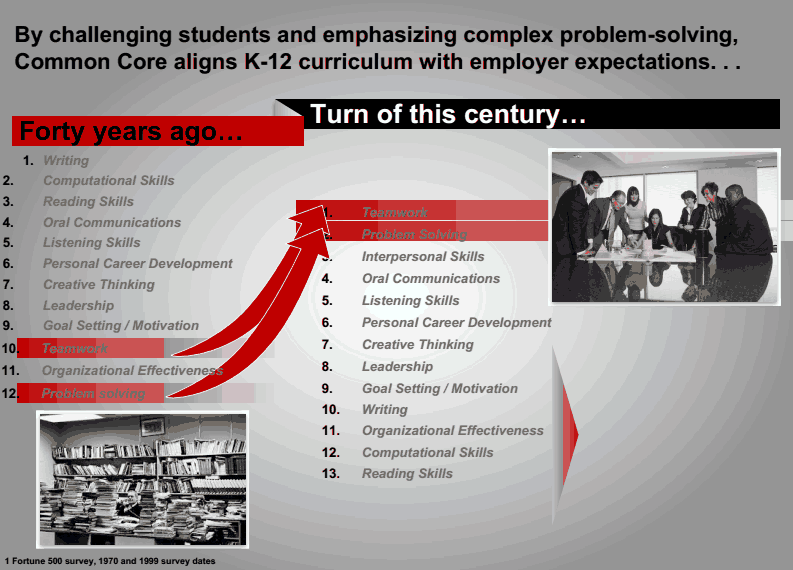
Common Core has students working and collaborating together. Common Core encourages students to problem solve in groups, using technology to assist them.
And then what do we do? We (not just my district) then decide that in order to show us their knowledge, they are to take a test, on their own – in isolation. I’m sure I’m not the only one that sees this disconnect.
How is it that we expect ALL students to do well when we teach, and they learn, in one way; then have them take a test in isolation? No wonder my students thought nothing of helping each other on the Benchmark Assessment, it’s what they do daily.
Here’s a crazy idea: Let’s ditch the tests altogether. Yup, class tests, district assessments, state, national, PARCC, and SBAC. As a nation we need to focus on learning, problem solving skills, collaboration, and teamwork. THESE are the skills that employers are looking for, not can someone take a test on their own.
Credit: Dr. Beverly Young, Assistant Vice Chancellor, Academic #ccttcd2014
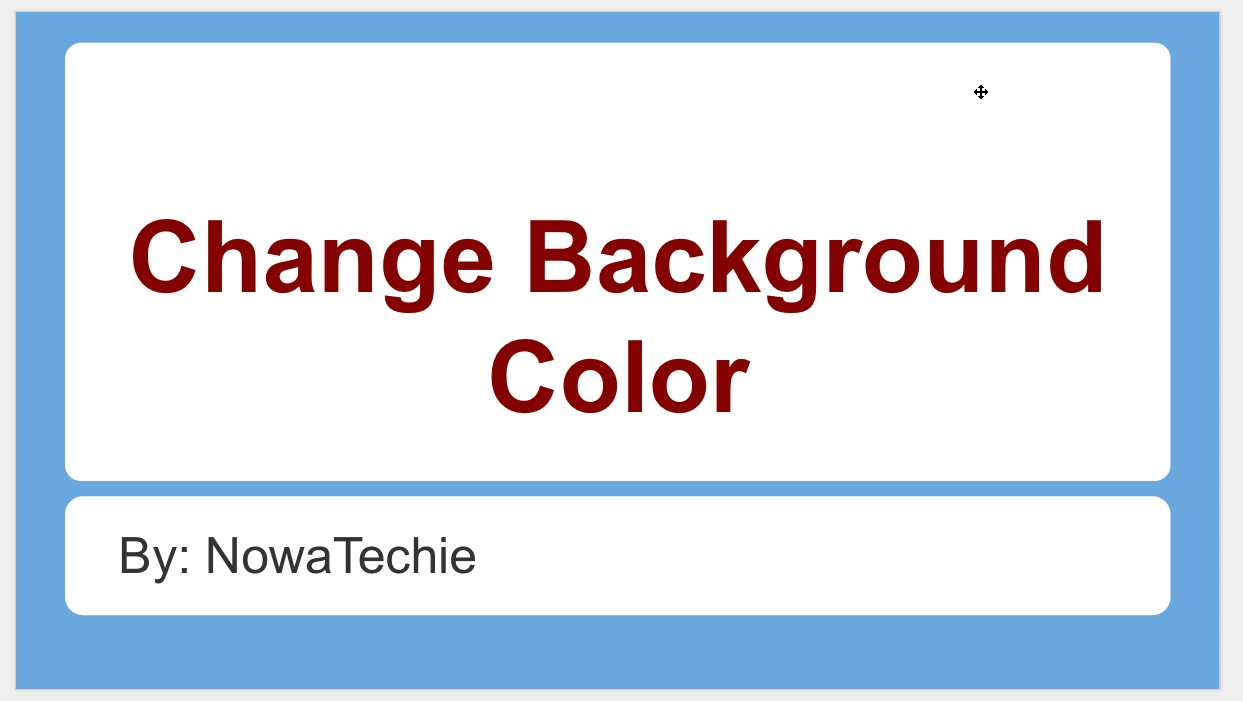
So, say you like a particular Theme in Google Presentation, but not the color. Well, that is an easy fix!
1. Choose the desired Theme. For this example, I chose ‘Label’.
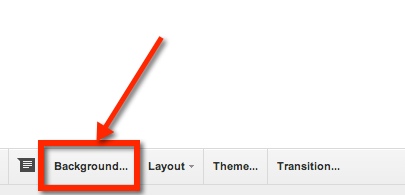
2. Just above the slide, there is a toolbar. One of the options is ‘background’. (NOTE: be sure that the slide is selected – on left – NOT a space on the actual slide, otherwise you will not be able to see this option.)
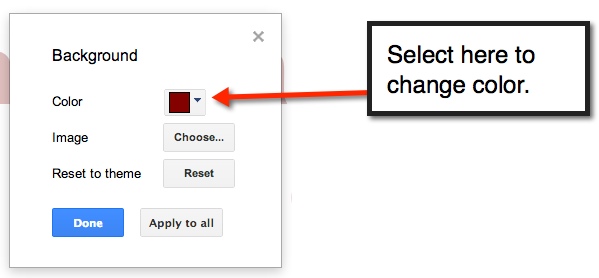
3. A pop-out window will appear. This is where you can select a new color.
4. Select ‘Apply to all’ in order to have a uniform looking presentation. Then select the blue ‘Done’ button, and viola you have customized the Presentation Theme.
I like to stay in contact with my students’ parents. One way in which I do so is through a weekly email. Each Thursday I send home an email updating the parents on what we have been learning, what we will be learning, and any important dates or events that are coming up.
The Problem:
How do I create a form that I can use week after week? I like to have the subheadings ‘pop’ with color. I didn’t want to have to rewrite the ‘Update’ weekly, nor did I want to copy and paste the previous week’s ‘Update’ for 36 weeks.
The Solution:
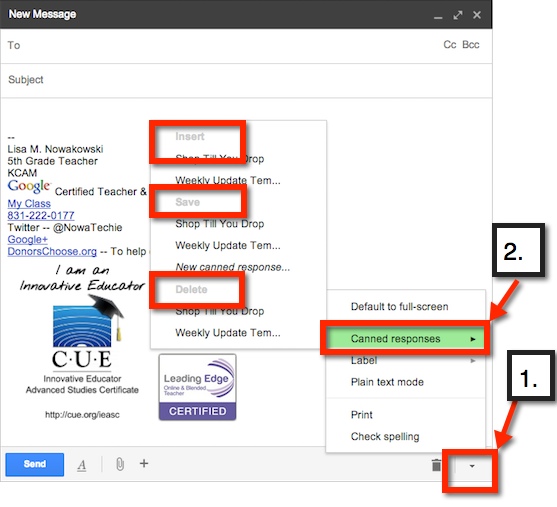
Canned Response! I created the first ‘Update’ email, and saved it as a Canned Response template. Now when I send out my ‘Update’, I simply insert the ‘Weekly Update’ Canned Response template. It’s so simple.
How:
Canned Response can be found on the bottom of an email draft – 1 (bottom right, small arrow). Once it’s chosen, additional choices can be made. Choose – 2– ‘Canned Response’. From here, you can: ‘Save a Canned Response’ (save to use in the future, like I did with my ‘Update’), ‘Insert a Canned Response’ (like I do each Thursday), or ‘Delete a Canned Response’.