Delete Calendar

Throughout the years, I have created a few different Calendars. This can become cumbersome, and I find the need to delete a Calendar from time to time. Here’s how to delete a Calendar:

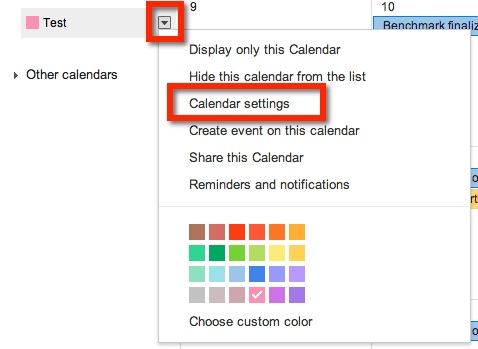
From your Calendar page, locate the calendar you wish to delete. Your calendars are located under ‘My Calendars’. If you don’t see any, choose the arrow to the LEFT of ‘My Calendars’. All your calendars will be listed here. Once you have located the Calendar to be deleted, select the arrow to the right of desired calendar, and choose ‘Calendar Settings’.

pic 1


pic 2


You will be taken to a new page. Near the bottom of the page, you will see ‘Delete Calendar’ and ‘Permanently Delete This Calendar’

pic 3


Once you select the blue link ‘Permanently Delete This Calendar’, a pop out window will appear. It will ask if you want to Delete the calendar. Select ‘Yes’, then choose ‘Delete for Everyone’. Once you do that, the Calendar is deleted and will no longer appear the ‘My Calendars’ list.

pic 4

Insert Calendar Into Site

Recently I was asked if you could insert a SECOND calendar into a Google Site. The answer is YES!

Create a New Calendar

The process is simple. First, CREATE the new calendar. Make sure that the calendar is created in the same account that the Site is associated with. Choosing the arrow to the right of ‘My Calendars’ will give you the option to create a new calendar.

pic 1

This will take you to a new page where you will name your new calendar (1.). If you would like your calendar public, which you probably do if it’s on a website, be sure to choose the  “Share with Others’ then ‘Make This Calendar Public’ options on the page (2.). Once you have set up your calendar, remember to ‘Create Calendar’ (3.).

pic 2

Your new calendar will now appear under ‘My Calendars’ on your Google Calendars Page.

pic 3

Now you are ready to insert information on your new calendar.

Insert New Calendar Into Google Site

Locate the Site and Page you would like to insert your new calendar. Enter ‘Edit Mode’ on the Site – choose the pencil icon at the top right of the page (or press e on the keyboard).

pic 4

This will then bring up editing options. Find ‘Insert’, then ‘Calendar’.

Pic 5

A new window will appear, choose the desired Calendar. Then, choose the blue ‘Select’ button. From here, a new screen will pop up. This will allow you to set the properties of the calendar on your Site. Remember to choose the red ‘Save’ button when you are done.

pic 6

pic 7

Now that you have inserted your new calendar, remember to ‘Save’ the page (located at the top right of the page). You will now see your new calendar.

pic 8

Form Letter in GMail

I like to stay in contact with my students’ parents. One way in which I do so is through a weekly email. Each Thursday I send home an email updating the parents on what we have been learning, what we will be learning, and any important dates or events that are coming up.

The Problem:

How do I create a form that I can use week after week? I like to have the subheadings ‘pop’ with color. I didn’t want to have to rewrite the ‘Update’ weekly, nor did I want to copy and paste the previous week’s ‘Update’ for 36 weeks.

The Solution:

Canned Response! I created the first ‘Update’ email, and saved it as a Canned Response template. Now when I send out my ‘Update’, I simply insert the ‘Weekly Update’ Canned Response template. It’s so simple.

How:

Canned Response can be found on the bottom of an email draft – 1 (bottom right, small arrow). Once it’s chosen, additional choices can be made. Choose – 2–  ‘Canned Response’. From here, you can: ‘Save a Canned Response’ (save to use in the future, like I did with my ‘Update’), ‘Insert a Canned Response’ (like I do each Thursday), or ‘Delete a Canned Response’.

Canned Response

Comment in Google

Another feature that allows for easy collaboration in Google Documents is the ‘Comment Feature’. This feature allows me to highlight a particular text and comment on it, for clarification or questions. It’s really very easy.

First, highlight the desired text (can be a word, phrase, sentence).

pic 0

Now you can add your comment. There are 4 ways in which to access the ‘Comment Feature’:

1.  From the Tool Bar iconPic 1


2. ‘Insert’ option on Tool Bar

3. Keyboard Shortcut


Pic 2


4. Gray Comments button next to Share button on top right.

pic 5


A yellow comment box will appear to the  right of the document. This is where you will type your comment.

pic 6


If more than one comment is on the document, and you are unsure of which comment goes to which highlight, simply click on either the comment or the highlighted section. If the highlighted text is chosen, then the comment will ‘pop up’ and show in the yellow box. If the comment is chosen, the highlighted text will become a darker yellow.

When you have finished making your comment, be sure to chose the blue comment button.

Screen Shot 2014-01-29 at 8.02.48 PM

Pen Pals

Basque Country

Last year a friend of mine, who teaches in Spain (Basque Country), contacted me with the idea about our students becoming pen pals. There were several issues that needed to be worked out before we could begin. Her students spoke very limited English, their 1st language varied from Spanish to Basque to Arabic. A group of her students were Gypsies and had little interest in school, and her school has VERY strict Internet policies for students.


Problems Solved:

Of course my initial response was to have my students use Google to communicate, but with her school’s policies, that wasn’t possible. Our next best idea was to use Dropbox. She had her students type letters on her computer which she then uploaded into a shared file in Dropbox. When all the files were ready, I passed them out to my students. The initial reaction was that of excitement. My students loved that they had a connection to a student in another country, on another continent.

Student Response:

While they were excited with the new activity, they were also intrigued to see that many of those in Spain were just like them. The boys (in Spain) that had written that they enjoyed soccer were the Pen Pals that my boys fought over. One student (Spain) wrote that her brother plays soccer, but she didn’t like it and went on to describe all the things that she liked to do. Of course, my girls all wanted to write back to her. Then there was one special student. My friend had told me about her. I chose a student who would be sensitive and write a quality letter back. This particular student was having a hard time assimilating to her new home in the Basque Country. She was from the Middle East and bullied at school. The student I chose to pair her up with was an outgoing and kind girl. When my student wrote her response, the bullied girl was envied because her Pen Pal had written so much. It also helped her to gain confidence.

All in all it was a success. The Spanish students were able to practice their English, and even the most reluctant student was completely engaged. My friend reported seeing a change in those students who had little interest in school. Some of her students asked to write. It was a first for many of them to want to do something school related.

So Now What?

Well, today I was pleasantly surprised with an email from my friend. It seems that her current group of students are aware of the Pen Pal program we had going and asked her when they get to do it! So here we go, our second go-around with this. We are even thinking of doing videos this year. There are still the same strict policies that she must adhere to, but we think we can work it out. We will be using Dropbox again. Today I shared with my class what we will be doing. They seem eager and on board.

Clean Up Your Bookmark Bar

I love having my Bookmark Bar. It has many websites ready to go at the click of a mouse. However, I hate that it also provides the name of the site. Sites like Twitter and Facebook have recognizable favicons (those handy little pictures that appear on tabs and in the Bookmark Bar).

I recently learned that I could get rid of the names and just leave the favicons on Chrome. Here’s how…

pic 1


pic 2


pic 3


pic 4


pic 5