Before I delve right into the reasons why I have mad love for my PLN, let me explain who exactly is in my PLN. When I first started teaching in the mid 90’s (that was just a few years ago, right?), my PLN was limited to those whom I directly worked with; those teachers in my building. Now my PLN stretches across the nation and across boarders. While I still enjoy, and learn much from, collaborating with those at my site/district, I often turn to Twitter for help, collaboration, and/or ideas. I also belong to several communities on Google+, thus widening my network. So when I say that I have ‘Mad Love For My PLN’, I’m talking about hundreds of people.
Now getting back to my story. Recently I have started video taping the school announcements. I have 5th graders read, record, and upload the ‘Morning News’. This was the brainchild of a Kinder teacher, Ellen Lynch. One of the biggest issues I was having were the actual announcements. The old way of doing things required teachers, and students in some cases, filling out a form in the office. I wanted to make it more streamlined and efficient. So what did I do? Well, I turned to a small portion on my PLN – Manhattan Beach CUERockStar Teachers. Yeah, mad love for these folks.
Mad Love for these folks
I reached out to this amazing group of educators. I explained the problem and was given a few great solutions. In the end, I chose to use a Google Spreadsheet Add-On, AutoCrat. I know what you’re thinking, “That’s great, but really, did you need to blog about that?” Yes, yes I did. I needed to blog about this for a few reasons A) My issue was solved within 24 hours. Not only did they provide their thoughts, but Reuben Hoffman also provided me with resources. B) I had a Google Hangout (GHO) with Alice Chen, Karl Lindgren-Streicher, and John Miller. What started out as just sharing thoughts and ideas, and me realizing I solved the problem already, quickly turned into a 45 minute talk about Minecraft. When you have a Minecraft Guru/Master/Ninja/all around awesome guy like John in your midst, you take advantage of his wisdom. C) EVERYONE has access to this type of support. D) It’s this support and collaboration that gets me excited, inspired, and and ready to try new things.
So yes, I did need to share my ‘Mad Love’ for these amazing people. I am blessed to have them in my PLN. And if you don’t already have these people in your PLN, you need to jump on Twitter and Google+ now and start learning from them now!
Before we get started, let’s go over some basic vocabulary. I do this only because as I have conversations with non-educators, there seems to be some confusion. This ‘Glossary’ is so that we are all on the same page as we have this conversation.
Assessments – The methods in which a teacher, school, district, state, and/or government measures learning.
Curriculum – How something will be taught. Most commonly associated with textbooks, programs, lessons, units, and the like.
Standards – Expectations or goals; the outcome.
Common Core
Now getting back to why Common Core Standards are ‘Bad’. I’ve come to the conclusion it’s because the ‘nay-sayers’ don’t understand the new methods, and quite honestly don’t have the deeper understanding that Common Core expects. I don’t say this to insult anyone, in fact, I’m in that group of folks that don’t fully understand everything, but I am learning. Before you start to disagree with me, think about it. Where is the controversy centered? Is it the ELA standards or Math standards? Yeah, it’s the Math standards. I haven’t heard anyone complain about how “stupid” the new ELA standards are, or how they are “making our kids dumb and confused”. And why is that? Well, no one can really argue with analyzing a text more closely. We all get it, we all want our children and students to be able to read a text and be able to intelligently speak on it. So what’s different about the new Math standards? They require students to have a firm grasp on math concepts. I have heard the argument, “What’s wrong with how I did math, I understood it?” and “Why should my child have to learn several different ways to solve a problem?” Let’s look at the first question: What’s wrong with how I did math? Nothing if you are good with a basic understanding. As Andy Losik pointed out, “The good old days of Math only taught us Magic Tricks to do problems.” How right he is. Think about it, this is like saying, “I read the book, but can’t really tell you what it was about, but hey at least I read it.” Yes, you can perform the basic operation, but you don’t really understand the how and why behind it.
Before you starting getting all up in arms about this, I was the same way when I first started teaching. Long ago I taught second grade. One of the biggest math concepts in second grade is learning to regroup – it was called borrowing back in my day. It wasn’t until I started teaching the concept that I truly understood why and how regrouping worked. I thought I knew, but I didn’t. As a child, I learned to cross out the number, make it one less and put a 1 in front of the number to the right. If you asked me to explain why and how it all works, I wouldn’t have been able to at the time. The second question asks: “Why should my child have to learn several different ways to solve a problem?” Well…As this is real life, there are several solutions to one problem – be it math, social, or everyday problems. I ask, “Why limit ourselves to one path, when so many are available?” For far too long, these ‘Magic Tricks’ have been very narrow in focus and catered to a select few students.
The Root of Why Common Core is ‘Bad’
We feel stupid. Yup, I said it, we feel stupid. I mean, as an adult, I should be able to do 4th grade math, but the new ways of learning and the deeper understanding sometimes leave me with the “What the heck are they talking about?” feeling. The complaints and descriptors are just knee jerk reactions because we feel stupid. If we take a moment to swallow our pride and just admit we don’t get it, I think we could learn a thing or two. I am learning all this too. And what I am finding out, is that while at first new methods may seem confusing, after practice they are actually easier than how I learned. Not only do the new ways give us a deeper understanding, it also allows more students to be successful in math.
I have heard (and engaged in conversations) where some have suggested that we keep teaching the way we have, and if need be pull those students who don’t understand it aside and teach them differently. I say that is short sighted, and bad teaching practice. Any quality teacher will show different methods and encourage students to focus on the few that they understand and make them successful. Any quality teacher, be it with Common Core or other standards, will differentiate his/her instruction.
Another argument I have heard is that it is nationalizing our education system and taking local control away. To this I say, “Yes, it is. Now get over it.” I know it’s harsh, but we live in a GLOBAL economy. This is the 21st Century, let’s teach like it is. Yes, I want to know that here in California I am teaching the same 5th grade standards as they are teaching in New York, Mississippi, Montana, or where ever in the US. If you don’t agree, why not? Do you want your standards to be lower than everyone else’s? Do you want them higher? With Common Core, states can add standards (15%). We’ve had State Standards for a while now, that takes away local control. No one balked at that.
I acknowledge that there is a political component to all of this. There are many out there, mainly from one political party, who are helping to spread misconceptions, hate, and backlash to the Common Core Standards. The reason why is another blog post all together. While I won’t go into the political aspect of Common Core, I didn’t want to omit this aspect.
What to do?
Well…Let go of our own insecurities. Allow your children to teach YOU how to do math. Be okay with saying, “I don’t understand”. Ask the teacher for directions. When a parent contacts me and asks for help, I gladly give it. I also understand that this is all new. I try to reassure my parents that yes, this can be confusing for me too. I have had students come into my classroom and teach me how to do math in a different way. Because of where I live, I often have students come to school to show me how their aunt/uncle/mom/dad learned to do a concept in Mexico. Often times the method is easier, and the result is the same.
Is Common Core Really Bad?
NO! Common Core is different, but NOT bad. In fact it is good. Again, I am only speaking about the Standards. The unrolling of Common Core in each district/state/nation is a whole different conversation. I am NOT talking about the assessments – PARCC or SBAC. The end goal of the standards are GOOD! I welcome them.
While this is geared towards the K-5 classroom, it is certainly applicable to all grade levels. Created for Annual CUE in Palm Springs, March 22, 2014:
Recently a friend and I were talking about some of our district meetings, some of which are the occasional ‘Tech’ meetings. We have tried the ‘Cafeteria’ style, where teachers choose from a list of presenters & presentations/workshops. It’s worked ‘okay’, but not great. And as my friend and I were talking, we got around to all the different things that my students do in class. She then suggested having students give some of the presentations/workshops!
I know, she’s brilliant! Now many would be skeptical of the idea of having 5th graders presenting to a group of adults. I will admit that, while I thought it was brilliant, I had my doubts that my students would be open to the idea. To my surprise, they were on-board. Many of them asked when the meeting is, and what they should present! Two girls want to show off their knowledge of ‘Animoto’, another boy wants to do a whole presentation on using iMovie from an iPhone (via Reflector – his idea), and a few others that want to present, just not sure on what. My students are FEARLESS and amazing!
After school I was talking to another teacher about the idea and my students’ responses. She also felt that it was an awesome idea. She pointed out that many teachers don’t think students can do what they have seen in the (past) presentations/workshops. She went on to state how powerful the experience could be for the students and the teachers. Teachers would not only see that students COULD do it, but have a deep understanding of the different tools or apps being used, and how these tools can be used to show their knowledge in different subjects. And the students would shine, gain confidence, and experience something so HUGE at such a young age.
I can’t wait to see how this ends, or should I say begins (let’s hope this is the beginning of something great)! I’m so excited. I will definitely be blogging about their success in about a month! Stay tuned.
If you have been to a Google Summit or other Googley type event, you have most likely witnessed a Demo Slam. For those of you who have not, a Demo Slam is where a presenter (anyone really) is given 3 minutes to show off their coolest, geekiest, most interesting tech ‘thing’. I have seen Demo Slams on tricks in YouTube, useful Chrome Extensions, tools in Google Docs, and Google Easter Eggs.
I began doing Demo Slams in my classroom. It began as a way to teach my students some simple tricks to help them in class. For example, I showed them ‘Build With Chrome‘, how to search images with reuse policies, and a few Chrome Extensions. It was a success from the beginning.
My story doesn’t end here. Not to be outdone, my students begged to begin doing them. You see, they like to ‘Out Geek’ me. They have each made it their mission to find a trick or two that I don’t know about. And yes, they have taught me so much! Of course I was thrilled that they wanted to do slams. So now I have a sign up sheet in my class. They can sign up for a slam anytime they want. I also have official time keepers. I just sit back watch, and learn new things from them.
One of the biggest successes came with ‘Build With Chrome‘. I briefly showed the tool, and as always encouraged them to explore it more on their own. I have a student who loves Minecraft, Legos, and creating, but is not big on getting up in front of the class and presenting. He took the idea and ran with it. He signed up for his own account, showed others what could be done with it, and ASKED if he could do a Demo Slam on it!
So pleased with their initiative, I have offered to share out the Demo Slams with other teachers. Recently, 2 girls went to a second grade classroom to show them a few keyboard shortcuts. I had 2 boys read about Anne Frank, and give a Demo Slam about what they read. Yeah, we decided Demo Slams don’t have to be tech related. It’s a HUGE success with my students. They are confident, learn from their mistakes, take chances, and freely share their knowledge. What more could a teacher ask for?
Today began our Second Trimester Benchmark Assessments. Fortunately, I am in a 1:1 Chromebook classroom. This means that my students are able to take the assessment online. My students work online daily, so this is no big deal – or so I thought.
The students had 1 open ended question to answer. As I was checking them, I noticed that two boys, who sat next to each other, had the same wording for their answer. My immediate thought was, “Oh great, they cheated.” That wasn’t really the case.
When I spoke with them, I asked why they both had the same answer. One boy, honestly answered, “We were helping each other.”
And that’s when it hit me. With or without Common Core, we still have a disconnect between how students learn, and how we ‘record’ their knowledge.
Common Core has students working and collaborating together. Common Core encourages students to problem solve in groups, using technology to assist them.
And then what do we do? We (not just my district) then decide that in order to show us their knowledge, they are to take a test, on their own – in isolation. I’m sure I’m not the only one that sees this disconnect.
How is it that we expect ALL students to do well when we teach, and they learn, in one way; then have them take a test in isolation? No wonder my students thought nothing of helping each other on the Benchmark Assessment, it’s what they do daily.
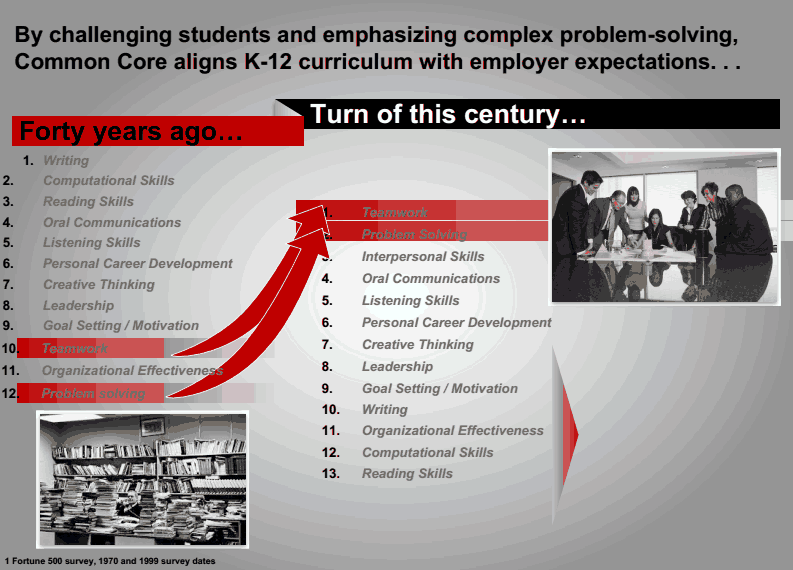
Here’s a crazy idea: Let’s ditch the tests altogether. Yup, class tests, district assessments, state, national, PARCC, and SBAC. As a nation we need to focus on learning, problem solving skills, collaboration, and teamwork. THESE are the skills that employers are looking for, not can someone take a test on their own.
Credit: Dr. Beverly Young, Assistant Vice Chancellor, Academic #ccttcd2014
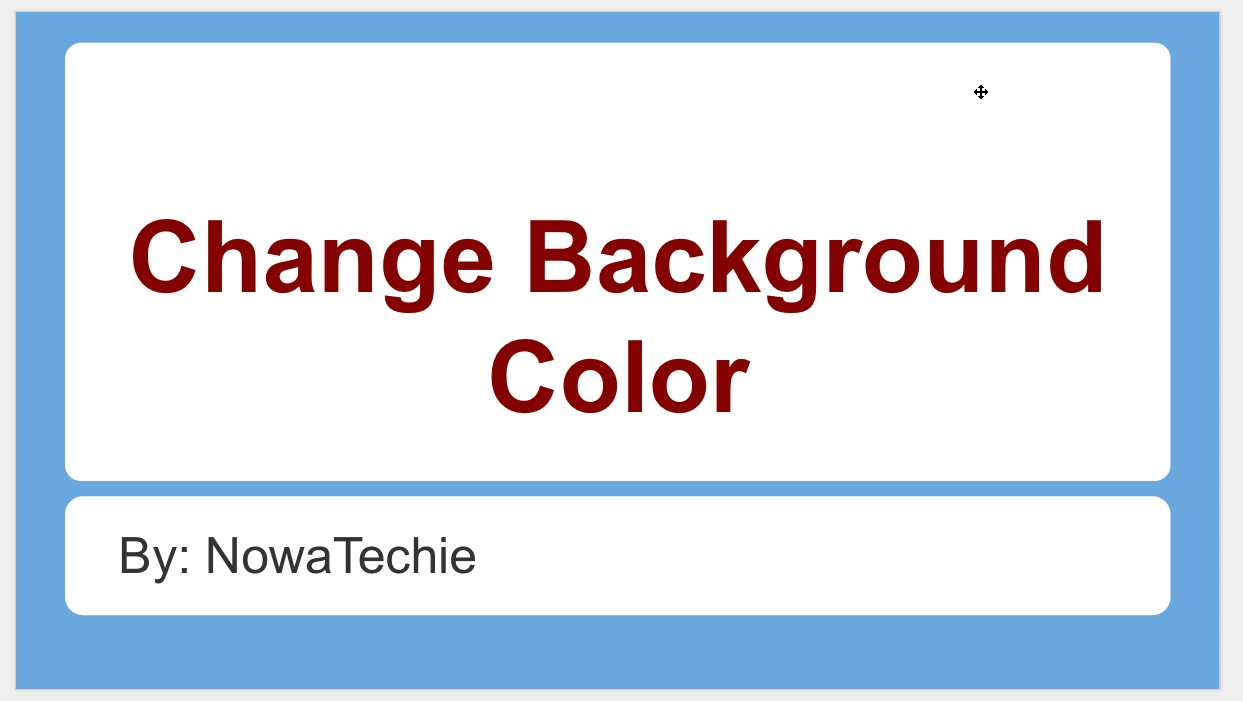
So, say you like a particular Theme in Google Presentation, but not the color. Well, that is an easy fix!
1. Choose the desired Theme. For this example, I chose ‘Label’.
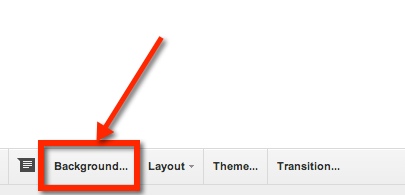
2. Just above the slide, there is a toolbar. One of the options is ‘background’. (NOTE: be sure that the slide is selected – on left – NOT a space on the actual slide, otherwise you will not be able to see this option.)
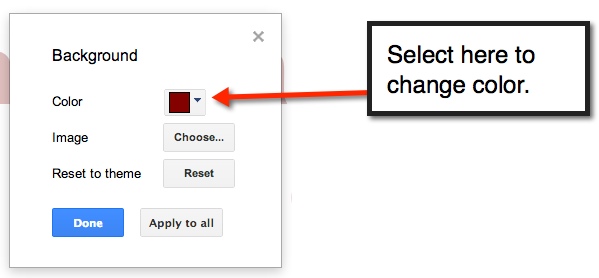
3. A pop-out window will appear. This is where you can select a new color.
4. Select ‘Apply to all’ in order to have a uniform looking presentation. Then select the blue ‘Done’ button, and viola you have customized the Presentation Theme.
It may be gray and dreary outside, but inside Cal Poly’s Cotchett Education Building the ideas are shining! Today is Central Coast Teacher Tech Challenge Day (#ccttcd2014). What an awesome day!
The day began with Holly Clark giving us an inspirational talk. She challenged us to actively engage ALL students. She reminded us that engaged students are talking, moving, collaborating. Holly also brought up the fact that collaboration isn’t Student A does part 1, Student B does part 2, and then coming together to report out the information. Collaboration is working TOGETHER on a joint project. A great example she cited was Mystery Skypes/Hangouts. Students work together, as a class, to discover where in the US another class might be.
We then went off to our sessions. What made this different from others I have been to, is that 1 session contained 2 presentations. The presentations were paired to compliment one another. My first session was on Blogging. I was paired with Teacher Hovey and Teacher Townshead, who shared about music in the classroom, and the different tools that could be used. Each presentation lasted about 20 min, with 10 min at the end for Q & A.
Finally Dr. Beverly Young spoke about CCSS and Next Generation Science Standards. A brief history of the new standards was given. She went on to state that assessment should be an extension of the learning process, this is what SBAC was designed to be. Dr. Young pointed out that students will be tested on a new assessment based on a curriculum in which they have had little experience with (1 year in many cases). She posed the question, how long will it take us to see the results of CCSS curriculum?
All in all, I LOVE hanging out with Ed Tech folks. It energizes and inspires me. It makes me happy, and remind me that I’m not alone!


 Let’s look at the first question: What’s wrong with how I did math? Nothing if you are good with a basic understanding. As