Voiceover Videos with Snagit

After sharing the awesomeness that is Literacy Shed, the most often question I get is, “How did you do the voiceover?” (See Presentation)

There are a multitude of programs that you can use: Screencastify (Chrome Extension), Screencast-O-Matic (download), Quicktime Apple or Windows (download), or my personal favorite, Snagit (Chrome Extension). If you are using Chromebooks you will need to go with a Chrome Extension – Screencastify or Snagit.

Here’s how my students use Snagit:

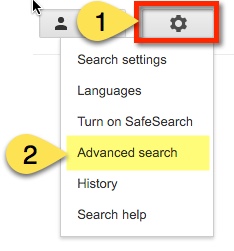
After adding Snagit to your (or your students’) Chrome browser, it will appear in the toolbar next to the URL as shown below. Click on it.

Oktapodi 1

Once you (or your students) choose Snagit, they will see a black sidebar appear on the right side of the screen. Please note that the first time you open the Extension, it will ask you to allow Snagit to access your mic. You must allow. You have the option of saving an image or a video. For voiceovers, you will want to select ‘Screen’ under ‘Video’. Also, note that the mic icon is on.

Oktapodi 2

This will bring out a pop-out menu in which you will select ‘Entire Screen’. This way, you (or the students) can switch to full-screen mode. With a little editing, they can chop off the first portion.

Oktapodi 3

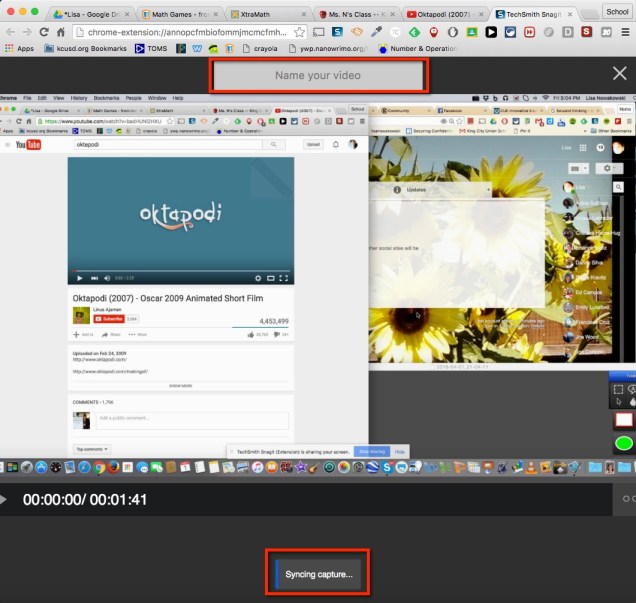
Once ‘Entire Screen’ has been selected, you will see a notification at the bottom of the screen, notifying you that the screen is being shared (aka you are now screencasting).

Oktapodi 4

In YouTube, the last choice on the bottom right is full screen. Have the students chose this. As a side note, I use 2 Extensions with YouTube: DF YouTube and Adblock for YouTube.

Oktapodi 5

Now voiceover away! Once you are done, select the ‘Stop Sharing’ option at the bottom of the screen.

Oktapodi 4

This will then open a new tab in your browser. Hang tight. Depending on the length of your video, it may take a while to upload to your Google Drive. Once it is completely synced, the blue ‘Syncing Capture’ will change to green and you can THEN name your video. NOTE: The video will be saved in a folder named TechSmith in the Drive. TechSmith is the maker.

Oktapodi 6

Depending on your district, you can keep them in the Drive – remember to change the shared setting to ‘anyone can view’ – or upload them to YouTube. My district has the student Drives locked so that anyone outside our district CANNOT see them. If this is the case for you, you have a few options.

  1. Have the students transfer ownership to you. Most district will allow teachers to share items in their Drive.
  2. Have students share the video with you. You then download the video and upload to YouTube. This was the route I took.
  3. Create a shared class YouTube account (from your district) and have students upload it to this (or you upload to this).

The advantage to a class YouTube account is that the students can then go into the editor and chop off the first portion of the video, that is no doubt messy.

TLC Ninja Podcast

TLC Logo v3I’m so excited to see this come to fruition! For quite some time, I’ve been wanting to start a Podcast. I LOVE the idea of sharing, communicating, and collaborating with others. So a while back, I contacted @CoffeeNancy (Nancy Minicozzi) about joining forces on this. And she agreed!

Yesterday, we taped our first podcast (using Blab – this is where you can see us too, total bonus!). We’re even in iTunes! Now do you see why I’m so stoked? We’re totally legit!

So the premise is that you, the audience, decide what is discussed. What do you want to know more about? Want to talk about something awesome YOU are doing? We also intend to keep it short and sweet. We all have busy schedules, so our podcasts will be no longer than 15 minutes.

How do you join in on the fun? Go to TLC.Ninja (yes, our domain is .ninja – that’s how awesome is this?). You can listen to us here, see when our next podcast is taping, and contact us with YOUR ideas. We will normally be on Blab (even if you just want to watch us live) every 1st and 3rd Monday of the month at 7 pm pst (unless otherwise stated). The podcast will be available on iTunes by the following Wednesday.

Join us next Monday (8:15 pm pst) when we talk to Tracy Walker, a CUE LeRoy Finkel Fellowship Finalist, about her ‘BIG’ idea.

My Teacher Training Failed Me

IMG_1964.JPGWell, it didn’t totally fail me. I did go through all my methods courses, learned how to create meaningful and engaging lessons, and even practiced in several classrooms before I was let loose on my own.

It failed me in other ways, and most of us too, I’d guess. It failed to teach me how to deal with:

  • The first grader who was molested by mommy’s ‘friend’.
  • The child who was dropped off at school by mom, who then walked to the nearest crack house.
  • The boy who was being beaten at home.
  • The girl who lived in a tent, in the woods, with her mother.
  • The child who is raising themselves because the ‘adult’ in the home is unreliable.
  • The girl whose mother was murdered, by her father.
  • The boy who came to school hungry, every day, and most likely took classroom food home with him.

Or the 10-year-old girl who lost her mother 2 1/2 months ago. The girl who had to sit and listen to a great opportunity to come to classes and have bonding experiences ‘with your mom’. The girl who wanted to go and bravely asked, “What if you don’t have a mom?” The girl who was eyed, sympathetically, by all the other girls in the room. The girl who has to figure out a new normal at a young age.

These are the ways in which teacher training failed me.

Google Classroom – Adding Materials

One feature that I really like in Google Classroom is the ability to add materials. My class is currently working on a project, with a digital text. I want them to be able to access the text at any point.

After logging into Google Classroom, I navigate to the classroom where I’d like to add materials. From the Stream page, I click on About.

Screen Shot 2016-03-13 at 8.01.06 PM

Now that I am on the ‘About’ page, I can add the desired materials. The first box on the page contains Course Information. The second box allows you to ‘Add Materials’.

Screen Shot 2016-03-13 at 8.06.48 PM

Simply by clicking on ‘Add materials’, the box changes to give you choices.

Screen Shot 2016-03-13 at 8.07.30 PM

You’ll notice that after adding a title to your materials, you have the option to add a file from your computer, Google Drive, YouTube, or a link. You have the ability to add as many as needed.

Screen Shot 2016-03-13 at 8.09.50 PM

The three dots in the right corner allow you to edit or delete the materials.

This feature is a great way to keep all important materials in one place. In Writing, you can house all your rubrics. Math can house tutorials. The possibilities are endless, syllabus, study guides, videos, whatever you can think of!

Draftback

Recently, I became aware of an AMAZING Chrome Extension: Draft Back. Veronica Tadeo (@MsTadeo) introduced me to this. It’s simple, it plays back your, or your students’, Google Docs.

Once the Extension is installed, you will see a Draftback button next to the Share and Comment button on the top right corner.

Screen Shot 2016-03-06 at 6.39.37 PM

Once the function is selected, it creates a playback. Choose ‘View’. Once selected, a new tab will appear with the playback.

Screen Shot 2016-03-06 at 6.42.38 PM

You can see that at one point I copied and pasted text. Pretty cool, right?

Draftback.gif


A Tale Unfolds & Writing

At the beginning of February, I began A Tale Unfolds. Since then, I have noticed an improvement in my students’ writing. Their sentences are more interesting and they try to vary the types of sentences they use. Here is a picture of a student who has writing difficulties, practicing her sentences in her spare time!

Photo Credit: Tressa Luke

Another teacher was so impressed, she took these photos and HAD to share with me! This is awsome! Look  at all those adjectives.

Playlists in YouTube

I’m a huge fan of YouTube, but then again who isn’t? One of my favorite features is the ability to create Playlists. These are a collection of videos of your choice. For example, I have a playlist for grammar to help students who are struggling with various grammar issues.

In YouTube, on the left side is my menu. The second section shows my ‘Library’ (aka playlists). creating them is SUPER easy!

Screen Shot 2016-02-18 at 7.26.57 PM

When I find a video I like, I add it to (or create a new) playlist. The ‘Add to’ choice appears just below the video.

playlist 1

playlist 2

If you are creating a new playlist, you will have the option to have it ‘Public’ (open for anyone to find), ‘Unlisted’ (other can view if they have the link), or ‘Private’ (must be shared directly with others).

playlist 3

After you name your playlist, select ‘Create’. Viola! You now have started your playlist collection

playlist 4

Mathbowl 2016

WMathbowl 1hile our school didn’t win, we had a lot of fun! I have never seen my students so focused and determined. One student asked if I could assign MORE challenges! Yes, MORE! How awesome is that?

In the midst of it all, we were challenged to participate in a Fai-To! This is where our school and another go head to head. Considering that our Internet went down twice in the past week, I was pleased to learn that we WON the last Fai-To!

There aren’t many classrooms at my school using Mangahigh, so to have 136 points is pretty big for us.

mathbowl 2

To top it all off, I had an IEP for a student on Friday. The parents commented how much the student, who struggles academically, enjoys Mangahigh. The student often asks to try, “Just one more time,” in order to achieve a higher score, beat another student, or gain another medal.

Just another reason to love this program! And to all the winners, congratulations!