It’s the end of April. If you’re like most teachers, you’re spent. Your students are spent. But the learning doesn’t stop just because the calendar flipped.
How do we keep the “polish” on our math skills without adding more prep to an already overflowing plate?
The “Assign and Go” Solution
I am thrilled to share that MathReps are live and pre-made inside the Snorkl library. No more standing at the copier. No more hunting for the right PDF. You can quite literally “Assign and Go.” Whether you need to sharpen the 4 operations or dive deep into fraction models, the heavy lifting is already done for you. And what a relief that is!
Why This is a Game-Changer Right Now:
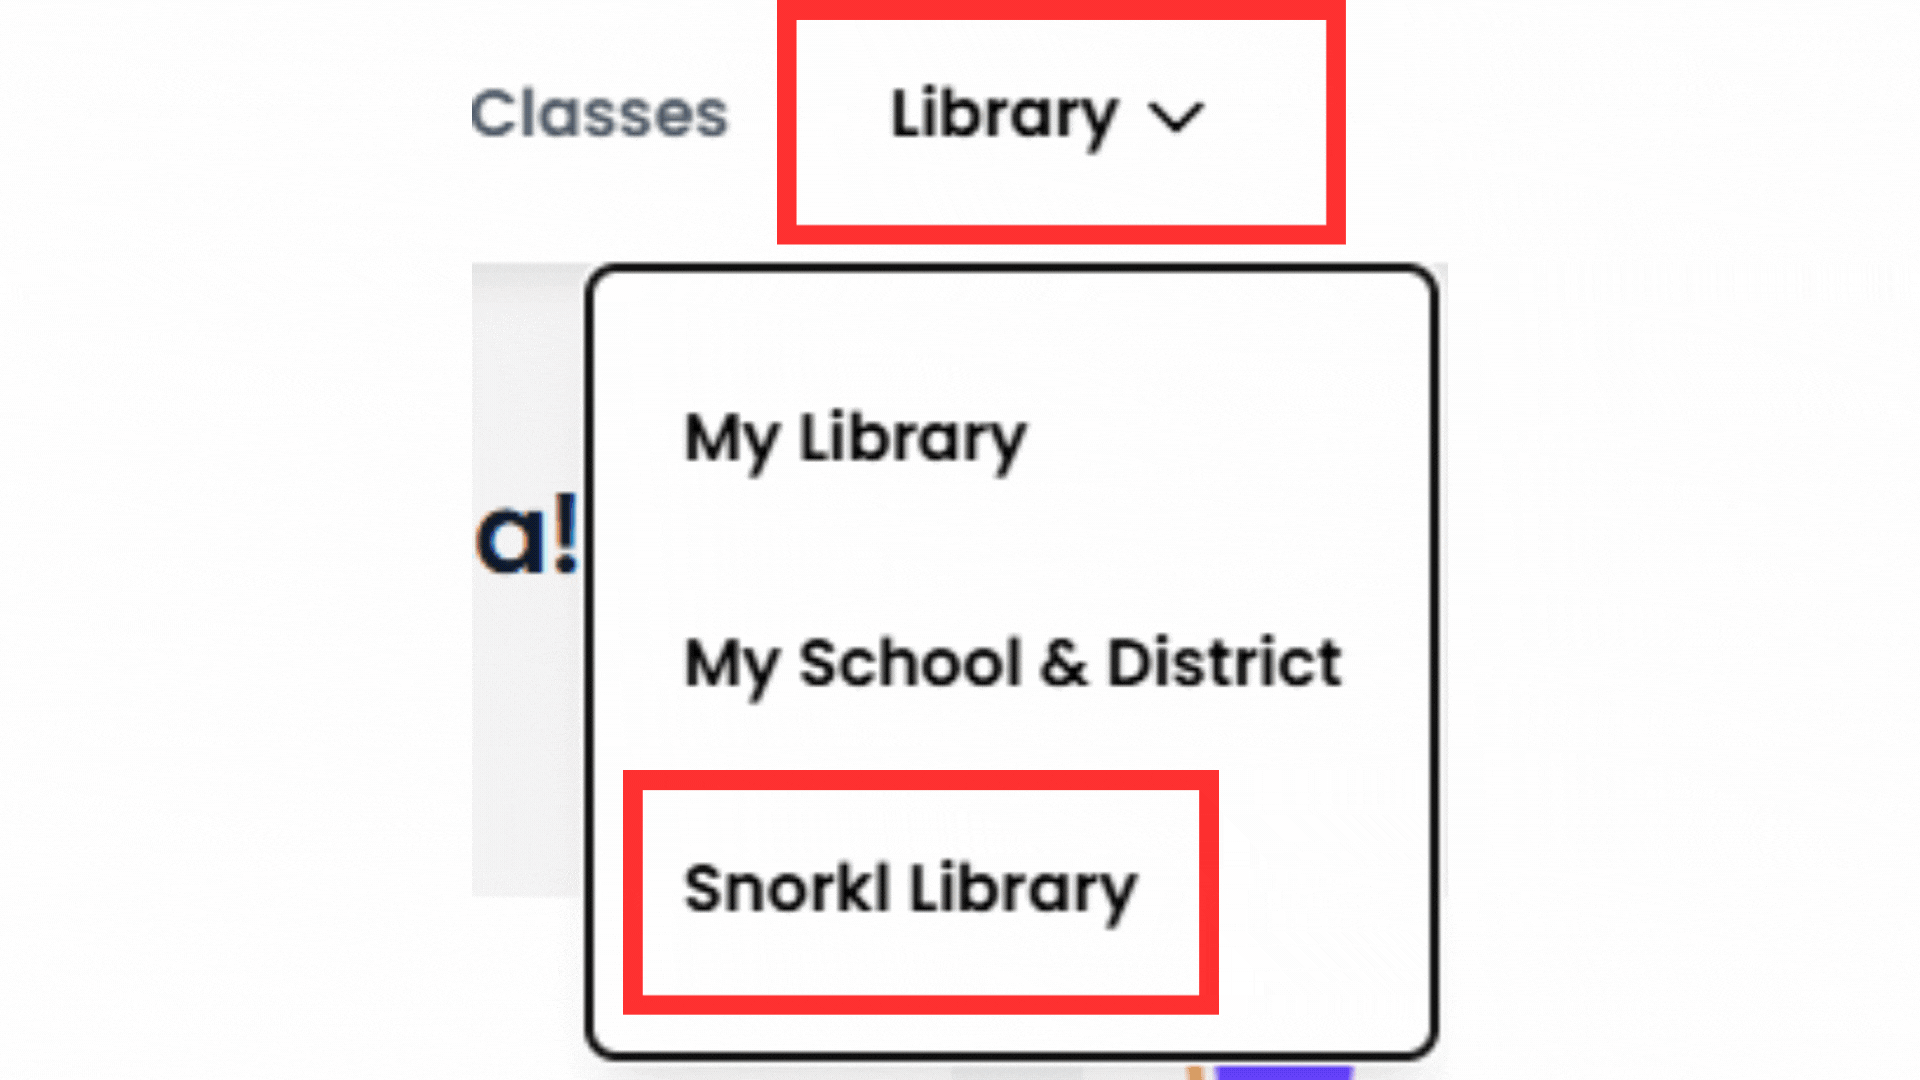
Zero Prep: Navigate to the Snorkl Library, click “EduProtocols,” and select “MathReps.” Everything from Kinder to 4th Grade (with 5th Grade coming soon!) is ready to push out to your students instantly.
The AI Co-Teacher: At this point in the year, you don’t have the bandwidth to listen to 30 individual explanations. Snorkl’s AI does it for you. It listens to the student’s logic, catches the “Instructional Debt” (like that hidden skip-counting), and provides immediate feedback. Although you may have to remind the students to review the feedback, I’m finding that in some younger grades.
Consistency Over Novelty: Since these are based on the MathReps your students already know, you aren’t teaching a new tool; you’re just using a better engine to run the routine.
How to Find Them:
It couldn’t be easier.
Log into Snorkl.
Navigate to the Library.
Look for the EduProtocols section.
Select MathReps.
A Quick Update for 5th Grade
I know my 5th-grade teachers are waiting. I’m currently getting those frames ready for you! Stay tuned; they’ll be live in the library soon to help you finish the year strong.
The Bottom Line: You don’t have to choose between your sanity and your students’ growth. Let Snorkl handle the prep and the feedback so you can focus on being the human connection your students need as we close out the year.
In the sports world, athletes don’t spend the week before a championship learning new plays. They spend it “polishing”, perfecting their form, sharpening their reaction time, and ensuring their fundamentals are second nature. However, as a lifelong Detroit Lions fan, I’m not sure this analogy is always accurate. While I love my Lions, there have been plenty of games where it looked like they just learned the plays in the huddle! But all joking aside, as educators, we are preparing our students for life skills, not just a state test.
The Problem: The “Skill Blur”
When students are sitting at a computer, facing math problems one after another, cognitive overload is a real threat. The “how and when” of the four operations can easily get jumbled with fraction rules, and suddenly, all that geometry vocabulary becomes one big ole mess in their heads. This can be frustrating for both students and teachers.
It’s not that they didn’t learn the material; it’s that the retrieval is getting blocked by the sheer volume of information and tasks that need to be completed.
The Solution: MathReps as a Tactical Warm-Up
MathReps lower the affective filter by repeatedly practicing these core skills. I remember a year when my students didn’t just “do a unit” on decimals; we consistently spiraled decimal practice into our MathReps alongside other skills.
Because it was part of their regular routine, when they eventually faced a screen with decimal problems and tasks at the end of the year, they didn’t panic. The decimal didn’t throw them because it wasn’t a “guest star” in the curriculum; it was a familiar friend. By using MathReps as a 10-minute daily “Tactical Warm-Up,” we help students:
Filter out the Format: They’ve seen the area model and the number line hundreds of times. The “test screen” is just another canvas for their existing skills.
Sharpen the Fundamentals: We move from “manual labor” math to automaticity.
The 15-Day “Polishing” Routine
If you have 15 days left before the test, don’t reach for a packet. Reach for a Routine or EduProtocol.
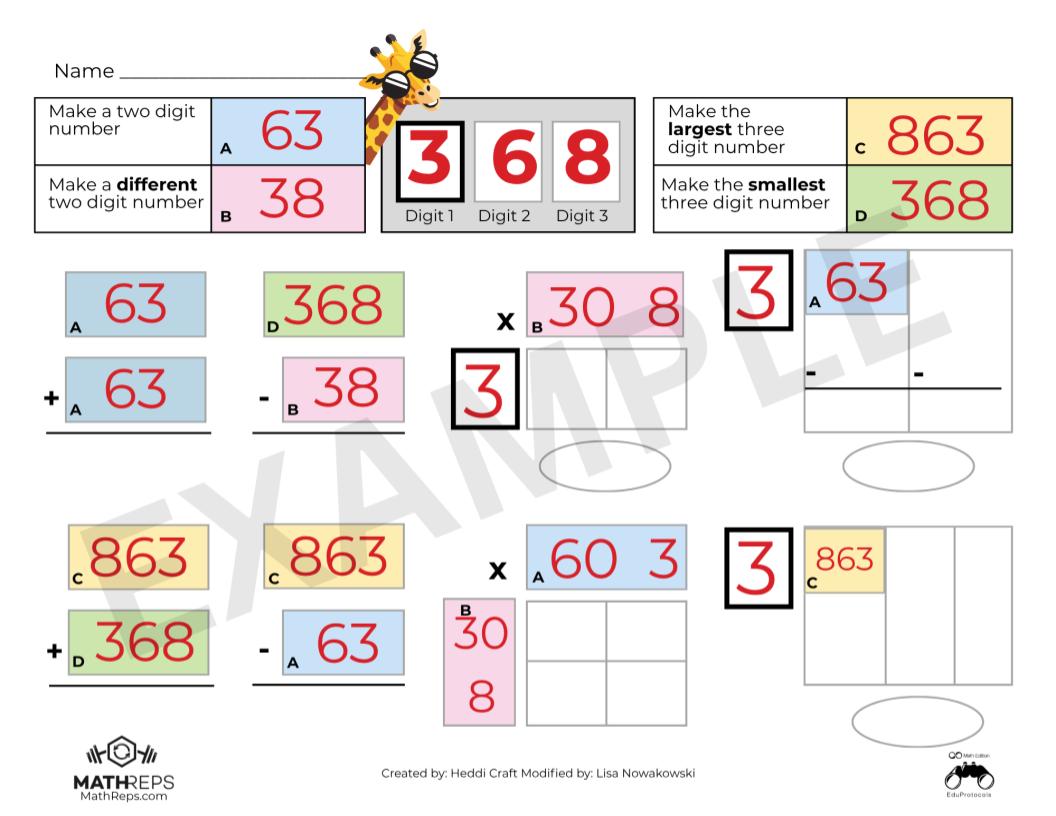
The Selection: Pick the MathRep that addresses the skill your students find the weakest. If they are tripping over the arithmetic, use an Operations Frame (like the giraffe example below).
The Routine: Use the same MathRep at the beginning of your math period for at least one week. Consistency beats variety here. On Day 1, they are reacquainting themselves with the procedures; by Day 5, they are mastering the logic.
The Pivot: After 5 days, if you’re feeling good, move to another high-leverage frame. Or, cycle back to a different MathRep you used earlier in the year to keep those older skills from getting lost in the sauce.
The Bottom Line
We aren’t “cramming” for a test; we are clearing the fog. When we polish these skills through MathReps, we give students the confidence to show what they actually know, rather than getting lost in the “mess” of a testing interface and the information overload that bogs them down.
As an instructional coach in a district that recently began Standards-Based Learning in math, I hear similar concerns across the district, especially this time of year. The pressure to have mastery of all the Priority Standards before the year ends. (It’s important to note that all the standards are being taught. There are Priority Standards and supporting standards. The supporting standards do just that: support. They are the prerequisites, if you will, to the Priority Standards.)
But there is a hidden “Instructional Debt” that makes these standards feel like an uphill battle. If we want our students to succeed at high-level problem solving, we have to talk about the one thing that has become a bit of a “taboo” word in modern math: Memorization. Okay, the act of memorization isn’t taboo; some of the old methods are no longer supported by current research. It’s a frustration for all K-12 math teachers. So let’s talk about it and how we can help students master facts using current research.
The “Cognitive RAM” Problem
Every student has a finite amount of mental energy (let’s call it “Cognitive RAM”). I can hear you all now, “So do the teachers!” When we ask a student to solve a multi-step word problem, that task requires a massive amount of RAM for reading comprehension, translation, planning, and strategic persistence.
If that student hasn’t memorized their basic addition, subtraction, or multiplication facts, they are forced to use their limited RAM for “manual labor”: counting on fingers, drawing tally marks, drawing, modeling, or skip-counting. By the time they get to the actual logic of the problem, they’ve run out of “mental memory.” The whole task seems insurmountable.
The truth is: Memorization is Creative Freedom. When the facts are automatic, the brain is finally free to be creative in the approach to solving the problem. It breaks down a barrier. Think about it. If you are trying to solve a problem and realize you need to multiply 376 by 48, but you don’t have your facts memorized, this task just became a slow, muddy drudge. However, if you know you will need to multiply 376 by 48 AND you know your facts, the hard part is behind you once you know what to do. Suddenly, things don’t feel so unattainable.
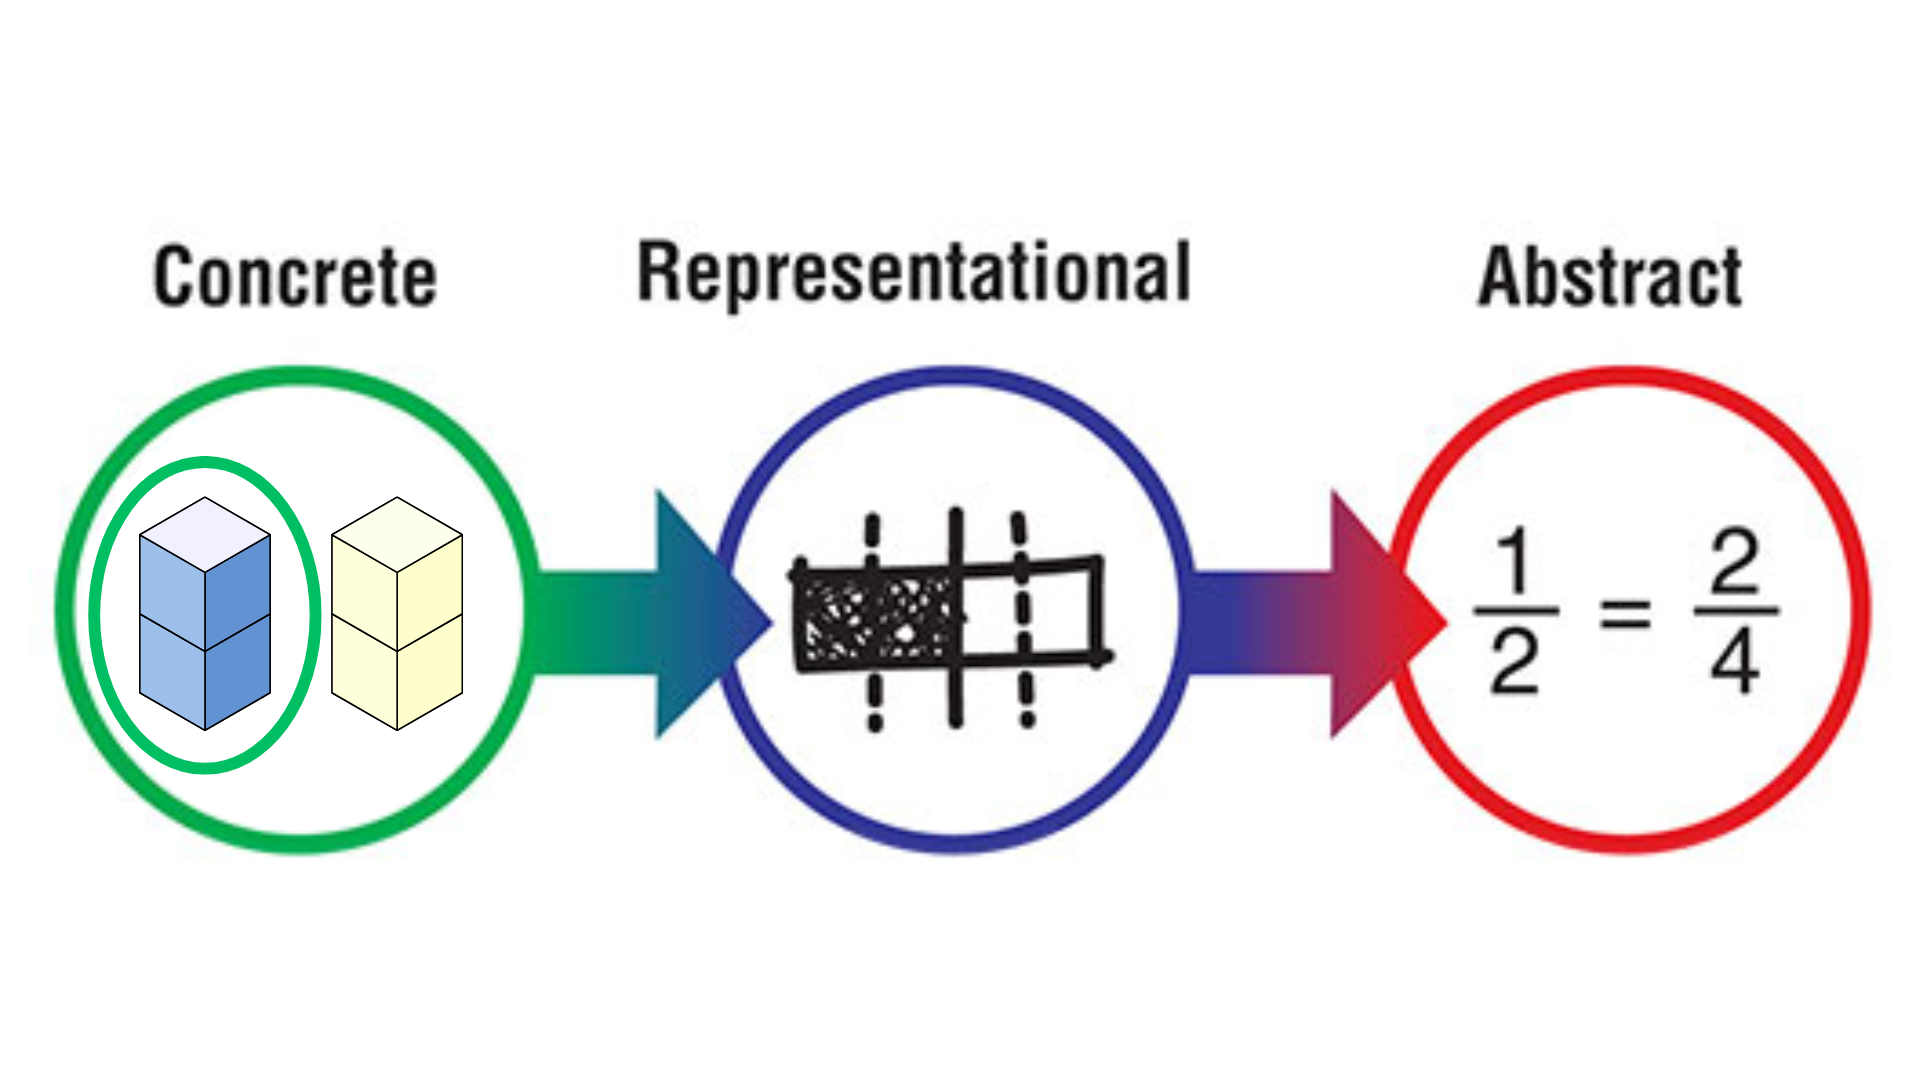
The Progression is Non-Negotiable
To be clear: I am not advocating for “rote memorization” without understanding. Memorization is the final step of this Learning Progression. It only works if it is built on a solid foundation:
Concrete: Manipulating base ten blocks and counters.
Representational: Drawing tape diagrams, number paths, and arrays.
Abstract (The Goal): Automaticity, mental fluency, and algorithms.
If we jump straight to memorization, we build a house of cards. But if we stay in the “Representational” phase forever, allowing students to rely on skip-counting patterns or finger-counting, we are capping their growth. We are asking them to do “back-breaking” math every single day. We do need to nudge them to move beyond the Representational model and help them see/understand that they are ready for the abstract and that the abstract is, in fact, your friend.
The Three Gaps Holding Students Back
When I listen to teachers discuss where students are “stuck” on a standard, they usually find that there is a gap in one of these three essential progressions:
1. The Missing Floor (Addition & Subtraction Facts) If a fourth grader is still “counting on” to solve 14 + 6, they aren’t just slow, they are overloaded. Mental math strategies like “Make a 10” are the building blocks for every standard that follows.
2. The Fluency Wall (Multiplication & Division) Skip-counting (7, 14, 21, 28…) and arrays are beautiful ways to learn multiplication, but it’s a weight around a student’s neck during long division. We have to move them across the bridge to automaticity.
3. The Magnitude Gap (Flexible Thinking) When a student looks at 1/4 and 5/6, do they see numbers to crunch or magnitudes to visualize? Flexible thinking means knowing that 1/4 is “a little bit” and 5/6 is “almost a whole.” If they can’t visualize this, they aren’t ready for the standard of comparing fractions.
Bridging the Gap with MathReps
This is exactly why the MathReps framework exists. We don’t just “hope” kids learn their facts or develop flexible thinking. We build consistent, high-frequency opportunities to practice these skills alongside the priority standards.
A MathRep ensures that students touch the concrete and/or representational models every single day until those skills settle into the abstract. It allows us to pay off the “Instructional Debt” in small, daily installments so that when students are expected to solve two-step word problems with multiple operations, our students have the mental capital to win.
The Bottom Line: Don’t be afraid to slow down and build the floor. You aren’t “behind” on the pacing if you are busy building the progressions that make those standards possible.
Every teacher has that one student – the one who is mathematically brilliant or deeply creative but remains quiet during whole-class instruction. When a teacher finally hears that student’s voice through a tool like Snorkl, it’s a powerful moment of validation.
It’s validation that the tech we are using is meaningful and having a measurable impact. It’s the proof that the student is absorbing the information and is, in fact, brilliant. Most importantly, it gives us the data to back up our suspicions that the student is capable of much more than they show in a group setting.
The “Autopsy” Model: Why the Whole-Class Check Isn’t Enough
For years, the gold standard of education has been the “Turn It In” culture. A student completes a worksheet, the teacher collects it, and it is eventually graded (usually 24–48 hours later).
Even when we try to speed this up by “checking together as a class,” we are often still stuck in the Autopsy Model.
While a whole-class check provides “immediate” answers, it isn’t personalized. A student might mark an answer wrong, but the “why” remains a mystery. The teacher is still acting as a coroner, documenting a collective result after the thinking has stopped, rather than coaching the individual student through their unique misconception.
The “Biopsy” Model: Catching Learning While It’s Alive
We need to move toward a Biopsy Model, where feedback is instant, alive, and happens while the student is still in the “messy middle” of thinking.
Looking at this image, which leads to better understanding and engagement? The left shows an autopsy; the right shows a biopsy.
In my district, I’m seeing teachers achieve this through a powerful combination of analog and digital tools: Wipebooks + MathReps + Snorkl. And soon, a Kami component will be used for assessment.
The Low-Stakes Rehearsal: Students start on a Wipebook. Because it’s erasable, they aren’t afraid to make a mistake. They can “draft” their thinking, erase, and refine until they are ready to share.
Cognitive Unloading: Students snap a photo and record their explanation. For our ELD learners, this is a game-changer. Snorkl allows them to record in their primary language. By removing the “Brain Tax” of translation, students can use 100% of their mental energy on the math logic itself.
The Immediate Pivot: Because Snorkl provides instant, personalized AI feedback, the teacher’s role shifts. You aren’t just reading answers off a key to a silent room; you are intervening based on real-time data.
Moving with Data-Driven Intent
The most exciting part of this shift isn’t just the tech; it’s the Strategy.
Editor’s Note: The “Insight” Advantage Don’t just look at individual scores. Use the Insights feature to see patterns across your class. Snorkl analyzes the results and groups students with common mistakes together. This allows you to pull a small group immediately and address the issue while the interest is still ongoing.
A Rallying Cry for Success
When we see a quiet student step into the arena, using their own voice, their own language, and their own logic, it validates that our instructional choices are working. It proves that the student can do the work, and now we have the data to back it up.
I want to hear from you: When was the last time a “quiet” student shocked you with their brilliance? How did you uncover it? Share your success stories below. Let’s celebrate the moments where the “biopsy” saved the day!
It’s the same story every year. You leave school on Friday, thinking the lesson was solid. The exit tickets were great, the students “got it,” and you have the data to prove it.
Then Monday morning happens. You know where this is going, right?
You pose a warm-up question, and instead of hands in the air, you get a sea of blank stares. It’s frustrating, defeating, and it feels like you’re constantly playing catch-up. Reteaching isn’t fun for you, and it certainly isn’t for them. But why does this happen? I’m so glad you asked.
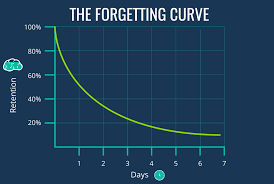
The Science of “Monday Amnesia”
The culprit isn’t your teaching; it’s a psychological phenomenon called the Ebbinghaus Forgetting Curve.
In the late 1800s, psychologist Hermann Ebbinghaus discovered that human memory declines exponentially. Without active reinforcement, we lose 50-70% of new information within the first 24 hours – yikes! By the end of a week? Up to 90% can be gone.
When we wait until “Friday Review” to revisit a concept, we aren’t reviewing; we are re-learning. We are trying to fill a bucket that has already leaked dry. This is where our frustration begins.
How to Flatten the Curve
Ebbinghaus also found a solution: Spaced Repetition. And if you follow John Hattie’s work, he has found that spaced repetition has an effect size of 0.62 to 0.65. Every time you revisit information, the forgetting curve flattens. The memory becomes more durable, and the rate of decay slows down.
The “sweet spot” for that first repetition is within the first 24 hours. This is where MathReps comes in. See, I got you!
Why MathReps is the “Escape Hatch”
MathReps is built on the 10-Minute Mastery Loop. It works because it solves two major classroom problems at once:
The 24-Hour Reset: Instead of waiting for a weekly quiz, MathReps hits the same standards/skills daily. By practicing on Tuesday what was learned on Monday, you “reset” the forgetting curve before the “blank stares” have a chance to set in.
The “Brain Tax” Refund: Usually, reteaching involves a new layout or activity. This forces students to pay a “Brain Tax”, using their cognitive energy just to understand and navigate the instructions and tasks. With MathReps, the format stays the same for 6-8 weeks. Because the structure is predictable, the “Brain Tax” is zero. Students spend 100% of their mental energy on the math. And this is exactly what we want them to do.
Build Mastery, Not Just Distant Memories
When you use the same MathRep for 6-8 weeks, the skill moves from working memory into immediate recall. You don’t need a hundred different activities; you only need 5-7 core MathReps to cover the entire year’s essentials. Right there is what every teacher wants to hear. No digging through sites to find another activity, no extra work for you, just 5-7 MathReps that you work with during the year.
Check out this 30-second breakdown of how the protocol works:
Ready to start your first loop?
Don’t waste another Monday morning playing catch-up. Use our searchable database to find the perfect daily rep for your current unit or one that will help with your yearly review for those state tests.
💡 Pro-Tip: Start your first 8-week cycle with Place Value. It is the foundation for almost every other standard, and building automaticity here will pay dividends all year long.
Well, I’m back. It’s been a hot minute since I’ve written here. I was in the February slump that somehow dragged into March – you know how that goes. But during that quiet time, I was busy building the tool you’ve been waiting for!
As many of you are aware, I am the creator and curator of MathReps. For a long time, I have wanted a searchable database where you can look up MathReps by standard or keyword (s). I am pleased to say that I have created such a system! Yes, that’s right, you can now search through the entire K-12 MathReps library and find what you need. The system is seriously slick; it will take you to the exact slide you need. No more searching through stacks of slides. No more wasted prep time. We’ve all been there. We know there is the perfect MathReps for 4th-grade fractions, but you’re clicking through a few different slide decks to find it. I decided that HAD to end.
Here’s a quick 55-second walkthrough to see it in action.
What You’ll See: What this new database does for you
Search by standard: type in “4.NF.1” and go
Search by keyword: need “Decimals” or Array”? Just type it in
Direct Access: It doesn’t just take you to the slide deck; it takes you to the exact slide
This is just the beginning. I have a few ideas for making it even better. Stay tuned. I’d love for you to go try it out at mathreps.com/search-all-mathreps and tell me: What’s the first standard you’re going to search for?
For 4th-grade educators who are guided by the CCSS.Math.Content.4.NF.C.6 and CCSS.Math.Content.4.NF.C.7 standards (part of the Number & Operations—Fractions domain), this MathRep is a game-changer.
Use decimal notation for fractions with denominators 10 or 100. For example, rewrite 0.62 as 62/100; describe a length as 0.62 meters; locate 0.62 on a number line diagram.
Compare two decimals to hundredths by reasoning about their size. Recognize that comparisons are valid only when the two decimals refer to the same whole. Record the results of comparisons with the symbols >, =, or <, and justify the conclusions, e.g., by using a visual model.
Why Teachers Love It
Low floor, high ceiling: Students can start with simple conversions and move toward rich reasoning and comparisons.
Multiple entry points: Some may begin with fraction-to-decimal conversion, while others may focus on comparing decimals; yet, both pathways are supported.
Discussion built in: The MathRep encourages students to explain their thinking (“I know 0.59 is less than 0.6 because …”), which deepens understanding. Using this MathRep in Snorkl can further support student reasoning.
Standards-aligned and ready to use: Especially helpful when you need a targeted resource for 4.NF.C.6 and 4.NF.C.7.
Ready to Get Started
Download or open the accompanying MathRep (see video) and begin your lessons with this ready-to-go template. Embed the video in your class expectation or homework link to give students a chance to revisit the concept later. Doing it on paper? Why not print out a blank template and a completed template on the back and insert it into a plastic sleeve? Students then have a reference if they get stuck.
Visit MathReps.com for free templates and more resources.
Final Takeaway
This MathRep is a powerful, standards-aligned tool for supporting 4th-graders in mastering decimal notation and comparison. By anchoring learning in discussions, visual models, and student reasoning, it simplifies complex content into manageable and engaging experiences. Add this to your toolkit and watch your students build confidence with decimals.
Let me know how it goes in your classroom – I’d love to hear your success stories and any tweaks you make!
I’m sure I’ve mentioned Snorkl before, but it’s worth sharing again, especially because MathReps are part of the platform!
If you haven’t explored it yet, Snorkl is an AI-powered feedback tool that provides students with meaningful and personalized responses to their work. Teachers can create their own assignments or choose from Snorkl’s library of ready-to-go activities. These activities span all grade levels and subject areas – from kindergarten through high school – and include math, ELD, science, history, and language arts.
When a student completes an assignment, Snorkl analyzes their work based on the rubric (which it can even create for you!) and provides feedback and a score. It doesn’t provide answers, but instead encourages students to think deeper and revise their work.
A few reasons I ❤️ Snorkl:
It’s simple (not loaded with bells and whistles) and intuitive for both teachers and students.
Teachers can start from scratch or choose from a library of quality tasks.
Feedback can be provided in multiple languages, but teachers always see it in English.
Directions and feedback can be read aloud, making them perfect for young learners or multilingual students. (And it doesn’t sound robotic!)
Snorkl in Action: A Classroom Story
Recently, I had the opportunity to visit a 3rd-grade class to help them get started with Snorkl. (Total aside, but the teacher—Erin Daines—is one of the most naturally gifted educators I’ve ever met. I always learn something new in her classroom!)
On the first visit, we started simple with a fun activity from the Snorkl Library: “Introduce yourself and draw a picture of something you like.”
It was a low-stakes way for students to explore some of the whiteboard tools—pen, highlighter, shapes, and lines and get comfortable with the platform. We set it up so they could view and comment on one another’s work, and the engagement was instant. The room was buzzing with creativity and laughter.
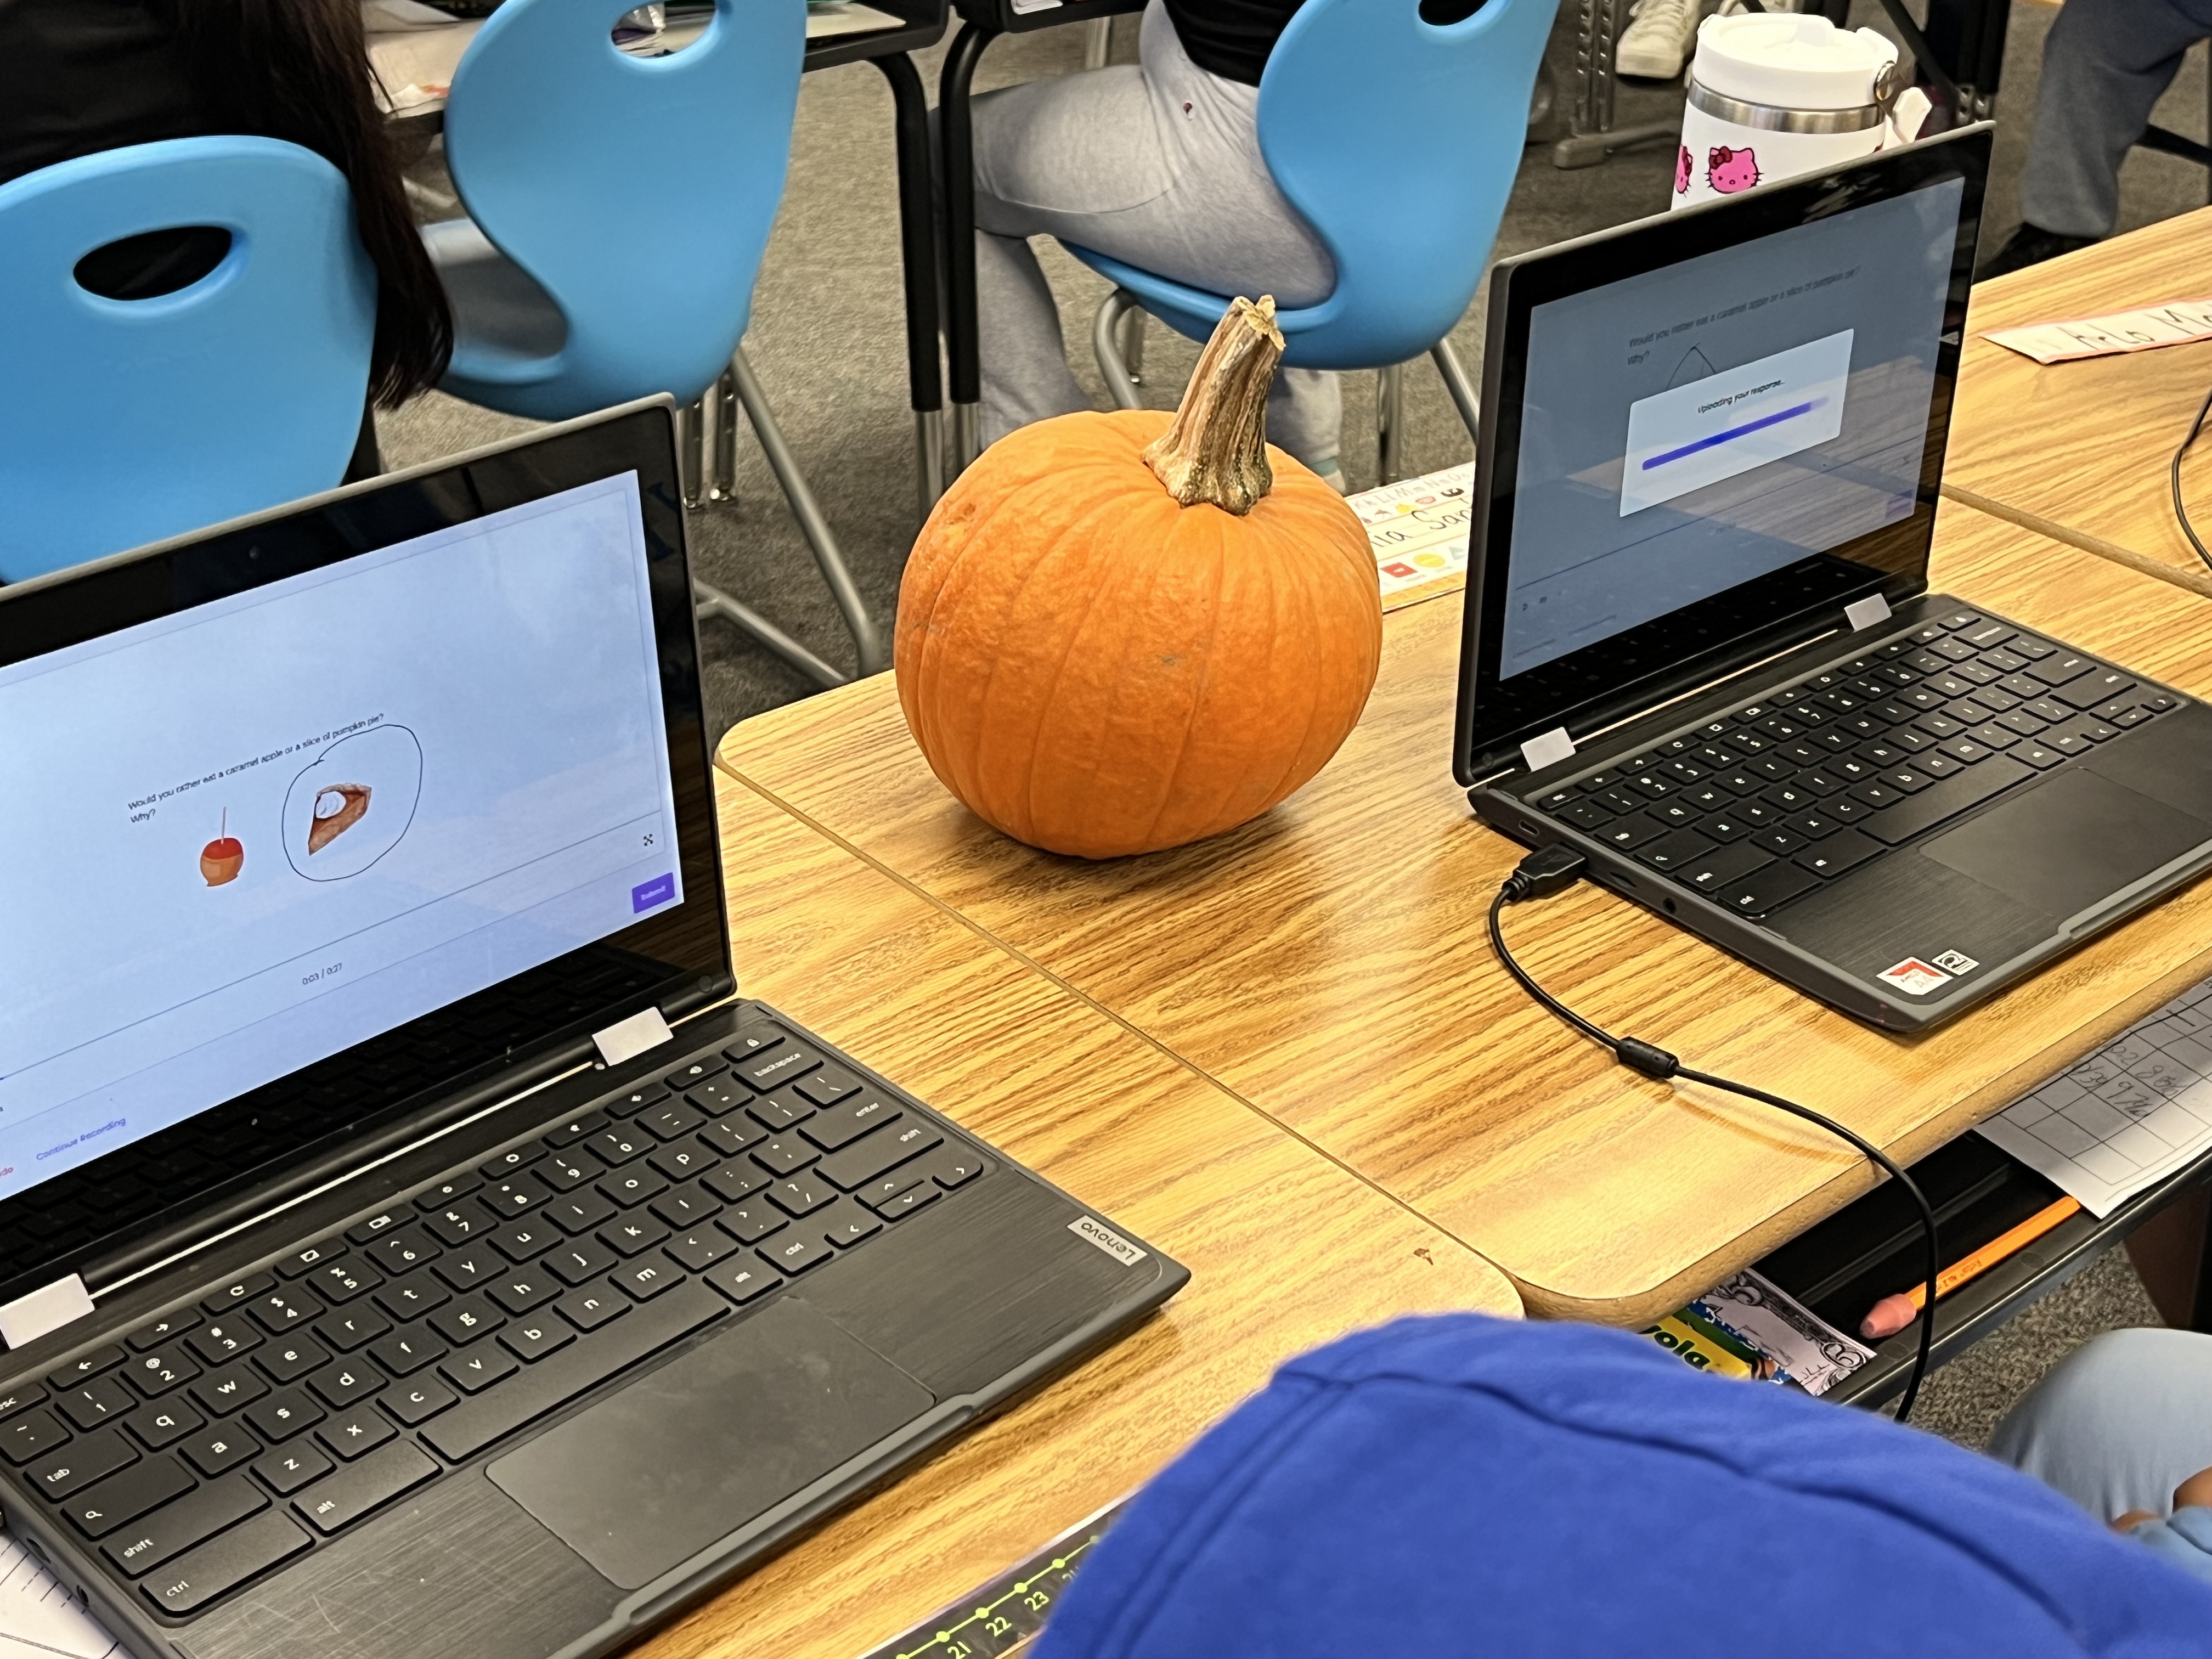
When I returned the next week, we took things a step further. We made the next assignment collaborative, which meant students appeared under playful names, such as Zany Zebra or Curious Coyote. This anonymity helped students focus on ideas instead of popularity, something I really appreciate.
We started with a Would You Rather prompt: “Would you rather have a caramel apple or a slice of pumpkin pie?”
Students had to choose one and explain why. One student chose “neither” and explained his reasoning. Snorkl acknowledged his logic but scored it lower and challenged him to pick one, since the task was to make a choice, an excellent learning moment in a safe environment.
Then came the highlight: a 3rd Grade MathReps addition activity in Snorkl!
Students completed the task, then recorded their explanations to show their thinking. We know that when students can explain a process, their understanding deepens. Snorkl provided instant, helpful feedback that supported this reflection.
The best part? When students didn’t earn a 4/4, they wanted to improve. They read or listened to the feedback and tried again: some two or three times! The combination of MathReps and Snorkl fostered perseverance, reflection, and a sense of pride in learning. It was so exciting to witness.
Try MathReps in Snorkl!
Yes, MathReps are live in Snorkl—you’ll find them under the EduProtocols section. Currently, activities are available for grades K–4, with additional 4th-grade content and upper-grade levels forthcoming.
If you’d like to beta test upcoming MathReps in Snorkl, I’d love to have you join in! Just reach out and let me know.
So go ahead—try a MathRep in Snorkl. Let your students explore, explain, and shine.
MathReps are more than just a worksheet—they are a targeted, daily instructional frame designed to leverage the science of learning to create genuine mathematical mastery. Here is a look at their inherent power and how they succeed where traditional, rigid curriculums often fail.
The Power of MathReps—What Makes Them Effective?
MathReps are powerful because their structure is built on proven principles of cognitive science and student-centered learning. (Note: MathReps are not a curriculum, rather a powerful tool that can enhance any curriculum.)
Reason
Explanation
Systematic Spaced Repetition (The Forgetting Curve)
The daily repetition directly combats the ‘forgetting curve,’ a term that describes how quickly we forget new information. By consistently allowing students to revisit skills, MathReps move concepts from short-term memory into long-term mastery (fluency) in a way that end-of-unit tests or once-a-year review packets cannot.
Reduced Cognitive Load
The basic lesson frame/graphic organizer is predictable and familiar. When the structure is constant, students don’t waste mental energy figuring out the assignment’s format, allowing them to dedicate all their cognitive load to solving the problem, making connections, and mastering the skill.
Connection Between Concepts and Strategies
MathReps are designed to promote a deeper understanding by requiring students to connect multiple representations (e.g., area models, partial quotients, and the traditional algorithm) on a single page. This helps them bridge the ‘how’ (procedural fluency) with the ‘why’ (conceptual understanding).
Daily Spiral Review of Multiple Standards
Unlike unit-by-unit curriculums that drop a topic once the unit is over, MathReps embed daily spiral review for several standards at once. This ensures that skills learned in September are still being practiced and reinforced in February, building confidence and preventing skill degradation.
Customization and Differentiation
They are fully customizable, allowing teachers to select skills based on student data and individual needs. This makes MathReps a personalized learning tool that meets each student exactly where they are—a crucial advantage over a standardized textbook.
Fosters Long-Term Success
Real-world evidence shows their success. One 3rd-grade team, for example, reported an increase in fraction proficiency from 19% to over 82% after implementing the daily repetition of MathReps.
How MathReps Do What Traditional Curriculums Fail To Do
Traditional math curriculums, whether purely procedural or heavily conceptual, often fail in three key areas that MathReps are specifically designed to address.
Failure of Traditional Curriculums
How MathReps Solve It
Failure to Ensure Skill Retention
Traditional curriculums move on too quickly. If a student misses a concept or needs more time, they “fall off the train” and develop a learning gap that a built-in review system can’t fix.
Failure to Bridge Conceptual and Procedural Fluency
Curriculums often lean too heavily in one direction: either “drill and kill” (rote memorization without understanding) or purely conceptual (understanding the theory but lacking computational skill). Often focusing on one skill at a time and never showing the connections.
Failure to Adequately Address Learning Gaps
Standardized, one-size-fits-all textbooks cannot accommodate a classroom where students may have learning gaps spanning multiple years. Pushing “high expectations” without addressing prior knowledge often leads to student failure.
MathReps provide the crucial daily rhythm of practice and reflection that students need to connect, internalize, and ultimately master their math skills, setting them up for success when confronted with more complex material.
This past summer, I’ve been sharing insights about the MathReps collection available in Snorkl. In my recent post, New MathReps Available in Snorkl Library, I provided a quick guide on how to easily navigate the platform to discover your favorite MathReps. Don’t miss the latest video that demonstrates how to seamlessly add these resources to your library and customize them to suit your specific needs.