Create Videos for Your Class

This post is created for Professional Development for KCUSD, October 24, 2012.

In this 40 minute session attendees will:

  • Familiarize themselves with quick and easy video techniques.
  • Be able to leave this session and enter your classroom ready to go.
  • Be able to use videos for assessment purposes.

Video taping doesn’t have to be difficult. You just need to remember what your focus is: the content of the video, not the quality.

This first video was created and shot by a student.

I was looking to see if the student understood the concept of place value. The video was shaky and there were several pauses. I didn’t care. This video can be shown as a review in class or used by students to review on their own. I also used this video as an assessment tool. It’s time we start assessing ways other than paper/pencil, fill in the blanks!

What do you need? Any of the following will do:

  • FlipCam (no longer made, but can probably find on ebay, Craigslist, or other such sites. This one is my favorite!
  • Sony Bloggie
  • iPod
  • Smart phone
  • White board or paper for student to write on
  • Writing tool

Where to start?

  • Give students a specific task (i.e. show me how to add 4 + 3)
  • Tell them the video must be done in one shot, no editing!
  • If there are mistakes, it’s okay (unless they’re huge then have them redo!)
  • A quiet setting is more favorable (just outside your classroom, or in the corner)

Okay, so they’ve done the video…Now what???

You will want to upload your video somewhere. I suggest Vimeo. Since we do not have access to Youtube (education); this is the next best thing. If you don’t have a Vimeo account, sign up. It’s all FREE! Once you have uploaded your video to Vimeo, you will have to wait approximately 1/2 hour for you to be able to view it. Make sure you set the privacy settings to ‘anyone’.

To set your video to ‘anyone’.

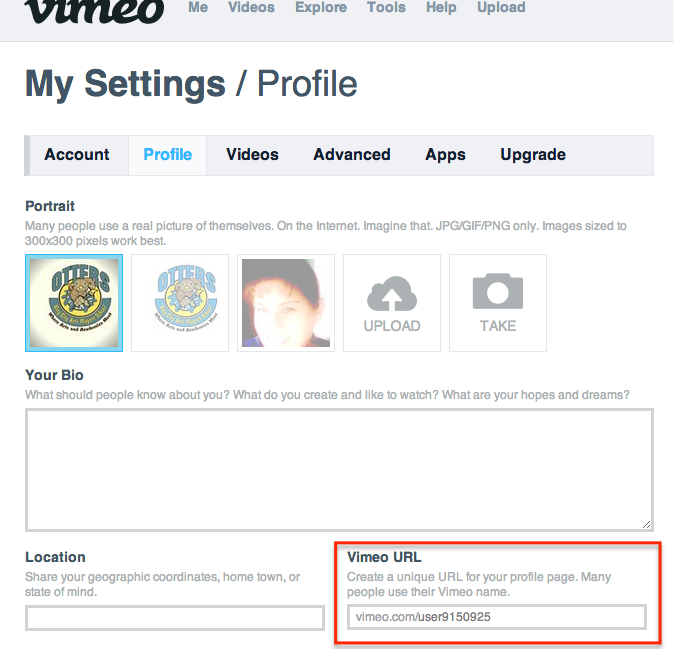
Personally, I like to put all videos on my website. This makes it easy for students and parents to find. If you don’t have your website set up yet, you can direct people to your Vimeo URL. You can find yours by going to the Profile section of the Settings.

That’s great Lisa, but I teach Kinder. How can I use it?

  • Have students stand in a single file line with a shape, number, or high frequency word on a paper. You hold the camera. Have students walk up to you one at a time and say what’s on their paper.
  • Have students draw a story (retell or their own), with an older student recording the younger student can verbalize the story.
  • Record a silly song they like to sing.

5 Video Projects to Try With Your Students Written by Richard Byrne

Some tips: 

  • If students are recording, give very specific directions. Now is not the time to get creative. Tell them to just record the paper they are working on.
  • If students are to be in the shot, as for interviews, tell them where to stand.
  • Focus on the content, not the video quality.
  • Have fun!

If you’d like to see other videos my students have created, check them out here.

How Blogs Can Be Used In the Classroom

This post is created for Professional Development for KCUSD, October 24, 2012.

In this 40 minute session attendees will:

  • Familiarize themselves with different [blogging] host options: kidblog, Blogger (part of our Google Apps), Edublogs, and Weebly.
  • Kidblog will be the primary focus for this session.
  • Be able to leave with the knowledge on how to begin a classroom blog.
  • Be able to use their new blog for assessment purposes.
  • Be able to maintain a simple blog.

Blogging is an informal way to communicate thoughts and ideas. Many ‘posts’ contain pictures or videos to enhance the reader’s experience. Think of a blog as a journal, and each post as a journal entry. However, educators are using blogging in the classroom to extend learning beyond the classroom walls and into the 21st Century. Students can now communicate with other students around the world through blogging.

There are some really great options for hosting your blog. For beginners, Kidblog is easy to manage. As a 3rd grade teacher I found this easy for my students and myself to manage. Choose the one that you feel most comfortable with. For the purposes of this PD we will look at Kidblog. After you sign up, this is what you will see, minus my posts and comments.
You have a few options for blogging. You can A) be the sole blogger and have your students post comments, B) be a blogger and assign a select few their own blog (which you will approve all posts and comments for), or C) be a blogger and assign each student in your class a blog (which you will approve all posts and comments for). The choice is really yours. There is no right way.

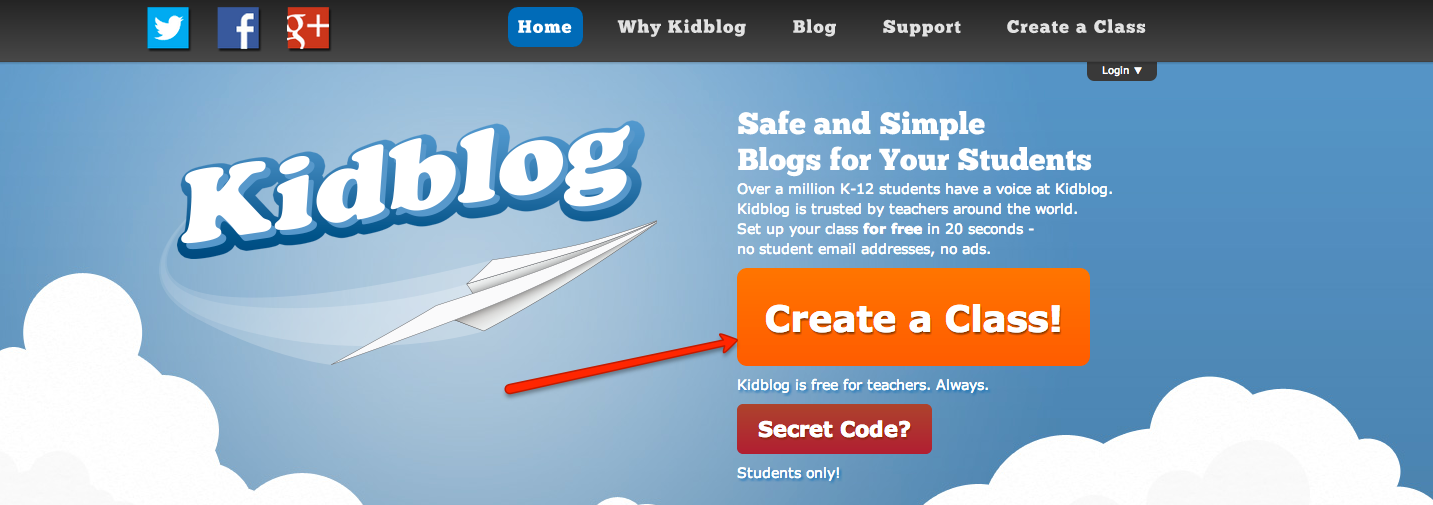
Now let’s get you set up. Go to kidblog.org and choose ‘Create a Class’

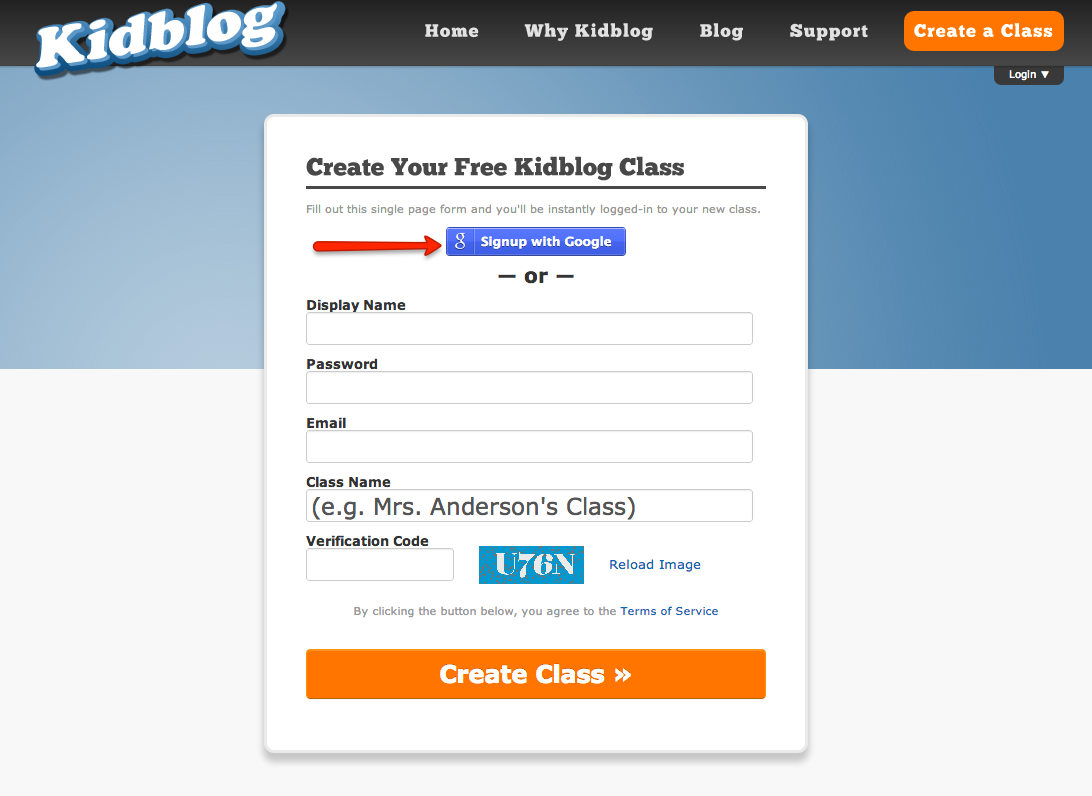
Sign up using your school email (it’s Google).

On the next page, you will need to choose the blue button “Always Allow”. You will only need to do this step when you first sign up.

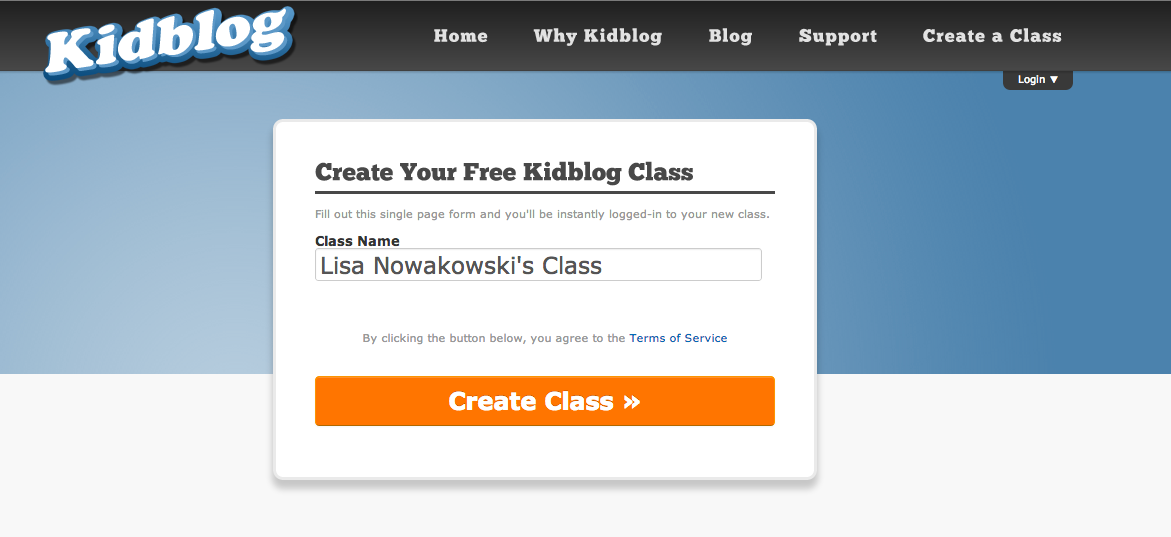
Now you need to name your class.

Now you are ready to begin! You are now looking at your dashboard. This is your command central. To get started and make sure the world can see you, we need to go to settings.

I place a link on my website for my students and parents to have quick access.

Kidblog has several themes you can choose from. All you have to do is decide which one works best for you.

Changing the time has proven useful for me. I have asked students to respond to a post, or create their own, if the time is at 10pm, I know a parent or older sibling is doing the work for them!

Remember to save all changes before moving to the next page.

Next, we will go to the ‘Posts’ section in ‘Settings’.
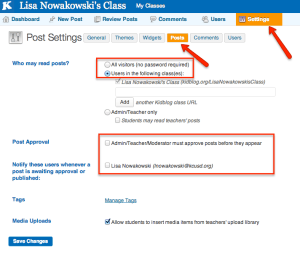
We are still in Settings.

Choose the ‘Posts’ button.

CHANGE ‘Who may read my posts?’ to ‘everybody’. This makes it easier for parents and students to comment.

Next, check mark the two boxes that state Admin/Teacher/Moderator must approve posts before they appear. This is useful when you assign students their own blog.

Having a message sent to you regarding posts waiting for approval makes your life easier too.

Finally, remember to save all changes.

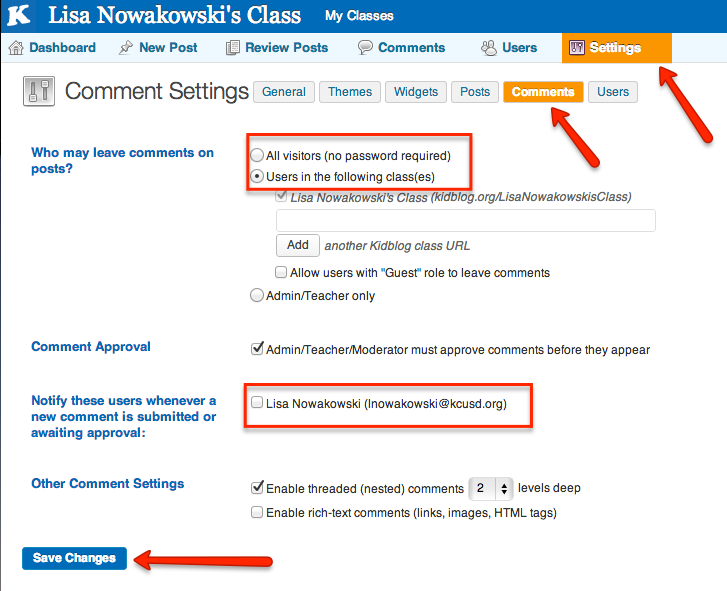
Now we will look at our ‘Comments’ settings.
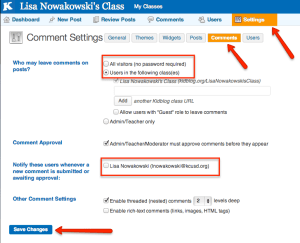
We are still in the main ‘Settings’.

We are in ‘comments’.

You will notice that this looks very similar to the ‘Posts’ settings.

CHANGE the setting ‘Who may leave comments on posts?’ to ‘All visitors’. Not only will it encourage students, parents, and grandparents to comment, but you can then encourage other classes or schools to comment.

Comment approval is already checked to be approved before they appear.

Again, check the notification box.

Finally, save all changes.
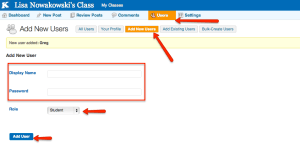
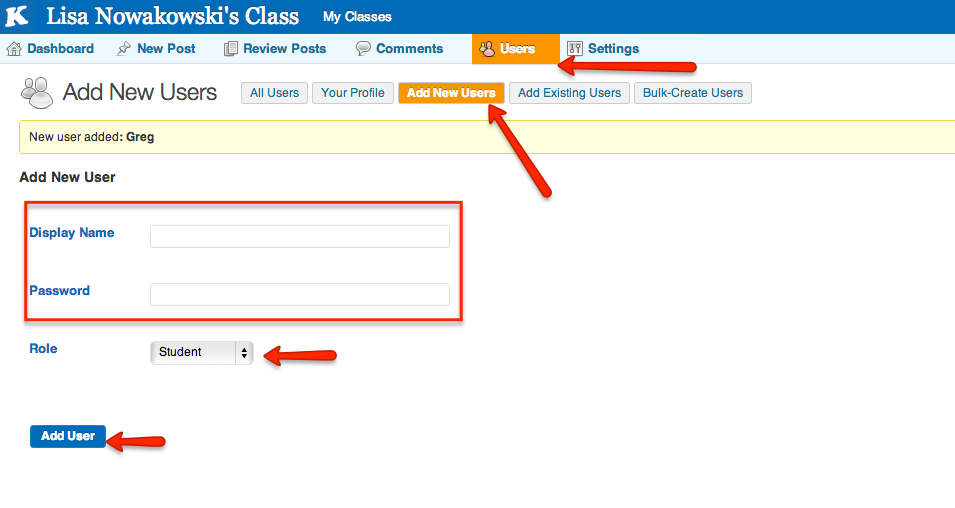
 If you want students to have their own blog, select ‘Users’ and ‘Add New Users’.

I find it easiest to set the display name as the student’s first name.

I often keep the password the same as the display name. This way it’s easier for younger students to remember.

Keep their role as ‘student’

And finally, save all changes.

You and your students are now ready to start blogging! Simply select ‘New Post’ at the top of the page and begin writing. It’s that easy.

How do students get in you ask?

Now what?

Now that you are all set up, the uses are limitless. I have used blogging as a form of assessment:

  • For assessing on a post I write, I pose a question or problem. The students then answer.
  • For assessing on their blog, I have students respond to a question or problem that I have posted on their blog. I did this by accessing each student blog and copy/paste the question. This way, each student is working on his/her own blog without copying what someone else may have written (which can happen in the above example).
  • Another way to assess, is to have students explain on concept on their blog. This way I don’t have to go in and post on each blog first. For example, I will have students explain how to multiply two numbers.
  • I have used it for assessing writing. I give students a choice of 4 or 5 topics or writing prompts to choose from. They then respond on their blog. We have a scale (rubric) in class, so they know what I expect.
  • I also expect students to comment on each other’s posts. Again, there is a scale to avoid such comments as, “Good job!” The comments should be specific and part of the topic.

Families can also get involved. Many times the family members comment on the student blogs, making it even more meaningful and powerful for the students. The idea that the world can read what they write is a powerful motivator for quality writing.

Happy blogging to everyone!

Student Videos

Since I first went to CUE in Napa Valley in 2011, I have been integrating student videos into my routine. I often have students create their own tutorials which I then post on my class website for all. This serves two purposes for me. First, I don’t have to make a tutorial for students to refer to with key concepts. Secondly, I use the tutorials as unobtrusive assessments. Today, this was a very valuable lesson for me. I sent two top students out to create a video on multiplying with decimals. They proved to me that they knew what they were doing so off they went to the office to create their lesson. It wasn’t until after school that I was able to view the video. While watching, I saw 2 misconceptions both students had. The upside to all this? Well, I can now go back tomorrow and target the misconceptions (with the whole class), because if these two have the wrong idea so does the rest of the class. And, they aren’t as proficient as I thought (or would like them to be). I guess it was a good learning day for us all.


Multiplying with Decimals (with misconceptions)

GTA Mountain View

Well, I’ve applied again. This time I had several people look over my application questions and video and give me feedback. Many thanks to all those who helped. It was all due last week and I felt good sending it off. So, here is the video portion of the application. It was rather difficult to put in all the cool things that happen in the classroom in one minute. Hope you enjoy it. We had fun creating it.

Cool Teaching Moment

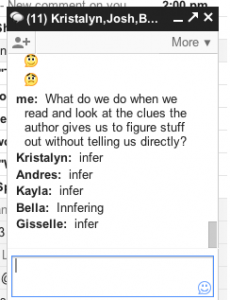
Today while working on our Google Apps (Gmail), the students discovered (Kristalyn to be specific) that they could have a group chat. So using our Google Chromebooks we had a giant group chat. This then turned into a vocabulary review. I joined in the discussion and began asking them questions. What a great impromptu learning opportunity! I have never seen a group of students so motivated to work. I’m still buzzing with the excitement that was generated. It’s days like this that make teaching the best profession!

Google Calendar

Google Calendar is a wonderful tool with many features. This is just a basic overview. We will go over creating a calendar, adding events, and adding your calendar to your email page — makes it super easy to see what’s coming up.

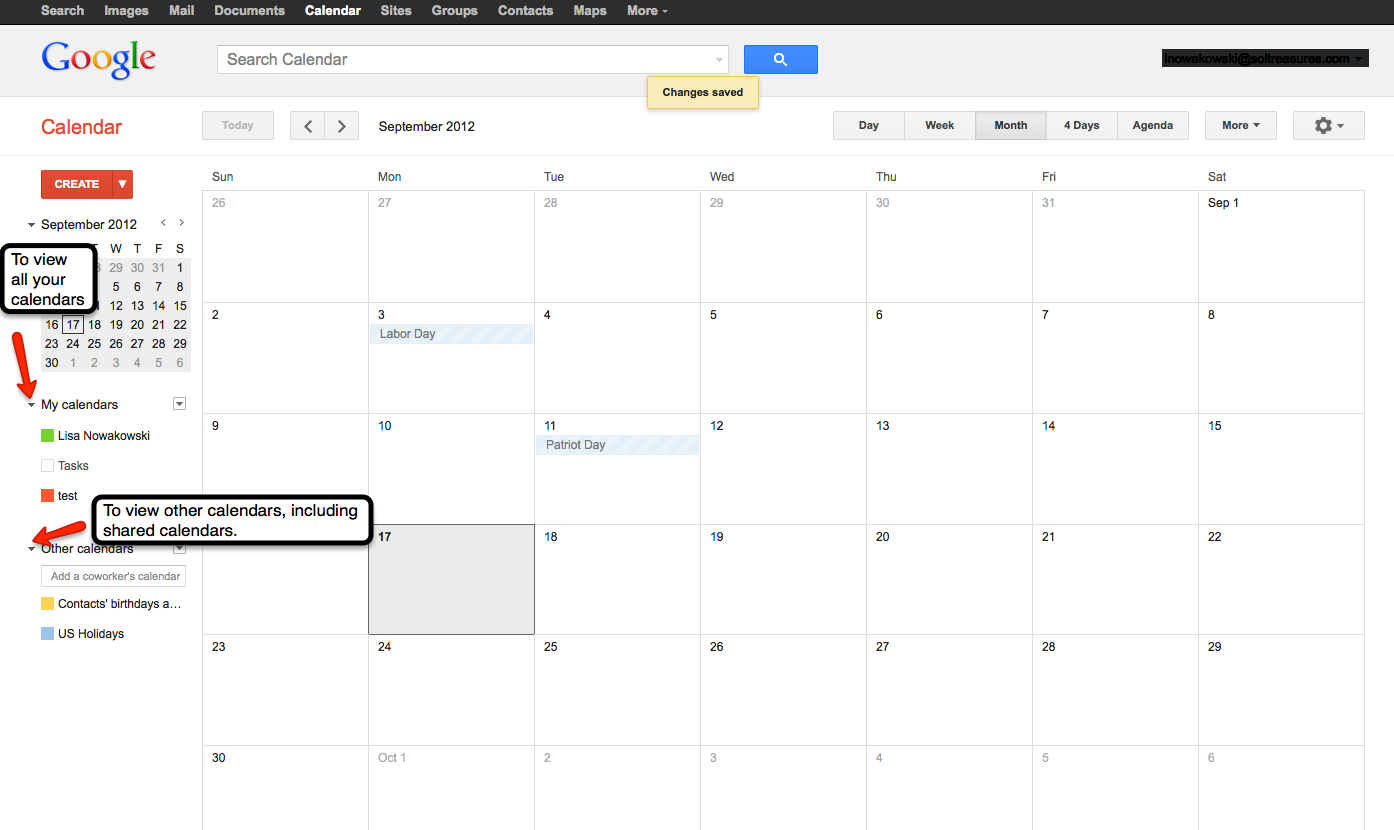
First, log into your account and go to Calendar. You can do this by going to the top bar or Calendar when you first log in.

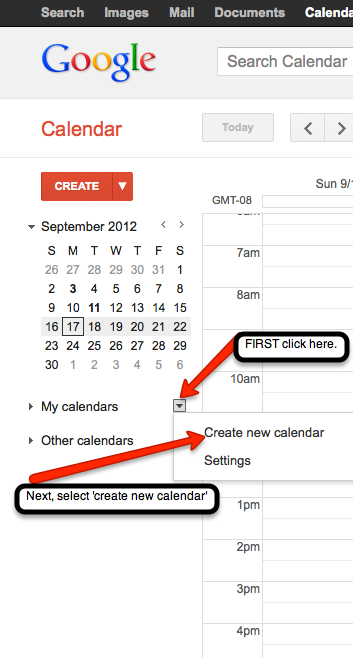
 You will now create your own calendar. Find the ‘My Calendars’ section. Just to the right of that, there is a small arrow. Click on the arrow to create a new calendar.

Next, fill out the information for your calendar. If you would like to add this calendar to your website, be sure to check the ‘public’ option. You also have the choice to share your calendar with a few. Simply input their email addresses. When all information has been added click the ‘Create Calendar’ button located at the bottom of the page. This will then take you back to your calendar.

To view your calendar(s) click the small arrow to the left of ‘My Calendars’. Yours will be listed with separate colors for each calendar. To view other calendars, click the small arrow to the left of ‘Other Calendars’. You can add a variety of calendars, including friends. To view, and add, other calendars click on the small arrow to the right of ‘Other Calendars’ — the small arrow with a box around it. Holidays & Moon Phases calendars can be found under ‘Browse interesting calendars’. Once you find one that you like, you can ‘subscribe’ to it.

Add an Event:

The quick option is to click on the date of choice and fill in the information.

The other option is to ‘double click’ on the desired date and fill in the information. Remember, if you want the information to be posted on your webpage calendar, choose the ‘Public’ option. Save all information when you are done.

Joining Other Calendars:

You will receive an email notification that you have been added to a Calendar — by say your lovely secretary, to view the school’s Calendar. The Calendar will automatically be added to your Calendar page under ‘Other Calendars’.

View Calendar on Your email Page:

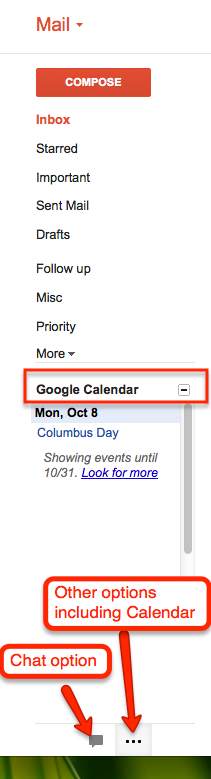
Going back to your email page, you will click on the ‘Gear’ on the right and choose ‘Settings’

From the ‘Settings’ page, you will go to the ‘Labs’ tab. Scroll down until you find ‘Google Calendar’. Once you have located it, be sure to ‘Enable’ the lab. Finally, ‘Save all changes’. This button can be found at the top or bottom of the page.

You can now easily switch between the ‘Chat’ option and the ‘Calendar’ by clicking on the icons at the bottom of the left column.


Soon, I will discuss how to add an attachment and ‘event flair’ to an event!

Sharing in Google

The easiest way to collaborate is by ‘sharing’ Documents in your Drive. We have talked about how to create Docs and folders. Now, just take it one step further and ‘share’ those to have dynamic, cross-grade, cross-district PLCs. It’s quite easy.

Sharing a Document (or presentation, form, spreadsheet, drawing):

Once you have created your desired document, click the blue share button.

Type the names of those you wish to share with. You can allow others to edit or view. The default setting is ‘edit’. If you would like to retain control over who is allowed to have access to your document, click on the ‘change’ link on the bottom right. Change the ‘share settings’ to ‘Only the owner can change the permissions’. When finished, click ‘Done’.

Sharing a Folder:

Now there are many times when you will want/need to have ‘shared folders’, with your PLCs. That is the same process as sharing a document. The advantage with sharing a folder is that whatever is placed in that folder, it is automatically shared with everyone.

First find the folder you would like to share with others, select it. Then click the ‘share’ icon at the top of the page.

You will then be taken to the ‘Share Settings’ to select others to share the folder with.

I currently have several shared folders. I share an ELD folder with prezos and documents with several teachers in my district. I also share a Math folder with homework forms.

I have shared documents with 10 other teachers to create one OUTSTANDING document. One document was created within 12 hours by teachers in a 50 mile radius. Several of us were creating, sharing, and editing at the same time. It was an amazing experience. This type of sharing makes our lessons better, makes us better teachers, and allows the creativity to seamlessly flow.

Student Video Tutorials

As we all know, one of the large pushes for Common Core is that students will have a deeper understanding of the standards. One way in which this can be accomplished is through peer tutoring. Add in a video camera and you have 21st Century tutoring. The focus of the videos/projects should be the content, not the quality of  the videos. The following video is a student explaining the process of multiplying 3 – single digit numbers. Viewing this video, I immediately know that the student has a firm grasp on multiplication. The focus was on the process. Admittedly, my one suggestion to the student would be more details for clarity (i.e. first explain that in order to obtain the final answer, one needs to multiply 2 of the numbers then multiply that product by the third digit).

Multiplying with 3 numbers from Lisa Nowakowski on Vimeo.


This particular video was filmed with an iPod by a 3rd grader. The video was then uploaded to Vimeo.com (Vimeo is a great alternative if your district blocks Youtube & Youtube Education). I then put the video on my classroom website for all to view. You will also notice that nowhere in my description did I mention editing. The videos can be done in one take. Again, the focus is on the content of the material.

Videos are also a great way to assess student understanding. The videos can then be placed into a digital portfolio.

Some parameters could be:

  • Giving time limits
  • Telling students where to stand in the video
  • Specific topics

Have fun with it! Your students most definitely will.

Create a Folder In ‘Drive’

In order to help you stay organized it is highly recommended that you create folders in your Google Drive. This is a very easy process.

From Chrome

Folder 1

Folder 2


Once there, you will see a red ‘Create’ rectangle. Click on that and you will see your options. Choose ‘Folder’.


You will then name your folder


This folder will appear in your ‘Drive’ in the list located to the right. Once you have your folder created you can then place items into that folder. To do so, locate the file you wish to move. check the box to the left. This method allows you to choose as many files as you’d like to move at once. Then at the top of this window you will see a folder icon. Click on the icon and check the folder you would like to place your item. Remember to ‘Apply changes’ and you’re done. Yup, it’s that simple!


Google Teacher Academy

Well, I have just submitted my application for Google Teacher Academy New York 2012. As I was filling out the application and working on the 1 minute video I was nervous. However, that is nothing as to what I feel now…Super nervous! Then some self doubt entered. That was so not nice or welcomed! That silly little voice that says, “Google wants someone who can reach large crowds. You don’t.”

To that voice I say, “QUIET! I did more with 3rd graders than most teachers do with middle school kids 😛 I am an amazing teacher!”

Then that silly little voice says, “Good point.”

So all that aside, I’m nervous, but hopeful. I am a tech savvy teacher. I do amazing things in technology with 3rd graders. Now that I am going to 5th grade, the possibilities seem endless! My brain is spinning with all the project based learning that will happen.

Oh, and here is that video…