Move PlaceMark Between Layers

I have begun to plan my trip to Italy. As part of this I am creating a Google Map for each city I will visit. Within each city, I have different layers: Transportation, Hotels, Sights. While creating my Rome Map, I accidentally placed a hotel in the Sights Layer. My initial thought was that I would have to delete it and start over again, making sure that I placed it in the correct layer. Then…I thought, “Wait a minute, this is Google. I wonder if I can drag and drop the hotel to the correct layer.” Happily the answer was yes! So easy.

Check it out. The image on the left has Hotel Oceania on the Sights Layer. I drug that up to the Hotels Layer, where it now resides – shown in the image on the right.

Insert Video – Google Slides

Inserting a video into a Google Slide is simple. Open the Slide you’d like to add a video to. Choose ‘Insert’ from the top menu, then ‘Video’.

Slides Video 1 (1)

Once you choose ‘Video’ a pop-out window appears. You then have the option to search for a YouTube video by either URL or Search by keywords. When you find your desired video choose the blue ‘Select’ button on the bottom left.

Slides - video 2 (1)

It will then appear on your slide.

Google Scholar

Recently my dad called, what he calls Google, (that would be me, the one with a computer) to do some research on a procedure for him. I started by doing my regular search on Google ‘Web’ when I quickly decided that I wanted something a little more scientific. This is when I switched over to Google Scholar.
Google Scholar logo
What is Google Scholar? Well, it’s ‘scholarly literature’. It takes out all the blogs, ads, and propaganda and only shows ‘scholarly research’. Since my dad was interested in a medical procedure, I figured looking at the raw data and statistics was better than looking at what the medical companies had to say.

Why talk about Google Scholar? I figure it’s one of those lesser known Google tools. It’s great for high school students and beyond. Since you can use various filters, it won’t be hard to find the information you are searching for. I’m sure when I begin my next Master’s program, this will become one of my best friends!

Filters available with Google Scholar:

scholar 1

Search By Reading Level

Update: 5-10-15

As of recent, this feature is no longer available.

Too Much Information

There IS such a thing as ‘Too Much Information’! When students begin ‘researching’ on a particular topic, they all too often type in the topic and choose the first link in the list. We need to help guide these students to better resources that they are able to access. One quick way is to teach students how to search by reading level on Google.

Conduct a Search By Reading Level

My students will soon begin learning about the Revolutionary War. When I ‘Googled it’ I was given a long list of websites and images. This is NOT what I want my students doing. They will inevitably go to wikipedia, ‘read’ information, become overwhelmed, and ultimately copy sentences. Thus driving me nuts. As I would like to avoid the whole frustrating process – for both our sakes – I am teaching them some basic search skills.

So here’s what I got when I typed ‘Revolutionary War’. Notice that along with images and videos along the top bar (below the search box) there are ‘Search Tools’. This is what I want!

Search 1

When I choose ‘Search Tools’ a secondary ‘bar’ appears on the next line. Choose ‘Reading Level’.

Search 2

Doing this will result in the ability to choose ‘Basic’, ‘Intermediate’, or ‘Advanced’. For my 5th graders, I encourage them to choose ‘Basic’. Explaining that the items that will be displayed will be closer to their reading level.

Search 3

It’s as easy as that to find information my students can access on the Internet. There is a lot of information out there, we need to arm ourselves and our students with the necessary tools to wade through it.

Resourceful Students

Today I assigned an article for my 5th graders to read from Newsela. They were to read and annotate the text,using the comment feature, in Google Docs (the original assignment was given in Google Classroom). I allowed them to work in groups in order to discuss and collaborate – we’ll talk about that in a minute.

In the middle of the assignment, I hear an electronic voice say ‘Ecuador’ in the back of the classroom. I asked my students who was doing that, and what were they doing. A group of three girls raise their hands. They explained that they didn’t know how to say a word so they wanted to hear it. Upon further questioning, they explained they went into Google Translate, typed the word, and pressed the speaker button. They simply ‘translated’ it into English. Yup, English to English! Brilliant!

gtranslate

Collaboration

As these three girls continued working together, I listened in on their discussion. After reading the article, they had a few questions to answer. One of the girls tried to assign each one a question to answer – with the intent of copying the answers from each other. Now, they know this is NOT collaboration. As I continued to listen, one of the girls pointed out that that wasn’t right, and they all needed to do the questions together. And that’s exactly what they did, answered the questions together! Smart kiddos!

Google Classroom Evolves

Google has listened to teachers’ feedback yet again. Since Classroom’s Beta rollout last summer, Google has continued to ask teachers what WE want, what would make their product better. We spoke, and they responded…again.

Today Google announced a few improvements based on OUR feedback.

1. Groups Integration

If you use Google Groups, you can now pre-populate classes with this newest iteration.

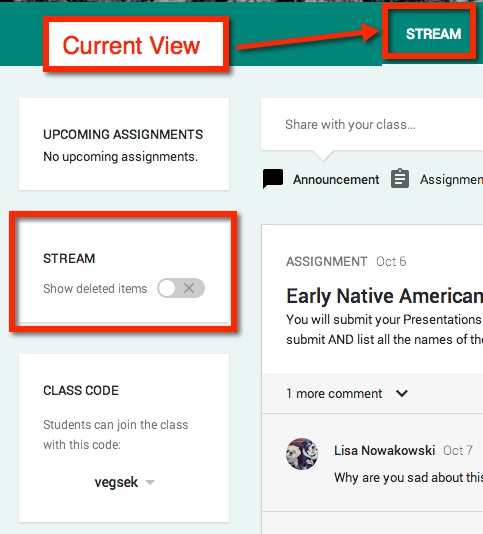
2. View Deleted Items

It’s a simple on/off toggle switch.

Classroom 1


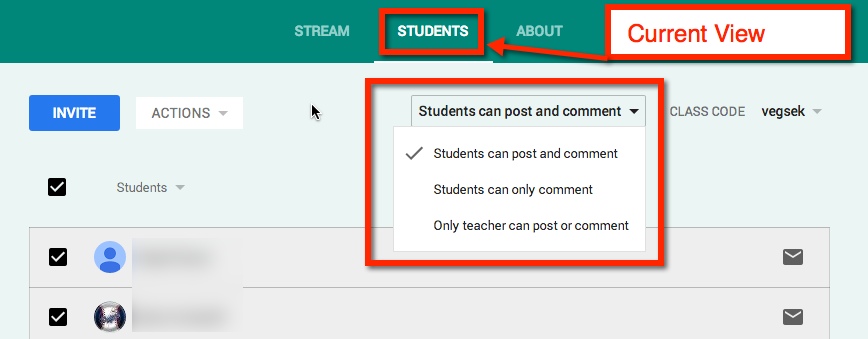
3. Control Class Commenting Feature

When in ‘Students’, you choose whether students can post, comment, or if the teacher is the only one with those rights. This feature will hold true for ALL students in the class. If you would like to control the ability for individuals to post/comment see below (number 4).

Classroom 2

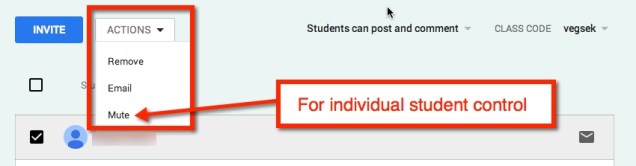
 4. Mute Individual Students

Every now and then a student tests the waters, and drowns. You now have the option to Mute those individuals. Muted students will not be able to post or comment in the Classroom.

Classroom 10

5. Sort Students

Some teachers prefer to sort by last name, while others prefer first name. Google has given teachers the freedom to sort as we please.

Classroom 3

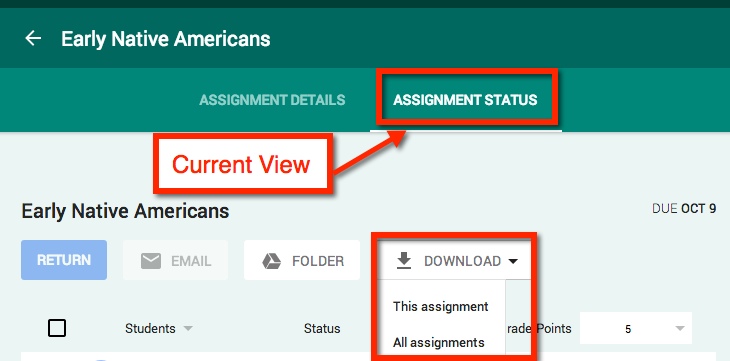
6. Downloading Grades

The ability to download ALL assignment grades at once (to CSV file) makes it easier to upload those grades into whatever grading program you or your district are using.

Classroom 4

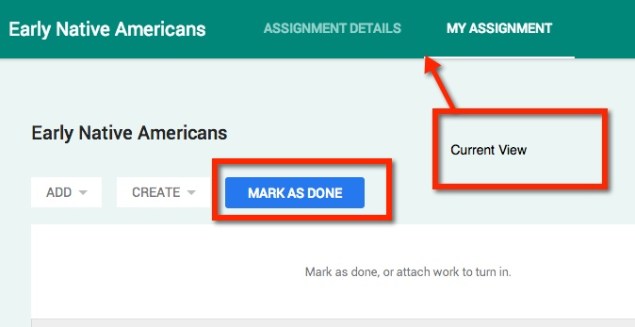
7. Students Can Mark Assignments as ‘Done’

Recently I had my students working on a Presentation in groups. I posted the assignment, but only the owner of the Presentation needed (or had the rights) to ‘Turn In’ the assignment. This left 40 ‘Not Done’ assignments – which looked messy and inaccurate. Now those students can go into their Classroom, and mark the assignments as ‘Done’.

This feature is handy when assigning reading, viewing a video, or other tasks where nothing needs to be handed in.

Student View in their ‘Stream‘. It has marked the assignment as ‘Late’.

Classroom 5

The student needs to ‘Open’ the assignment and ‘Mark As Done’.

Classroom 6

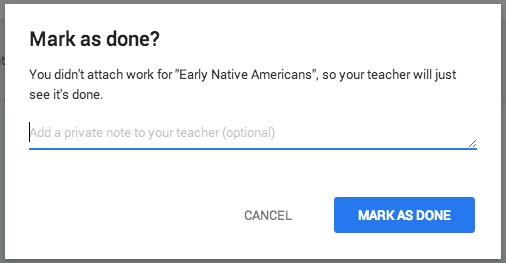
A pop-out window will appear asking if the student is sure this is the desired action. Notice the student can add a private message to the teacher.

Classroom 7


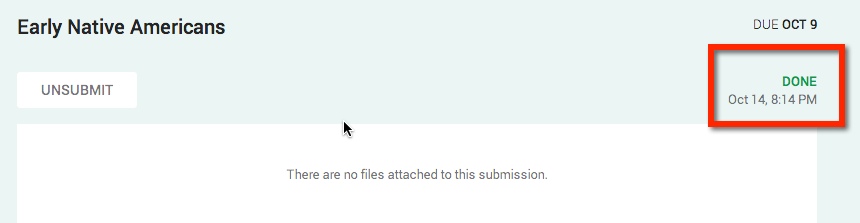
In their ‘My Assignments’ View the student has the option to ‘Unsubmit’. The completion of the assignment is noted in the right corner. It will also be reflected in their ‘Stream’ View.

Classroom 8


classroom 9

Customize Google Forms

Recently Google updated their Themes in Forms. I, for one, was happy to see this. I use Forms for homework and try to change the Themes as often as I can. This being said, if you’ve been using forms, you know how limited the Themes were. Now however, my choices are endless! The first time I customized a Form, I put a picture of my dogs on it. The next day, I showed my partner teacher (our students do the same Form for homework), and she put a picture of her baby on it. We’ve decided to start taking silly selfies and use them on our Forms.

So this is how to customize your Forms:

Choose the ‘Customize’ feature on any form:

Choose the area in which you’d like to customize: