Prepared for #ccttcd2014:
Genius Hour Info:
LiveBinder – Joy Kirr
This was prepared for #ccttcd2014:
Throughout the years, I have created a few different Calendars. This can become cumbersome, and I find the need to delete a Calendar from time to time. Here’s how to delete a Calendar:
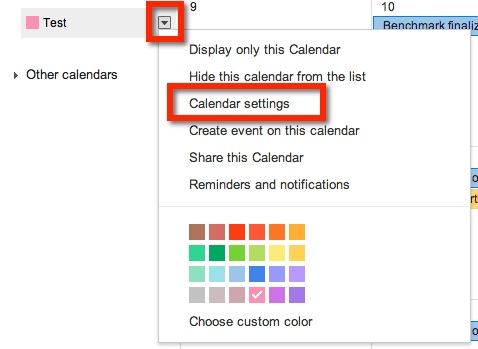
From your Calendar page, locate the calendar you wish to delete. Your calendars are located under ‘My Calendars’. If you don’t see any, choose the arrow to the LEFT of ‘My Calendars’. All your calendars will be listed here. Once you have located the Calendar to be deleted, select the arrow to the right of desired calendar, and choose ‘Calendar Settings’.

You will be taken to a new page. Near the bottom of the page, you will see ‘Delete Calendar’ and ‘Permanently Delete This Calendar’
![]()
Once you select the blue link ‘Permanently Delete This Calendar’, a pop out window will appear. It will ask if you want to Delete the calendar. Select ‘Yes’, then choose ‘Delete for Everyone’. Once you do that, the Calendar is deleted and will no longer appear the ‘My Calendars’ list.

Recently I was asked if you could insert a SECOND calendar into a Google Site. The answer is YES!
The process is simple. First, CREATE the new calendar. Make sure that the calendar is created in the same account that the Site is associated with. Choosing the arrow to the right of ‘My Calendars’ will give you the option to create a new calendar.

This will take you to a new page where you will name your new calendar (1.). If you would like your calendar public, which you probably do if it’s on a website, be sure to choose the “Share with Others’ then ‘Make This Calendar Public’ options on the page (2.). Once you have set up your calendar, remember to ‘Create Calendar’ (3.).

Your new calendar will now appear under ‘My Calendars’ on your Google Calendars Page.

Now you are ready to insert information on your new calendar.
Locate the Site and Page you would like to insert your new calendar. Enter ‘Edit Mode’ on the Site – choose the pencil icon at the top right of the page (or press e on the keyboard).
![]()
This will then bring up editing options. Find ‘Insert’, then ‘Calendar’.

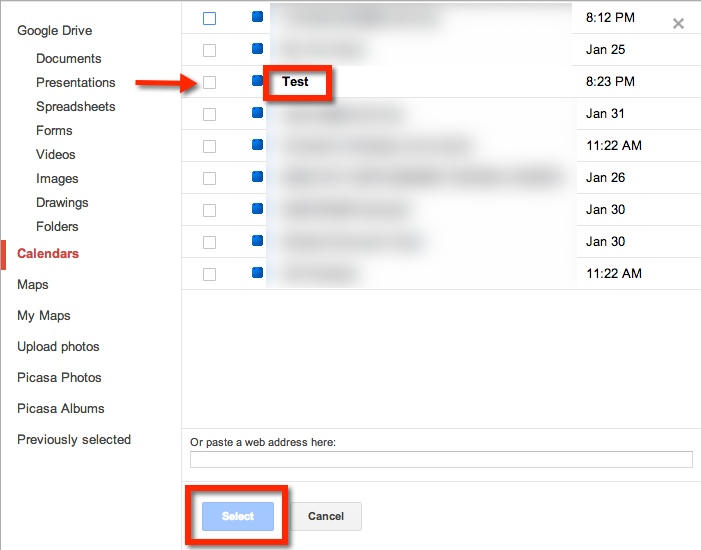
A new window will appear, choose the desired Calendar. Then, choose the blue ‘Select’ button. From here, a new screen will pop up. This will allow you to set the properties of the calendar on your Site. Remember to choose the red ‘Save’ button when you are done.

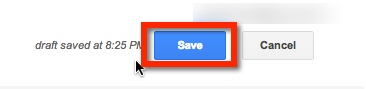
Now that you have inserted your new calendar, remember to ‘Save’ the page (located at the top right of the page). You will now see your new calendar.
I like to stay in contact with my students’ parents. One way in which I do so is through a weekly email. Each Thursday I send home an email updating the parents on what we have been learning, what we will be learning, and any important dates or events that are coming up.
How do I create a form that I can use week after week? I like to have the subheadings ‘pop’ with color. I didn’t want to have to rewrite the ‘Update’ weekly, nor did I want to copy and paste the previous week’s ‘Update’ for 36 weeks.
Canned Response! I created the first ‘Update’ email, and saved it as a Canned Response template. Now when I send out my ‘Update’, I simply insert the ‘Weekly Update’ Canned Response template. It’s so simple.
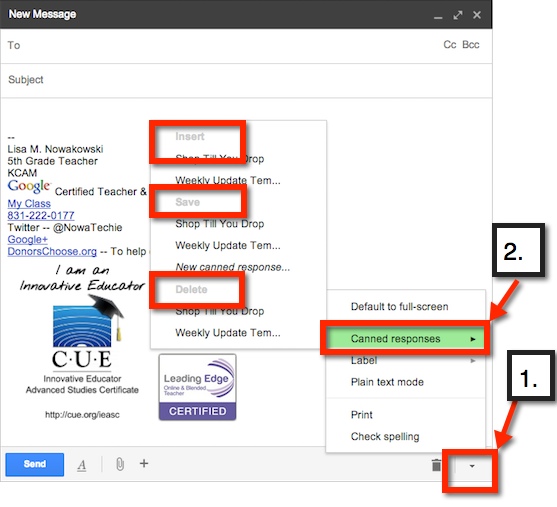
Canned Response can be found on the bottom of an email draft – 1 (bottom right, small arrow). Once it’s chosen, additional choices can be made. Choose – 2– ‘Canned Response’. From here, you can: ‘Save a Canned Response’ (save to use in the future, like I did with my ‘Update’), ‘Insert a Canned Response’ (like I do each Thursday), or ‘Delete a Canned Response’.
Another feature that allows for easy collaboration in Google Documents is the ‘Comment Feature’. This feature allows me to highlight a particular text and comment on it, for clarification or questions. It’s really very easy.
First, highlight the desired text (can be a word, phrase, sentence).

Now you can add your comment. There are 4 ways in which to access the ‘Comment Feature’:
1. From the Tool Bar icon
2. ‘Insert’ option on Tool Bar
3. Keyboard Shortcut
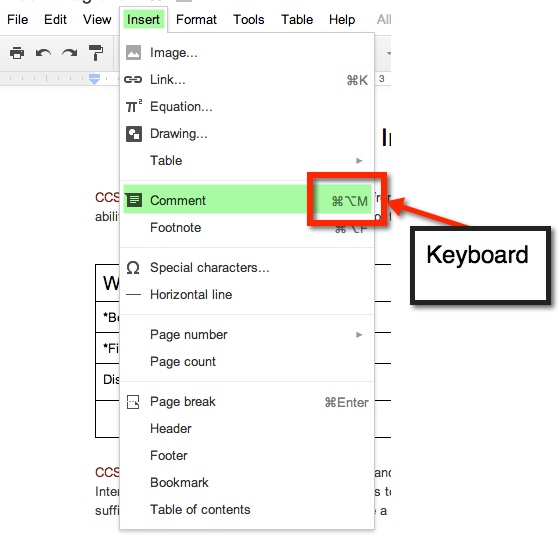
4. Gray Comments button next to Share button on top right.

A yellow comment box will appear to the right of the document. This is where you will type your comment.
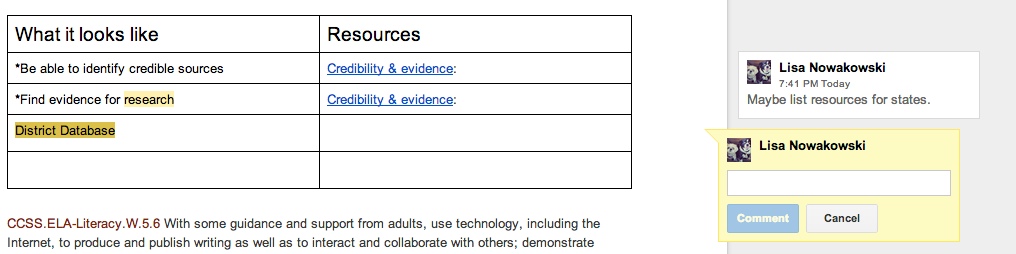
If more than one comment is on the document, and you are unsure of which comment goes to which highlight, simply click on either the comment or the highlighted section. If the highlighted text is chosen, then the comment will ‘pop up’ and show in the yellow box. If the comment is chosen, the highlighted text will become a darker yellow.
When you have finished making your comment, be sure to chose the blue comment button.

So Google has this handy little ‘Research Tool’ in Drive. I can research, AND it cites it for me, all in the document I’m working on.
While these Web Tools can be used with any subject, I focused this session on how you can incorporate them in your K-5 Math class.
Please add your ideas to the document. You will need to go to the document in order to add your thoughts.
Student Presentation Example:
Google Sites is great for many classroom uses, including: School Websites, Class Websites, Group Projects, and Student ePortfolios.
 Combining a fractions lesson and recipes is a natural combination. It connects the real world with a student’s learning. For the past month or so, my students have been learning about fractions: what they are, adding, subtracting, and multiplying them. Combine that with a teacher who is easily board with the norm, and you get a FANTASTIC lesson. One in which students ASK, “Can we work on our Recipe Project now?” Yes, students wanting to learn and were engaged.
What did we do? Well, we found some recipes. Okay, actually I found them in a cookbook that I had, from when I was a kid. They definitely weren’t the most healthy, but they were kids’ cookbooks, and worked well. I went through and found several recipes that involved fractions. Some had 2 fractions, others had 5 or more and included mixed numbers. Our student teacher handed out the recipes. Because there were various difficulties with the recipes, this allows the teacher to differentiate based on a student’s ability. The students were allowed to work together, but must hand in his/her own paper. The students had to: list the original ingredients, double the original recipe, cut the original recipe in half, and then make exactly 28 servings – one for each student, the student teacher, and myself. This took a few days. Fortunately, I do have a student teacher in my room so we were both able to filter around and help struggling students. Once they were done with the math portion, they had to create a presentation to show off to the class – and put in their ePortfolios.
We worked on this project for 3 or 4 days, including polishing the presentations. Each day the students would ask, “Can we work on our Recipe Project now?” Even the most reluctant, insecure math student was completely engaged. There were students strewn throughout the classroom at desks, under desks, and sprawled out on the floor. One group of boys worked outside to create a cardboard oven for their presentation. Other students chose to use Animoto and Google Presentation. They projected their ‘work in progress’ presentations on a big screen TV to get input from others. The room was so engaged and buzzing with creativity and learning, I HAD to call my principal down to see. He was impressed, and began asking the students questions about fractions, their algorithms, and gave suggestions for their presentations. The lesson was such a hit, my students told the other 5th grade teacher that she HAD to do it with her class, because it was so much fun. My students were happy to hear that her students had begun the project too.
Presentations will be next week. I admit, this was so much fun and worthwhile, that I am on the hunt for more lessons like this. Anything I can do to engage my students, I will. THIS is what Common Core is about: the four C’s. And this lesson had them all! Here is the lesson: Adjust a Recipe
This group will be incorporating an Animoto video into their presentation. Last week, they were practicing what they were going to say along with their video.
Yes, I found the lesson online. It is my belief that there is a plethora of information, lessons, and ideas out there. I do not need to reinvent the wheel. I am thankful to all who FREELY share. In turn, I FREELY share what I have found, my knowledge, and lessons I create. We are all here to help one another, and to help our students learn.
