Earlier this week, I was working on scheduling class visits. This meant I needed to either drag out a tab and split the screen or toggle between 2 tabs. That is when Chrome notified me that there was an easier way. And I am so glad Google let me know.
It’s called Split View (or Split Tabs). It’s a handy new feature in Google Chrome that allows you to view two different web pages side-by-side within a single tab—perfect for multitasking! And exactly what I needed.
The process is super easy:
Navigate to the first tab you want to include in the split view.
Right-click on the tab (located at the top of the browser).
A menu will appear. Find and select “Add Tab to New Split View.”
This action moves the current tab to the left side of the browser window.
The right side will list your other open tabs. You can then choose the second tab you’d like to view simultaneously, and voilà, split view activated!
Tech Tip: Once you’re in Split View, you’ll notice a new Split View icon in your toolbar (near the address bar). Clicking this gives you quick options to reverse views, close one side, or separate views back into two individual tabs. You can also resize the two panes by dragging the vertical divider.
Drag-and-Drop Method: You can also click and drag a tab down and to the left or right of another tab. A colored boundary or a “Create split view” label will appear, allowing you to drop the tab and split the view immediately.
Here’s a quick video to show you how easy it really is.
Today we’re diving into a quick and practical tip for Google Slides—adding image placeholders to your custom themes or templates. This simple feature allows students to easily insert images into a set space, ensuring consistency and maintaining the design you’ve created.
In our last post, we discussed how to create custom themes for classrooms. Now, we’re taking it a step further with image placeholders. Whether you’re designing print-ready templates or interactive digital materials, this feature is a game-changer.
What Is an Image Placeholder?
An image placeholder in Google Slides is a designated space where users can easily insert an image. Unlike a regular image, placeholders don’t become part of the background—they’re dynamic and customizable. This makes them perfect for student templates where you want to guide where images should go, without students accidentally changing the layout.
How to Add an Image Placeholder
Adding an image placeholder to your template is super easy. Follow these steps:
Open your Google Slides presentation and go to the slide where you want to add a placeholder.
Navigate to Slide > Edit Theme. This opens the theme editor where you can customize layouts.
Select the layout you want to edit or create a new layout.
From the toolbar, click on Insert > Image Placeholder. You’ll see three options: rectangle, rounded rectangle, and oval.
Choose the shape that works best and drag it onto your slide to create the placeholder.
And that’s it! You’ve added an image placeholder.
How Students Use the Placeholder
When students use your template, here’s what they’ll see:
The placeholder appears as a box labeled “Replace Image.”
Students can click on the box and choose Replace Image from the toolbar.
From there, they can insert images from the web, their drive, or other sources.
Once the image is added, it might not fit perfectly. Students can double-click to adjust the size or reposition the image within the placeholder (using the blue outline). It’s intuitive and easy for them to use.
Classroom Applications
Image placeholders are especially useful in educational templates. For example:
Math Activities: Use placeholders for students to insert images representing equal groups, fractions, or geometric shapes.
Science Projects: Students can add diagrams or pictures for their reports.
Creative Assignments: Templates for digital art projects or storytelling.
The placeholders ensure students stay within the layout, keeping the template neat and organized.
Adding image placeholders in Google Slides is a quick and simple way to create interactive and visually appealing templates. This feature keeps your layouts consistent while giving users the freedom to add their own images.
If you enjoyed this tip and want to see more, don’t forget to subscribe here or on my YouTube channel. Stay tuned for my next post to explore more quick tips using Google Slides. Happy creating, and see you next time!
Today’s tip is all about creating your own Custom Theme in Google Slides. Whether you’re designing presentations for your classroom, professional meetings, or digital work for your classroom, custom themes ensure consistency, efficiency, and a polished final product. Let’s dive in!
Why Use a Custom Theme?
Custom themes offer several benefits:
Consistent design across all slides.
Easy to replicate layouts for multiple presentations.
Prevent accidental changes by students in classroom settings.
Save time with reusable templates.
Accessing the Theme Editor
Open a Google Slides presentation.
Go to Slide > Edit Theme.
This opens the Theme Editor, where you can customize layouts, fonts, and colors.
Customizing Fonts and Layouts
Select a layout from the left panel.
Click on any text element and change the font (e.g., Montserrat).
Changes will apply to all slides using that layout.
Pro Tip: Stick to 1-2 fonts for a clean, professional look.
Adding Design Elements to Layouts
Use shapes (e.g., circles, rectangles) for design consistency.
Customize with gradient backgrounds and border styles.
Duplicate shapes and align them for a cohesive layout.
Creating Print-Ready Templates
Choose a Blank Slide Layout.
Use shapes and lines to design specific templates (e.g., Freyer models).
Customize with placeholders for consistent structure.
Adding Placeholders
Placeholders define editable and non-editable areas:
Text Placeholder: Editable text areas for user input.
Text Box: Static text areas for instructions or headers.
To add a placeholder:
Go to Slide > Edit Theme.
Choose Insert Placeholder from the toolbar.
Adjust its position and size.
Creating a Student-Friendly Template
For classroom activities:
Lock instructional text and static design elements.
Create editable sections only where students need to type.
Use gridlines for models (e.g., area models).
Final Touches and Testing
Switch to the normal slide view. Select a slide from the left panel.
Test your template by adding a new slide.
Verify that only editable placeholders are modifiable.
Creating custom themes in Google Slides is an excellent way to save time, maintain consistency, and improve the quality of your presentations and worksheets. Explore text and image placeholders in upcoming videos!
If you found this guide helpful, don’t forget to check out my YouTube channelfor more tips. Happy designing, and see you soon!
Welcome! Today, we’re exploring a super practical tip for Google Slides: Custom Page Size. Did you know you can set your slides to 8.5 x 11 inches? This makes them perfect for worksheets, handouts, or any printable materials. Let’s dive into this step-by-step guide and make your slides print-ready!
Why Customize Page Size?
Google Slides defaults to a widescreen format (16:9 ratio). While this is great for digital presentations, it’s not ideal for printed materials. Customizing your page size ensures:
Full-page printouts without unnecessary white space.
Better scaling and alignment for worksheets and notes.
Professional-looking handouts.
Accessing Page Setup
Follow these simple steps to customize your page size:
Open your Google Slides presentation.
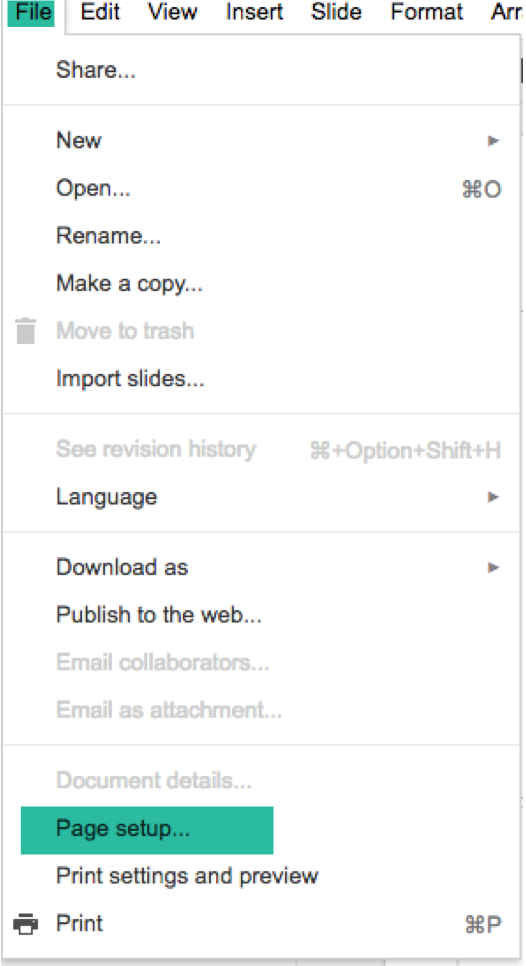
Go to File > Page Setup.
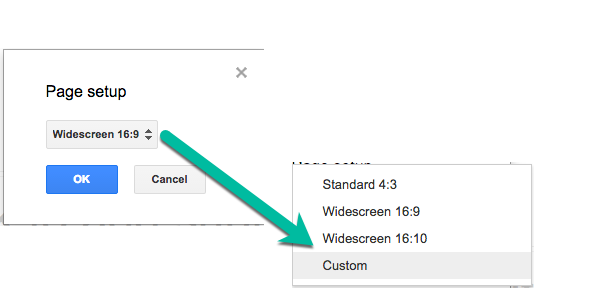
A dropdown menu will appear with default aspect ratios:
Widescreen (16:9)
Standard (4:3)
Widescreen (16:10)
Select Custom from the dropdown menu.
Setting Custom Dimensions
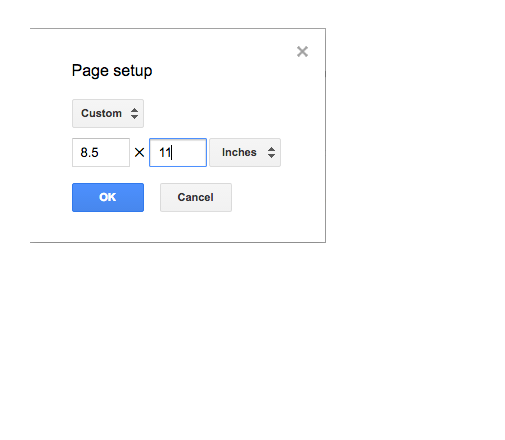
When you select Custom, you’ll see input boxes for dimensions. Here’s how to set it up:
Enter 8.5 x 11 inches (or reverse for landscape: 11 x 8.5).
Click Apply.
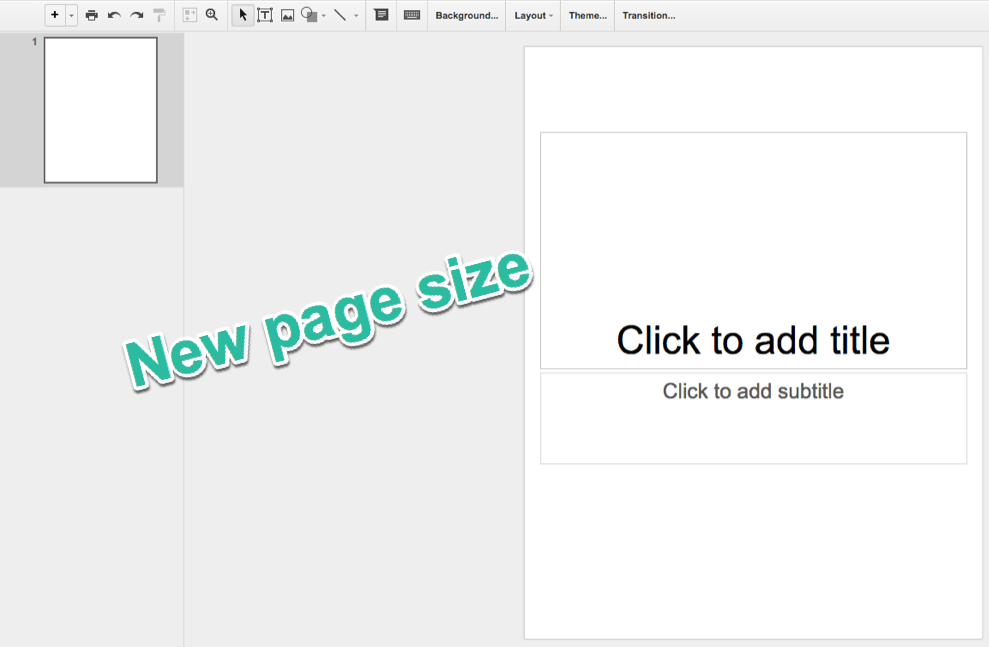
All your slides will now resize to match the new dimensions.
Note: The custom size applies to all slides in your presentation—you can’t mix different sizes in one slide deck.
Preview and Print
After customizing:
Review your slide content to ensure everything fits properly.
Go to File > Print Preview to see how it will look on paper.
Adjust text, images, and elements if needed.
Now, when you print, your content will fill the page without awkward white spaces!
Practical Uses for Custom Page Sizes
Custom slide sizes are perfect for:
Worksheets for classroom activities.
Printable newsletters or notes home.
Creative posters and flyers.
Customized certificates or templates.
Final Tips
Double-check alignment before printing.
Use high-resolution images for the best print quality.
Save your customized template for future use.
Customizing page size in Google Slides is a simple yet powerful tool. It eliminates printing frustrations and ensures your materials look polished and ready to go.
If you enjoyed this tip subscribe here or on my YouTube channelfor more Google Slides tricks. Happy designing, and see you next time!
Today, we’re diving into the world of custom gradients in Google Slides. Adding custom gradients is an excellent way to give depth and dimension to your backgrounds, shapes, or word art. Let’s explore how to create and customize gradients step-by-step. This guide is excellent for teachers, students, and professionals.
Introduction to Gradients
Gradients are a powerful tool for creating visually engaging designs. Google Slides offers two types of gradient options:
Preset Gradients: Pre-designed color transitions like light-to-dark or center-focused gradients.
Custom Gradients: Fully customizable gradients with multiple colors, stops, and directions.
This guide will focus on creating custom gradients to unlock your creative potential.
Applying a Gradient Background
Start by applying a gradient to your slide background:
Click on the Background button in the toolbar.
You’ll see the default solid color options. Switch to the Gradient tab.
Choose a preset gradient color, such as green, and click Done. You’ll notice how the gradient adds depth, transitioning from darker edges to lighter areas.
Customizing Gradient Colors
To create a custom gradient:
Go back to the Background menu and select the Gradient tab.
Scroll down and select Custom under the Simple Light section to open the customization panel.
Add and adjust gradient stops:
Click Add Stop to include additional colors.
Choose colors for each stop (e.g., start with light green, then add purple, and finish with dark blue).
Drag stops along the gradient bar to control the color transitions.
Preview your custom gradient in the panel before applying it.
Adjusting Gradient Settings
Take your customization further by adjusting these settings:
Gradient Type:
Linear: Creates a straight gradient with customizable angles.
Radial: Creates a circular gradient radiating out from the center or another point.
Angle: Adjust the angle of linear gradients (e.g., 45 degrees) to change the direction of the gradient.
Radial Position: Choose center, edge, or other starting points for radial gradients.
Once you’re satisfied, click OK and then Done to apply your gradient.
Using Gradients with Shapes and Word Art
Custom gradients aren’t just for backgrounds—you can apply them to shapes and word art as well:
Select any shape or word art.
Use the Fill Color tool and choose Gradient to apply a preset or custom gradient.
Access the Custom Gradient option to create unique designs.
Sharing and Customization Tips
Gradients can be a fun and engaging tool in classrooms or collaborative projects. Consider preparing several gradient templates for students or team members to explore and modify. Encourage experimentation to spark creativity!
Creating custom gradients in Google Slides is a simple yet powerful way to elevate your designs. Whether you’re working on a professional presentation or a creative project, these tools will help your slides pop and shine.
If you enjoyed this guide, be sure to subscribe to my blog, NowaTechie, or YouTube channel for more quick tech tips. Happy creating!
We’re diving into the world of image cropping in Google Slides. Whether you’re a teacher, student, or someone who loves to create professional presentations, knowing how to crop images effectively can take your slides to the next level. Let’s explore how to do it step-by-step. Grab a coffee, relax, and let’s get started!
Inserting an Image
First, let’s add an image to your slide. Here’s how:
Open a blank Google Slide.
Use the Insert Image tool (a little square with mountains on it) and select Search the Web.
Search for an image—for example, “puppies”—and insert it onto your slide.
This is your starting point. From here, you can modify the image to better fit your needs.
Basic Cropping Techniques
There are two simple ways to crop your image in Google Slides:
Method 1: Double-click the image to bring up black crop lines around it. Adjust the image size by dragging the edges, then click outside the image to finish.
Method 2: Use the Crop Image tool in the toolbar. Select the tool, and you’ll see the same black crop lines appear. Adjust as needed and click away to finalize.
Both methods let you trim the image without affecting the original file.
Cropping Using Shapes
For a fun twist, you can crop your image into custom shapes:
Click the down arrow next to the Crop Image tool.
Choose a shape, like a heart or a rounded rectangle.
Adjust the shape using the yellow diamond handle for curves or specific angles.
This feature is especially popular in classrooms or for creative projects. For example, rounded rectangles with a slight curve can give your slide a modern look.
Formatting Borders
Enhance your cropped image with a border:
Click the pencil icon (Border Color) to select a border color.
Use the Border Weight option to adjust the thickness.
Experiment with border styles, like dashed or dotted lines.
While playful borders might not suit formal presentations, they’re a hit with students and can add flair to informal slides.
Advanced Formatting Options
Take your images to the next level with advanced formatting tools:
Drop Shadow: Add a shadow under your image for depth. Adjust the color, distance, angle, and blur to customize the effect.
Reflection: Create a mirrored effect below the image. Modify the size, distance, and opacity for a polished look.
These options make your slides visually dynamic and engaging.
Accessibility Features
Google Slides includes tools to make your presentations more inclusive:
Use Alt Text to describe images for visually impaired viewers. Google often auto-generates this, but you can edit it for clarity.
Add a title or description to provide additional context for screen readers.
These small adjustments can make a big difference for your audience.
Cropping images in Google Slides is simple, versatile, and fun! With these techniques, you can create polished, engaging slides that stand out. Whether you’re in a classroom or boardroom, these skills will elevate your presentations.
If you found this guide helpful, don’t forget to like, subscribe, and hit the bell on my YouTube channel for more tech tips. See you next time!
In this quick tip, I’ll show you how to elevate your Google Presentations using the custom Word Art feature. Whether for school or professional use, you’ll learn how to add flair and make your slides stand out. Grab your devices, and let’s get started!
Getting Started with Word Art
Learn how to insert Word Art in Google Slides. Start by navigating to the “Insert” menu, selecting “Word Art,” and typing your text. Discover how to add line breaks by holding the Shift key and pressing Enter. With these simple steps, you’ll have the foundation for customized Word Art.
Customizing Fonts for a Unique Look
Breathe life into your Word Art by changing fonts. Explore Google’s font library to find styles that suit your presentation. From fun fonts like “Henny Penny” to more professional options, you’ll find endless possibilities to match your style.
Adding Color and Gradients
Use the fill color and gradient options to make your word art pop. Choose from solid colors, pre-designed gradients, or radial effects for a dynamic look.
Enhancing with Borders
Adjust the border color, weight, and style to add pizzazz to your word art. Experiment with solid, dashed, or dotted lines. While bold outlines can add fun, consider the context—subtle solid lines are better for professional settings, while dots and dashes are perfect for “Worst Preso Ever“.
Resizing and Maintaining Proportions
Easily adjust the size of your Word Art using the blue drag handles. For proportional resizing, hold the Shift key while dragging from the corners. This ensures your design stays balanced and visually appealing.
Adding Shadows and Reflections
Use formatting options to create drop shadows and reflections for depth. Customize shadow blur, distance, and color for the perfect effect. Reflections can also be adjusted for opacity and distance, adding a polished finish.
Accessibility Tips
Make your presentations inclusive by adding alternate text to Word Art. This step ensures screen readers can describe your visuals for visually impaired viewers, improving accessibility.
Wrap-Up and Next Steps
With just a few steps, your slides can go from plain to standout using Word Art. Experiment with these features and let your creativity shine. If you enjoyed this guide, subscribe for more tips and tricks delivered to your inbox!
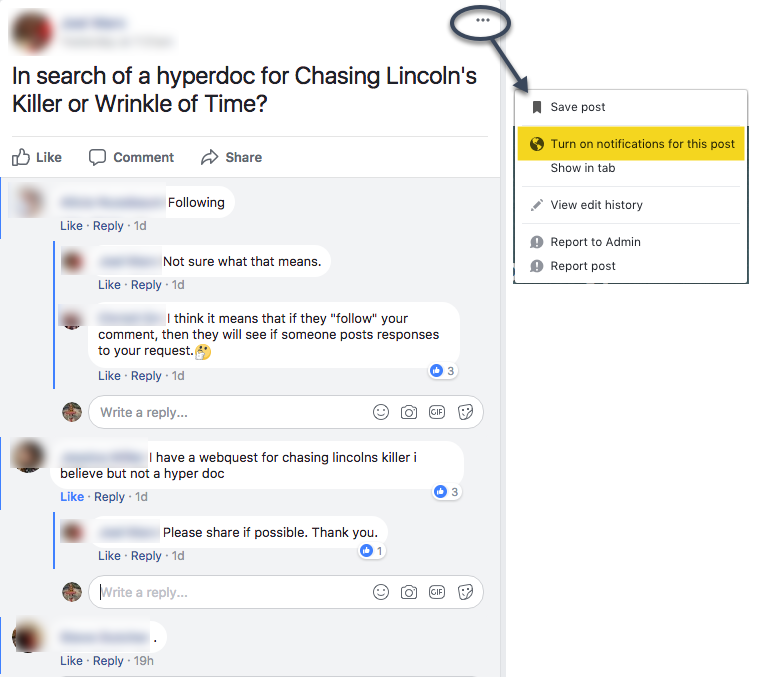
Many of us use a variety of social media outlets to collaborate, collect information and new ideas, and learn. One that I am using more and more is Facebook. There are several great groups to be a part of there. However, one thing that drives me batty is the ‘follow’ or ‘.’ in a thread. I understand why it’s done – to get the information when someone posts – but am still driven crazy by it.
Facebook allows you to ‘turn on notifications’ on a post without all the ‘follow’ in a thread. By turning on the notifications, you will receive all the comments without cluttering the thread with ‘follow’ or ‘.’. And it’s easy to do!
In a post, click on the three dots that appear in the right corner of the post. One of the options will be ‘turn on notifications’. That’s it!
Slime. A craze that is still going strong in my classroom. While many teachers find it the bane of their existence; I do not. Okay, fidget spinners might be the new bane of our existence. I don’t ban the slime, or fidget spinners, mainly because my students seem to understand that each has a time and place. My students, for the most part, have found a balance between work and slime.
This past week, my students began taking the state test. Again, I didn’t ban slime, nor did I encourage it. It’s just a ‘thing’ that exists in the classroom. As I was monitoring the students, I noticed an interesting phenomenon: while taking the test they were playing with slime. Let me be clear. It’s not all students, in fact, it’s about 5 or so and they were completely focused on their tasks.
One student kept the slime in her container, read, and simply played with it by dipping her finger in and out of the slime. She gets a bit nervous because she wants to do well. I believe it helped relieve some anxiety. I took a quick picture and texted it to her mom (our school’s secretary). We just giggled.
Meanwhile, a few other students had it on their tables, off to the side. They poked at it, rolled it, and kneaded it all while focusing on the test.
So if you’ve banned slime in your classroom, you may want to rethink it. Of course, there have been times where I had to confiscate slime because someone was focused on playing with it rather than working. However, if it helps calm students, why not let them play?
I love slides and the flexibility I have with them. I have been using them more and more, in the classroom, for something other than Presentations. I recently wrote how my students were using them to take collaborative notes. I have also used them as assessments in math and more recently as a version of Hyperdocs. One advantage to using Google Slides is that I have the capability to customize the size of the slide. This means if I want to make it the size of an 8.5 x 11 in paper and print it out, I can. Here’s how:
When open in Slides, go to ‘File’ on the Menu bar and select ‘Page Setup’:
This will open a pop-out window. The default is ‘Widescreen 16:9’. Select the dropdown menu and find ‘Custom’.
This will prompt another window which will ask the size you want. The default is inches but can be changed to centimeters, points, or pixels. Once you have your desired size, select the blue ‘OK’ button. And viola, you will have your custom size.
 Slime. A craze that is still going strong in my classroom. While many teachers find it the bane of their existence; I do not. Okay, fidget spinners might be the new bane of our existence. I don’t ban the slime, or fidget spinners, mainly because my students seem to understand that each has a time and place. My students, for the most part, have found a balance between work and slime.
 One student kept the slime in her container, read, and simply played with it by dipping her finger in and out of the slime. She gets a bit nervous because she wants to do well. I believe it helped relieve some anxiety. I took a quick picture and texted it to her mom (our school’s secretary). We just giggled.