Importing data into a Google My Map only takes a few clicks and a CSV, TSV, KML, KMZ, GPX, or XLSX file. This is especially handy in the classroom for research and tracking data.
Maps
Google My Maps Part 3: Lines and Shapes
There are so many learning opportunities with the lines and shapes feature of My Maps. We are currently adding and subtracting fractions with unlike denominators. It gets really boring doing problems from a book. In the coming days, I plan to create a Hypermap with lines – making sure the distance will be a fraction. (NOTE: My Maps measures distance using decimals. This will be good practice for my 5th graders to convert). My Maps will also tell the area and perimeter of a shape, MORE math opportunities!
Google My Maps Part 2: Place Marker Options
The Place Marker has several options available to the user. The icon can be customized through color and picture option. Adding information, directions, videos, and/or pictures is a breeze.
Lesser Known Geo Tools
It’s no secret that I LOVE Google My Maps and incorporating them into lessons. Whether it’s to have students document their learning like in the Pre-Columbian People’s lesson, or a self-guided lesson on Marco Polo (with additional tasks to show understanding); My Maps are the bee’s knees for me! But there are some insanely cool, yet lesser known, Geo Tools out there?
Smarty Pins – This fun game combines  trivia and location skills. Players are given a trivia question, which correlates to a place in the world, that they then must place Peg Man on the map. This game was developed by Google. The closer you are to the location, and faster you are, the more ‘miles’ you earn. You are given 1000 miles to start the game. However, if you are not accurate you lose ‘miles’. So if your answer is 149 miles away, that’s how many ‘miles’ or points you lose. Once you are out of ‘miles’ the games ends.
GeoGuessr – This is a super fun, highly addictive game (if you’re a nerd like me!). There are 2 modes and several GeoGuessr Maps to choose from. When you arrive on the site, the first game is ‘Explore the World’. Using Google Maps Street View, you are dropped in a location. Using clues (signs, vegetation, cars, etc.) you need to place a pin on the map as to the location of where you are. Scrolling a bit further down on the page, there are several maps focusing on countries, cities, and continents. I clicked on ‘North America’ where game maps for Canada and United States, along with some cities, appeared. You can set a timer for minutes and seconds. I mentioned a second mode: Challenge. This is where you can challenge a friend.
GeoSettr – This is similar to GeoGuessr, but YOU create your own GeoGuessr game. You start by dropping Peg Man in a location on the map on the left, zoom in as far as needed to find your desired location. You can see the view your players will see on the right screen. Then, set the pin for that round. You have 5 rounds. Once you have completed your GeoSettr, the game will give you a unique URL to share. You can check out mine. This could be fun for 5th Grade States and state capitals.

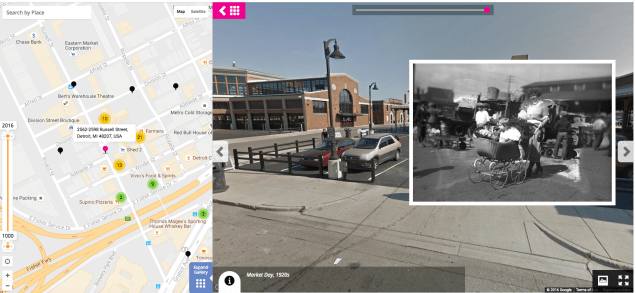
History Pin – This is a new one for me. This combines my love of historical (or family shared) photos with maps. I have only browsed some collections and was in nerd heaven! Again, using Google Maps and Google Maps Street View you are shown the Street View image of what the location looks like today with an insert of a photo, or image, from the past. Check out this example from Eastern Market in Detroit, MI.
Tour Builder – One of my all time favorites. This lets you create your own map story. The story is a bit more linear than using regular Google Maps. You choose all destinations in the order you want. You can add text, photos, and videos. Here’s a quick ‘Cheat Sheet‘ I created to help get you started.

SLOCUE Connects
Prepared for SLOCUE Connects Event 9-12-15
Let’s start off with a race…
Ninja Level 1 Challenge – Take a photo and insert into your map.
Ninja Level 2 Challenge – Take a video, upload to YouTube, insert into your map.
Google Maps & Adding Piskel From URL
This year a student found a free pixel art creator, Piskel. This has become all the rage in my classroom. The students can create original art or create gifs based on their work. So when we started on our state reports, I had a few students ask if they could create their state flag using Piskel. Of course I said yes! Mind you, I have no idea how this Piskel thing actually works – downloading, saving, file types, etc.
Then came the time to insert the image on their map via the URL. Yeah, this took a bit to figure out. BUT Jason, a student, and I figured out a work-around. LOVE figuring this stuff out with the students. So this is what we did:
On the right side we chose the ‘Export’ icon.
Then downloaded it as a png file (it wasn’t a gif)
Next we opened up Google Draw – yup handy work-around – and inserted the png. We then published the Drawing, and grabbed the link (URL)
Publish to Web: Go to file > scroll down to Publish to Web. Then:
Choose Link > Blue publish button > Copy link (URL) to the clipboard (PC – Control C; Mac – Command C)
Now in your map, locate the location you’d like to insert the image and choose ‘Image URL’. Next, paste (PC – Control V; Mac – Command V). Finally, choose the blue ‘Select’ button.
And that’s it! Collaborating with students can be VERY satisfying! Here’s the final product:
Thank you Jason & Andrew for allowing me to collaborate with you, and use your work.
Google Maps – Draw a Line
Google Maps allows you to draw a line, or polygon, when creating custom maps. This can be achieved by choosing the Draw a Line tool, choosing the type of line you’d like, and clicking along the places you would like to mark off.
I especially like the feature that allows users to change the color of the line and polygon, and change the line width.
Google Maps – Pins
Pinning a location on a custom Google Map is easy. You can either find the location by typing it in the search box at the top, or by placing a pin at your desired location.
Click on the Green pin > Add to Map > Pin will turn Red.
To pin location without looking it up: Select the Pin icon at the top of the screen, and click the desired location, then ‘Save’.
To change the icon symbol, go to the menu at the left, choose the point you would like to change, and click on the paint bucket.
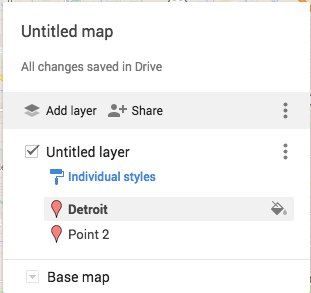
You can then choose a different color pin, icon shape, or even look for additional icons.
Want to know how to create a custom map? Check this out!
Happy Map making!
