Prepared for SLOCUE Connects Event 9-12-15
Let’s start off with a race…
Ninja Level 1 Challenge – Take a photo and insert into your map.
Ninja Level 2 Challenge – Take a video, upload to YouTube, insert into your map.
Prepared for SLOCUE Connects Event 9-12-15
Let’s start off with a race…
Ninja Level 1 Challenge – Take a photo and insert into your map.
Ninja Level 2 Challenge – Take a video, upload to YouTube, insert into your map.
This year a student found a free pixel art creator, Piskel. This has become all the rage in my classroom. The students can create original art or create gifs based on their work. So when we started on our state reports, I had a few students ask if they could create their state flag using Piskel. Of course I said yes! Mind you, I have no idea how this Piskel thing actually works – downloading, saving, file types, etc.
Then came the time to insert the image on their map via the URL. Yeah, this took a bit to figure out. BUT Jason, a student, and I figured out a work-around. LOVE figuring this stuff out with the students. So this is what we did:
On the right side we chose the ‘Export’ icon.
Then downloaded it as a png file (it wasn’t a gif)
Next we opened up Google Draw – yup handy work-around – and inserted the png. We then published the Drawing, and grabbed the link (URL)
Publish to Web: Go to file > scroll down to Publish to Web. Then:
Choose Link > Blue publish button > Copy link (URL) to the clipboard (PC – Control C; Mac – Command C)
Now in your map, locate the location you’d like to insert the image and choose ‘Image URL’. Next, paste (PC – Control V; Mac – Command V). Finally, choose the blue ‘Select’ button.
And that’s it! Collaborating with students can be VERY satisfying! Here’s the final product:
Thank you Jason & Andrew for allowing me to collaborate with you, and use your work.
Okay, it’s been a week, and I’m still feeling like a Rock Star! The students are really into their reports. So far the only hang up has been that YouTube is STILL blocked in my district. It happened to be open 1-day last week and some of the students were able to insert some videos – not many I’m afraid.
They are still working on them, but I’m still hopeful. I had many tell me that they WANTED to work on them at home. A few ASKED if they could write about MORE than one Indian Tribe. Yes, they are doing more than the minimum required, on their own! This is cool. Usually, it’s like pulling teeth for them to write the reports (and I could say the same about me when it comes to reading the reports. THIS is way more fun. I’m enjoying watching the process and guiding them along the way. Here is our Thinglink:
Update 10-16-15: Due to Google moving Maps to Drive and my district’s ‘sharing’ permissions no one outside our district is able to view the state reports. As a fix for this upcoming year, I will create a map for each student or group and give them sharing permissions. This way, the world will be able to see their work – which is what it’s all about.

Google Maps allows you to draw a line, or polygon, when creating custom maps. This can be achieved by choosing the Draw a Line tool, choosing the type of line you’d like, and clicking along the places you would like to mark off.
I especially like the feature that allows users to change the color of the line and polygon, and change the line width.
Pinning a location on a custom Google Map is easy. You can either find the location by typing it in the search box at the top, or by placing a pin at your desired location.
Click on the Green pin > Add to Map > Pin will turn Red.
To pin location without looking it up: Select the Pin icon at the top of the screen, and click the desired location, then ‘Save’.
To change the icon symbol, go to the menu at the left, choose the point you would like to change, and click on the paint bucket.
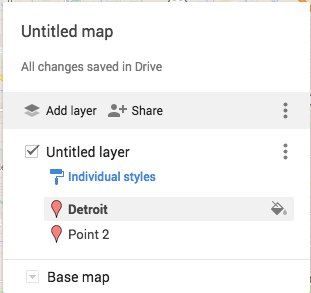
You can then choose a different color pin, icon shape, or even look for additional icons.
Want to know how to create a custom map? Check this out!
Happy Map making!
